
I’m baffled. I’m running VMWare Fusion on my Mac and it works well, but I want to set up a second virtual drive for it so I can test some software that copies files back and forth, keeping folders in sync. What I’m doing doesn’t matter, though. What matters is that I can’t seem to figure out how to add the second drive. Help!
This is a tricky one because we’re going to have to both use Mac software and PC software to get this done properly and you didn’t tell me which version of either you’re using. Fortunately, VMWare Fusion is basically the same in all versions of Mac OS so that’s fine, and as far as I can tell, the utility we’ll be using on the Windows 7 side looks like it’s the same interface since Windows 95, if not earlier. 🙂
Getting all our proverbial ducks in a row is still going to be important and I’ll show you the step-by-step instructions, which means that this is a long article with almost twenty screen caps. Sheesh.
Ready?
Okay, to get started, you need to launch VMWare Fusion (from herein in I’ll just call it “VMWare” to make life easier), then make sure that the Windows system within is not running. If it’s running or paused, start it up and “shut down” the operating system from within the Windows universe. Once the virtual PC is shut down you can proceed.
As a baseline, I’ve already set up a small “thumb” virtual drive within my VMWare, so I’ll show you that to motivate you to go through all the steps:

I also needed to shut down my Windows system so I could modify the configuration of the virtual machine. Once that’s happened, choose “Settings…” from the “Virtual Machine” menu:
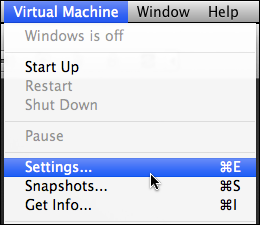
There are a bunch of different things you can set or adjust, as is immediately obvious:

In this case, however, we want to add a new virtual drive so click on “Add Device…” on the top right.

Now you can add one of a wide variety of different devices — including a floppy drive! How… retro!
Click on “New Hard Disk”, then click “Add…”

At this point you can specify how big you’d like to make the virtual drive. I’ve set it to 8GB but the default is 20GB, which might be quite a bit more than you want to allocate for your testing.
Before we leave this window, I suggest you click on “Advanced options” on the lower left, which opens up the window and shows a few more choices:

You can choose to pre-allocate the space for your new virtual drive, but in my experience, VMWare does a splendid job of allocating it as needed so that I don’t waste, for example, 7.9GB of space if I only have a 120Kb file on the new drive. Also pay attention to the “Remove Hard Disk” button: if you change your mind later and want to free up the space, this is how you remove an existing drive from a VM configuration.
Instead, however, indicate the size you seek and click “Apply” to proceed.
That’s all you have to do with VMWare Fusion, so now you can start up your Windows virtual machine. Once it’s up and running, you’ll be a bit disappointed to see that the new drive hasn’t magically shown up. It’s still just raw, allocated space, without a file system, so we need to add that.
The easy way to format a new drive is to use the administrative “create and format hard drive partitions” tool, and the easy way to get to that is to type in “format new” on the Start menu:

Select the Control Panel, as shown, and the program launches right up and prompts you to format the new drive. Before we look at that, however, here’s what I see underneath that window, showing how two of my drives are working just fine, but the new one, “Disk 2” is unknown, unallocated space:

No worries. If you’re seeing this same window, right-click (in Fusion, that’s Ctrl-click) in the unallocated space box denoting the size of the new drive, and select “New Simple Volume…”

You just launched the ingeniously named New Simple Volume Wizard!

As it says, click “Next >” to continue…

At this point you can reconfigure the size of the volume, but I suggest just leaving it as is and clicking on “Next >” again.
Next is where you’ll get to assign a drive letter to the new virtual volume:

Again, the default probably works just fine. Click “Next >” again and you can finally specify that you want the volume formatted and give it a name:

The Wizard will confirm the configuration, name, size, etc. If it all looks good, click on “Finish” to have the action actually take place. Once it’s done – confusingly – Windows pops up a box reminding you that the new drive needs to be formatted:

But, um, we just did format it so you can actually “Cancel” out of this because immediately below it is another window that shows:

That looks good! By default whenever Windows sees the new virtual drive, yes, it should open folders to view the contents:

And just for good luck, when I go back to the Computer view in File Explorer, sure enough, there’s my new drive (F:):

From this point forward, every time you restart or reboot this virtual machine, it’ll automatically mount and make the new virtual drive – or drives – available to you!