
I’m working on a manual for our company’s software and want to take screen captures on Windows 10. Problem is, the menus vanish when I launch the screen capture program. Help!
For the most part, capturing portions of the computer screen – or the entire screen – is pretty straightforward in modern operating systems, whether you’re running Linux, MacOS X or Windows. Where it gets tricky is with screen elements that only stay on the screen for a few moments or require a specific key or sequence of keys to be held down to show up. Go to take a screen shot or capture and you’ve run out of time or changed which keys are pressed and it’s gone.
Oh, I know that problem very well!
Windows 10 comes with a really slick little tool that most people probably overlook but that can solve this dilemma for you surprisingly easily: Snipping Tool. You can find it by doing a quick Win10 search for “snip”, as shown below:

Not only does it show you the matching program – Snipping Tool – but it even shows me some of my recent screen captures too. Handy.
Launch it, then consider pinning it to your TaskBar or dropping an alias on your Desktop for convenience. I have Snipping Tool pinned to my TaskBar and have done forever. Make screen grabs really easy!
Once you launch it, you get the tiny little control window on screen:

Before you take your first capture, let’s quick look at two really important menus. The first is the one that’s going to let you capture those ephemeral screen elements: “Delay“. Click on it and you’ll see you can delay from 1-5 seconds:

What does a delay mean? Your best bet is to practice with it to get it, but once you specify what region you want to capture, the program hides itself and waits however many seconds you specified before it takes the capture. I’ll show you exactly what that means in a moment, so let’s just look at the second menu too: “Mode“:
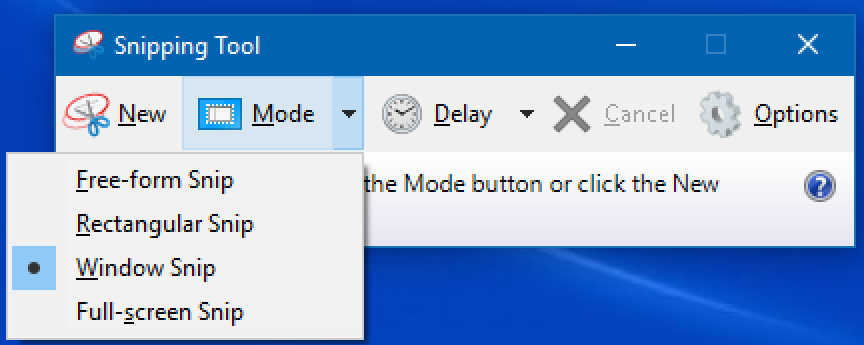
The top three are interactive – Free-form, Rectangular and Window snips – while the fourth option, full screen snip, instantly captures the screen (unless you’ve specified a delay, of course). I find that it’s easiest for me to do full-screen captures and then crop them in a graphics editor, but you can experiment with both to see which you prefer.
I’ll show you how I do it by trying to capture the elusive Desktop context menu. It looks like this and you get it by right-clicking on the Desktop:

Try to capture it, and you’ll find that clicking on “Full-screen Snip” in Snipping Tool causes the menu to vanish! So how did I capture it? With a Delay.
You have to do them in the right order, too: I chose a 5 second delay, then a full-screen Snip and immediately right-clicked on the Desktop to produce the context menu. I then simply waited a few seconds and Snipping Tool finally grabbed what was on screen and opened it up as an image within the edit portion of the utility:

The tool isn’t exactly packed full of features, but it’s enough to click-drag to define a subregion of the screen and crop the image down to just that portion. Once I’ve done that and am happy with the new image, a click on File > Save lets me choose the output format:

I recommend Portable Network Graphic (PNG) format but you can choose the one that works best for you and your software, of course. Then give it a name other than “capture.png” that helps you remember what it actually is and click Save. Done.
One useful feature: If you forget to save the image, Snipping Tool will remind you so it’s not lost:

That’s it. Now you know and should have no problems at all capturing even the most nuanced of program windows and menus with Snipping Tool!
Thanks for the tip! I failed to notice the new Delay feature in the latest update to the Snipping Tool.