
My new employer requires me to scan, sign and email them digital copies of a variety of documents I received in the mail. Seems really clumsy to me and I don’t have a scanner on my iMac! Is it 1990? Instead, is there an easy and modern way to scan and annotate them digitally?
While scanning might seem like a 1990’s tech, it’s still darn helpful in a variety of settings, from getting the best possible copies of printed material to working with formal documents. Not quite as ancient feeling as faxing; did you know that you can send faxes from your iMac or even your smartphone? For my own part, I certainly get a lot of documents and contracts that require a signature, and if asked, I expect most of the companies would say “print it, sign it, scan it, email us the scan”, which is about as clunky as you can imagine, and wasteful of resources too.
I’ve written before about how you can sign a digital document with Preview on a MacOS device like your iMac (or on a PC, for that matter), but let’s look at the scanning side of things. For this task, I’m going to purely use my iPhone because it turns out that the combination of its great camera and massive flexibility makes scanning, annotating, and sending printed documents surprisingly straightforward. What people don’t realize is that the scanner utility is hidden within an otherwise uninspiring – though useful – app: Notes.
SCANNING A DOCUMENT WITH NOTES ON AN IPHONE
That’s right. Notes. The iPhone app that ensures you don’t forget things when you head to the supermarket and lets you easily tap in a reminder or two at a tradeshow, presentation, or lecture, and then review it on your iPad or Mac system.
For this particular demo, I’m going to use a letter I received from the Breckenridge Marriott hotel when I checked in for a few nights stay. In our scenario I’m going to initial it and then text it back to the front desk, but, of course, they didn’t require anything like that from a guest.
To start, fire up Notes on the iPhone…

You can see what I keep in my Notes list: measurements, common orders at restaurants we like, a shopping list, and an old kids Web site account password… Yours is likely similar, a motley collection of information that’s all your own.
To scan the printed document from the hotel front desk, you’ll need to create a new Note. That’s easily done with the icon on the lower right. A tap and…

You can tap in a reminder to yourself, add a table of information, make a to-do list and even use the annotation tools to doodle, but for scanning, you need to tap on the camera icon. Three options appear:

At this point, you might be wondering about the difference between taking a photo and scanning a document. One big difference is that scanned documents are converted into PDFs, rather than saved as JPEGs or PNGs, but patience, padawan, all shall be revealed in a moment! Tap on “Scan Documents” to proceed, then point your camera at the letter or document:

It’s a bit hard to see, but the scanning utility has already tried to identify the edges of the document and overlay a light yellow rectangle. Don’t worry about it being perfectly square at this point, just move your phone up and down a little bit until the software is confident it’s identified the document. Once that happens, it’ll automatically snap the picture (so you shouldn’t need to tap on the white snapshot button).
Once captured, it will show a confirmation without the yellow overlay. It’s usually spot on with its image analysis:
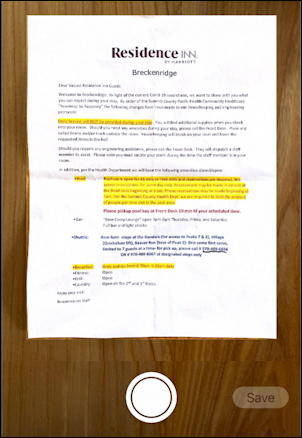
Look good? Tap on the “Save” button on the lower right.
The Notes scanner is smart enough to let you build a multi-page scan if you want, as the lower portion of the screen now indicates:

Only have a single page? No worries, tap on “Save” again and you can proceed with your scanned document.
ANNOTATING A SCANNED DOCUMENT ON YOUR IPHONE
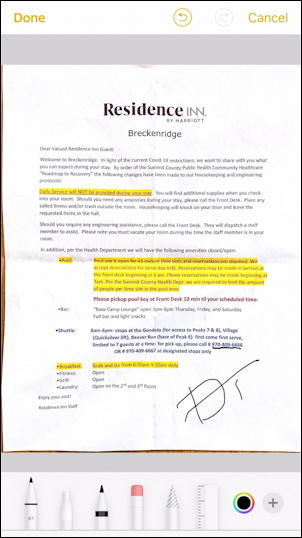
With the document scanned, you can now annotate it or add your signature digitally, as needed. It’s a bit confusing, though, because the regular Notes annotation tool won’t work on the image. It’s designed to be used in ‘text’ areas in a Note, not overlay an image. But there’s a workaround. So if you’re viewing this, you’re going to be disappointed if you try to annotate:

Instead, tap on “Done” and choose the share icon on the top right instead; the box with an arrow coming out of it. This brings up the share pane, which you can tap and drag upwards to make full screen, as I’ve done below:

To initial it, circle something or even sign the document, choose “Markup” from this list of options. In this context, you can add annotation on top of the scanned image by choosing the right pen and ink color. Then just use your finger to write directly onto the image, as I demonstrate by initializing the original letter from the hotel in Breckenridge:
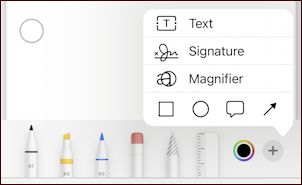
If you have already digitized your signature in Notes on your computer, by the way, you can access it with the “+” button on the right edge of the annotations toolbar. Here are the options you’ll see:
Keep in mind that when you scanned your document, you didn’t create a PNG or JPEG, you created a PDF file on your phone. That’s how you can add things like text ‘above’ the document, etc.
I’m going to stick with my crude initials, however, and go back to the share option. This time I can choose Messages and text the initialed document directly to the front desk:

Pretty dang cool, actually. You can also just save the new Note with the scanned document and access it directly from your iMac too if you have iCloud sync set up. A remarkable hidden feature of the iPhone!
Pro Tip: I’ve been writing about the iPhone and iOS since the very first iPhone was released. Yes, I’ve owned every major iPhone model! I’ve also written quite a few iPhone help articles on a wide variety of topics, so please check ’em out while you’re visiting. Thanks!