
I want to give my computer to my cousin since I got a new laptop from work, but want to ensure he can’t recover any of my deleted content. Does Windows have a secure delete feature, and if so, how can I use it?
There’s a world of difference between what appears to happen when you “empty recycle bin” and what actually occurs on your Windows PC. Indeed, “empty” is a bit of a misnomer because what it essentially does is just mark those sectors of your hard disk – or SSD – available, without actually “deleting” anything. To understand, we need to talk just a bit about how disks and file systems work…
Shortcuts: Empty Recycle Bin? | Install SDelete | Using SDelete
Your storage is broken up into thousands or even millions of “blocks”, typically 1024 bytes in size, and those are chained together to create large storage spaces. All of it’s tracked through the file system, which essentially has a catalog of every block on the drive, marked as “in use” or “available”. After a while, this is where fragmentation can occur too: Your last saved photo might have its data spread across blocks 1, 6, 22, 105, and 25,303, for example. Not to worry, systems are designed for this usage nowadays. The catalog of files and utilized storage blocks is known as the file allocation table (FAT) and having that get corrupted is fairly catastrophic, as you can imagine.
But when you empty the trash or recycle bin, what the system is basically doing is zipping through all of the blocks allocated for each and every file, changing each from “in use” to “available”. Eventually, they’ll be overwritten with the data from the new file, once allocated, but until they’re allocated, the old bits remain untouched, ready to be recovered or salvaged by an undelete utility or curious cousin.
No surprise, there are a lot of secure delete programs and utilities you can buy to address this problem: A search in the Microsoft Store reveals dozens of possible options, ranging from free to free with in-app purchases to a few dollars on up. But it turns out that Microsoft has its own secure delete utility you can download and use for free. The catch? It’s a command line tool so you’ll have to be comfortable using Command Prompt. Let’s have a look!
THE STATE OF DELETE ON WINDOWS 11
Right-click on your Recycle Bin and you’ll get a menu of options:
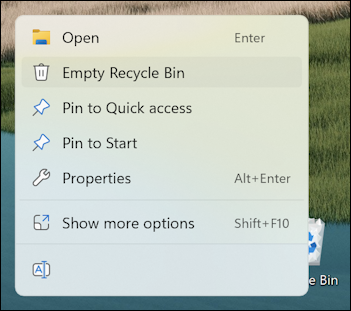
Choose “Empty Recycle Bin” and it’ll appear to do just that, but you now know that it’s not deleting anything, just marking the utilized space as available for other files.
Even “Show more options” doesn’t offer anything more sophisticated:
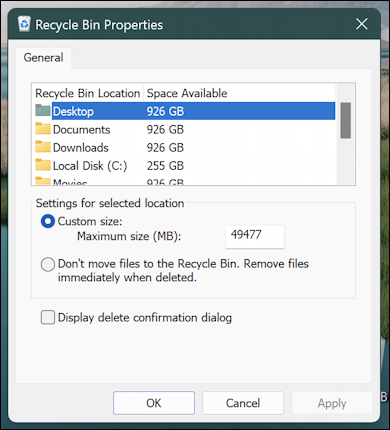
Even if you choose the “Remove files immediately when deleted” it still won’t be a secure delete that ensures nothing can be recovered. So what’s to do?
DOWNLOAD AND INSTALL SDELETE
The solution is to grab yourself a copy of the sdelete program from Microsoft. It’s part of a suite of tools known as “Sysinternals” and has very little handholding and no help screens. In fact, there are no windows at all since it’s a command line tool.
Grab a copy from learn.microsoft.com/en-us/sysinternals/downloads/sdelete where you’ll see this:
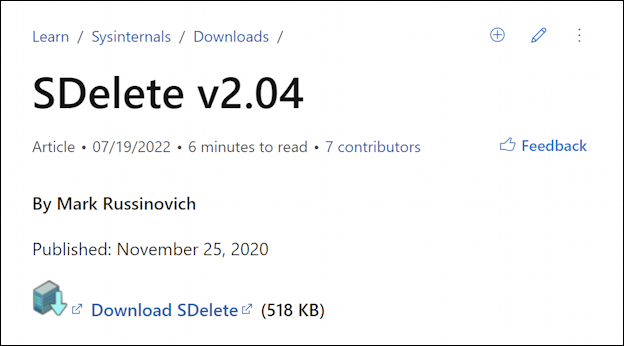
Notice how tiny it is: 518 Kb is probably the smallest download you’ll have all week.
Download SDelete and double-click the download to open it up. You’ll be prompted to extract the program into a folder, asking for a target directory:

As shown, choose “C:\Windows\System32” for this utility. Once you’ve found that, click on “Extract“.
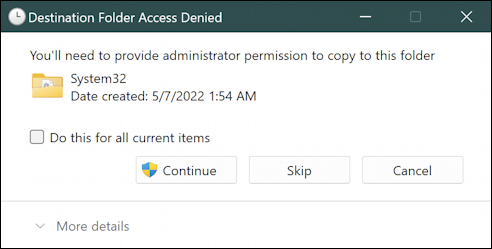
No worries, click on “Continue” for the three files it installs (a 32-bit and 64-bit version of the program). Done.
RUNNING SDELETE TO OVERWRITE FREE DISK BLOCKS
Now that it’s installed, you can quit the installer. Empty your Recycle Bin as per normal.
To run SDelete, remember that you need to use the Command Prompt, so use the handy Win11 toolbar search to search for “cmd”:
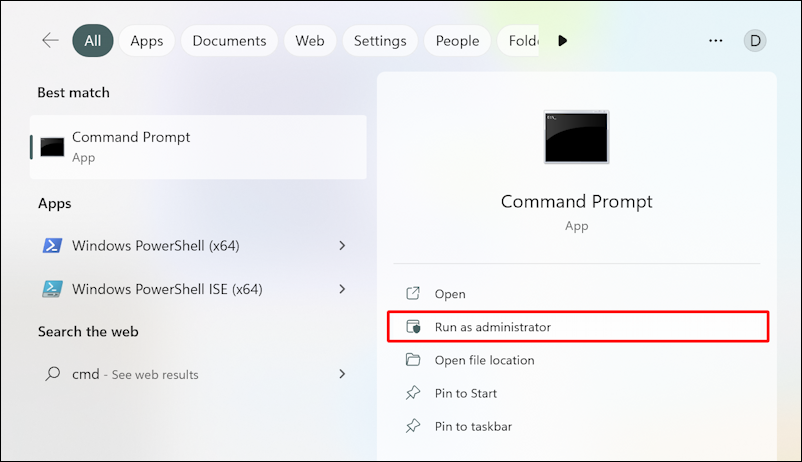
As highlighted, it’s critical that you run the program as administrator since it requires special permissions. Don’t have administrative permission on your PC? Try logging in as admin to fix that. Still can’t run as administrator? Then you might not be able to use SDelete (but you probably weren’t able to install it either).
The Command Prompt is old school MS-DOS/CPM style interaction, a fun retro experience that every Linux user will undoubtedly enjoy too. At this juncture you can simply type “sdelete” to learn more about the tool:
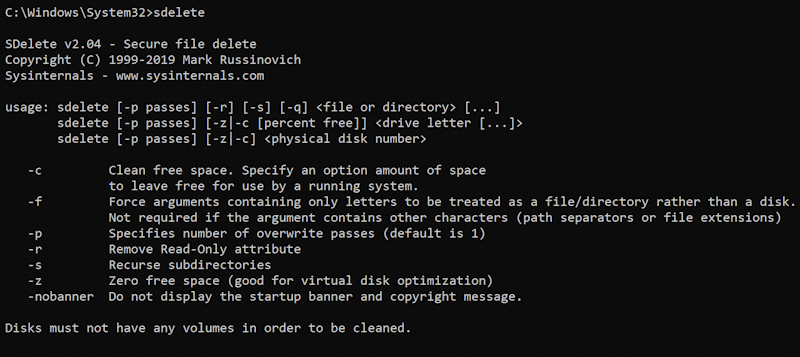
You can see that this utility, written by Mark Russinovich, has been around since 1999! Usage is a bit complex so if you don’t want to decipher all the options, know that this is an easy way to rewrite the data in all the free blocks on your C: drive:
sdelete -p 1 -c C:
This requests a one-pass overwrite of the C: drive. In practice, expect it to take quite a while, possibly an hour or longer, depending on the size of your drive and what percentage is empty and available. It starts thusly:
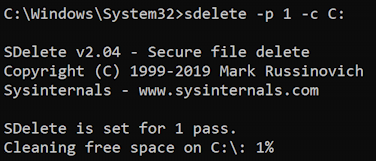
Notice “Cleaning free space on C:” and that the progress indicator shows it’s at 1%. After a while, it moves to the second phase of its process…
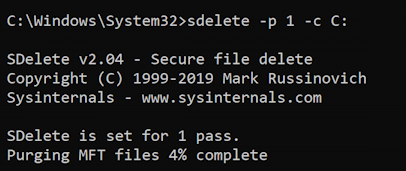
This time it’s “purging MFT files” (MFT = master file table), and it’s another rather slow process.
Finally, though, it’ll finish:
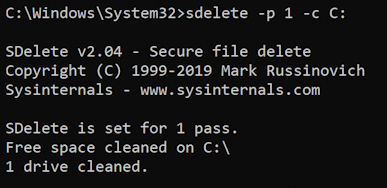
Mission accomplished, 1 pass wipe and delete, 1 drive cleaned.
Worth noting is for government work, the MILSPEC (military specification) is a three-pass, then seven-pass process. As Mark warns: “SDelete implements the Department of Defense clearing and sanitizing standard DOD 5220.22-M, to give you confidence that once deleted with SDelete, your file data is gone forever. Note that SDelete securely deletes file data, but not file names located in free disk space.” The latest MILSPEC requires three passes (“-p 3”) followed by another invocation with seven more passes (“-p 7”). This might well take overnight or longer.
Nonetheless, you now know how to clean up all of those unallocated but data-filled blocks on your hard drive. This isn’t something to use on a daily or even weekly basis, but if you’re worried about someone salvaging information from a drive, SDelete is a smart tool to have in your toolbox.
Power Tip: I’ve been writing about Windows for many years and have an extensive Windows 11 help library here. Please check it out while you’re visiting. Thanks!
Hi,
Thanks for what you’ve done.
👍
Thank you for this item. I knew that ‘deleting’ a file only marks the storage space it consumes as ‘available’ but doesn’t remove the file content from the disk. Instead, it sits there until it is overwritten by another file. sDelete offers a way to clean this ’empty’ disk space periodically, or when a computer is passed on to another user. Of course, the original user must ‘delete’ all his/her files before running sDelete when faced with such a situation, but the effect is what most of us would desirer (’empty’ space is truly empty).
I went a step further and created a batch file to run sDelete with a cls (clear screen) command at the top, and a pause command at the end. The cls command makes things a bit less cluttered, and the pause command keeps the CMD window open until I press a (any) key:
Start code———
cls
sdelete -p 1 -c C:
pause
End code———–
I created the file in Notepad and named it ‘Run sDelete.bat (with the ‘Save as Type’ field set to ‘All Files (*.*)’ at the bottom of the Save as dialog. If a military-grade deletion is required, the batch file can be modified as follows:
Start code———
cls
sdelete -p 3 -c C:
sdelete -p 7 -c C:
pause
End code———–
I hope this helps others,
Ernie
I intend to add running this batch file as a part of my semi-annual maintenance routines.