
Just read your tutorial on installing and configuring Boot Camp (see Installing Boot Camp and Windows XP on your Intel Mac) and it’s great. I notice that at the end you comment about your PC partition showing up on the Mac side when you reboot. That’s cool, but how do you find files on that disk?
Thanks for the kudos. Finding files in a big, confusing disk layout is exactly where the Mac OS X Spotlight command comes in so darn handy! First off, you need to get Spotlight to index the drive, which I talk about here: How to get Spotlight to index a drive.
With that done, I suggest that you boot into Windows and create a test file or folder right on your Windows desktop. I did that and called the file “FindMeHere.doc”. I figure there’s probably not another Windows file or folder with that name…
Now it’s time to reboot yet again, back into Mac OS X (remember you’ll probably need to hold down the Option key on boot to pick the right OS once you’ve booted into Windows). Once we’re in Mac OS X it’s time to search for the newly created file, which seems like it should be easily accomplished with Spotlight once it’s fully indexed the drive.
There are two problems, however. First, building a full index can take many hours and there’s no way to check on progress along the way with Spotlight.
But there’s a much bigger obstacle. One of the major limitations of Spotlight is that it only indexes HFS and HFS+ file systems, and while the Windows XP drive might show up on your desktop and be viewable with the Finder, it’s not in HFS format.

The net result is that it cannot be indexed by Spotlight, a rather frustrating problem and one that I expect will change as Apple fully integrates Boot Camp / Parallels into the OS.
Ah well, fortunately there’s a different, albeit more geeky way to dig around in a non-HFS file system. It involves opening up your Terminal and <gasp> typing in a command.
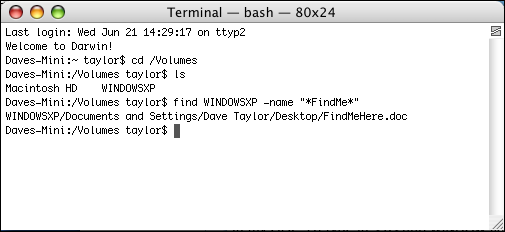
Do this: open up Applications –> Utilities –> Terminal then type in the command cd /Volumes. Type in ls and it’ll show you the name of each of the disks you have on your system. Find the one you want (in my case it’s called “WINDOWSXP”), then type in the following command:
In my case, I’d type in find WINDOWSXP -name “*FindMe*” and almost instantaneously I see the results:
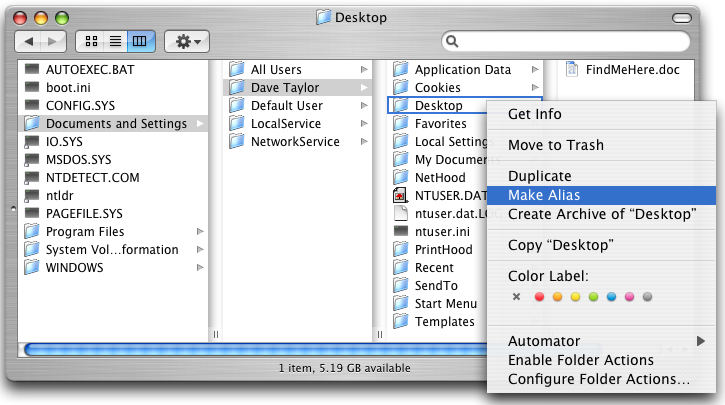
Regardless of what path you take to get here, you now know where your Windows Desktop folder is located on the disk. Open the drive with the Finder and navigate to the Windows Desktop folder, then choose File –> Make Alias (or right click and choose it from the contextual menu, as shown in the screenshot above) then drop that alias right onto the Mac Desktop for faster access in the future:
That should give you a good approach to finding content from your Windows partition while within Mac OS X.