
Every time I leave my AirPods at my girlfriend’s house my iPhone promptly notifies me that they’re “left behind”. Not useful! We go for walks, we leave the house, and I often leave my gear there. How can I disable the notification, but just for this address?
Apple’s got you covered with its slick and surprisingly effective Find My device tracking system. As you already know, most of your Apple gear, from your iPhone and iPad to your MacBook Air and AirPods earbuds report their location with some frequency. This means that you can go into the Find My app and not just see where your friends (who have opted to share their location with you) are located but also the location of all your devices. This app is also where you manage Apple AirTags, if you have any of those.
Tip: You can get to the Find My system through iCloud.com if you log in with the same AppleID. Even from a computer you’re borrowing because you can’t find your own!
Your account already has a Home and Work address denoted, and Find My defaults to not notifying you if you leave a tracked device in either place. You can change that, of course, but what’s more important is that you can add additional locations for the don’t notify list. Let’s have a look…
YOU’VE LEFT YOUR AIRPODS BEHIND!
I went into the local Target store a few days ago, leaving my computer and AirPods in the car. As soon as I was more than a few hundred feet away, this popped up on my iPhone’s screen:

If I would have left my phone behind too, it wouldn’t have generated the notification; Apple doesn’t really track our location, it just makes the assumption that we always have our phone with us. Probably true for 99% of people nowadays!
Not a big deal, but if I worked at Target and really didn’t want to get these notifications every time I stepped foot on the property, I would want to disable it.
Tap on the notification and it takes you to an informative screen:
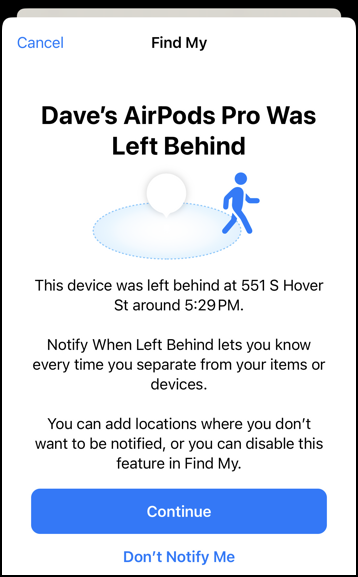
As you can see, this service is called Notify When Left Behind by Apple. It also notes that “You can add locations where you don’t want to be notified, or you can disable this feature in Find My.”
TURN OFF NOTIFY WHEN LEFT BEHIND
Tap on “Don’t Notify Me” and it’ll turn off all notifications for the device. Probably not what you want, on the off chance you forget them at a coffee shop or coworking space or even a friend’s party! Instead, tap on the blue “Continue” button…
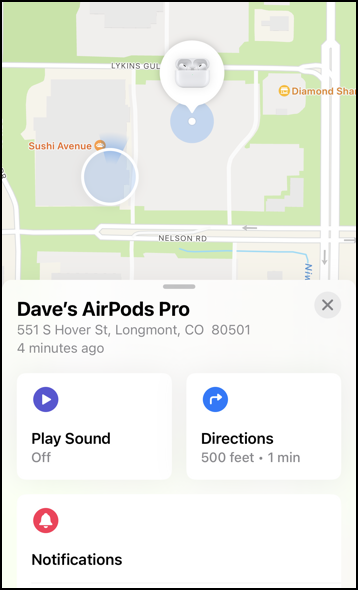
The map shows my location (in Target, the light blue circle with the white edge) and the last known location of my AirPods Pro (with a tiny picture!). In the parking lot. Helpful.
The Find My app makes it easy for you to find a lost device, and you can see that I can tap “Play Sound” to have it emit a warbling alert to help find it behind a couch cushion or similar. “Directions” can actually give you a directional arrow and range indicator to help you walk in a large space (like a park) to zero in on its location.
Tap on “Notifications” instead, however, and you’ll get to this screen:
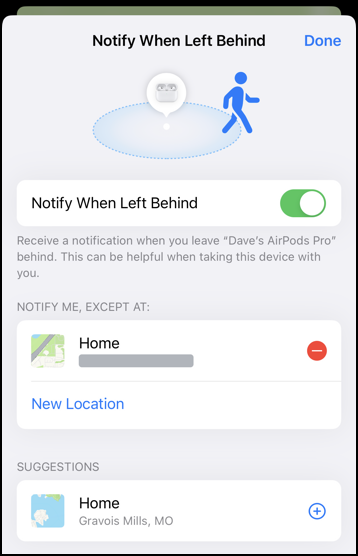
If you’d like to completely disable these notifications, tap on the slider adjacent to “Notify When Left Behind”. Done. Forever. Or… you can use the “Notify Me, Except At” feature. Notice mine already has my Home listed, and below that is a “New Location” link. Further down is a suggested location, a vacation home that I’m not going to add lest I leave my AirPods Pro there without realizing!
ADD A NEW DON’T NOTIFY LOCATION
Tap on “New Location” and a map shows up.
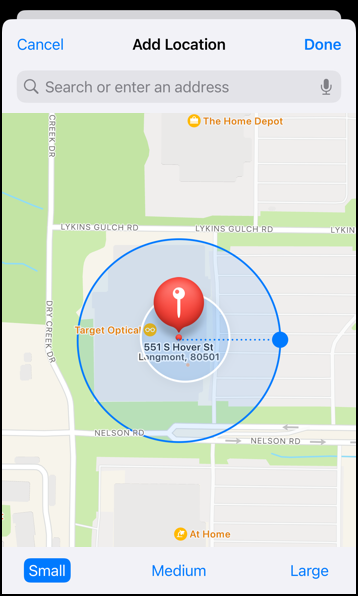
This is where it gets interesting: It’s centered on my location, not the location of the AirPods, but I can change the proximity value to be small, medium, or large. If I tap on “Large” then the map zooms out a bit to compensate:
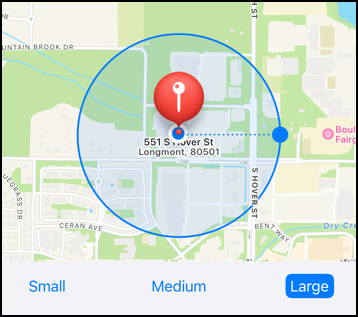
In this instance, it might be too big as it encompasses locations a fair distance away, even across the street.
Pick the radius that’s going to work best for you – and I suspect it’s almost always “Small” – and tap on “Done” on the top right. You’ll get a confirmation prompt:
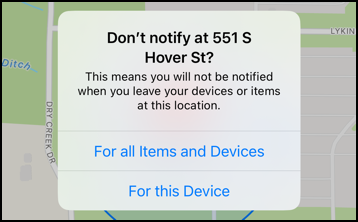
If you want to make this location a new home base for all your gear, which might be appropriate if you’re always at your girlfriend’s place, tap on “For all Items and Devices“. Otherwise, tap on “For this Device“.
Done.
You’ll now see the new address show up on the device notification screen:
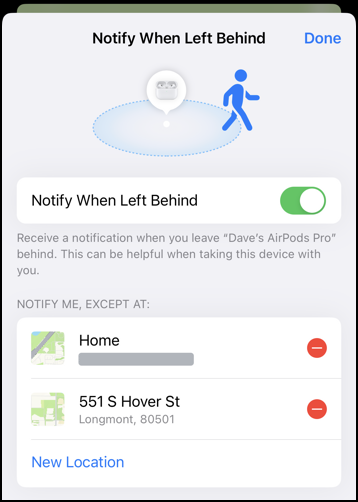
If you change your mind, the red circle with the “-” lets you remove it and get those notifications again!
Pro Tip: I’ve been writing tutorials for the Apple iPhone since it was first released. Please check out my extensive iPhone help area for lots and lots of useful content.