
There are a lot of cloud services that let you mirror your content on remote storage devices. Great for backup, but if you use services like Dropbox, OneDrive, Box or even WebDAV to share content, every mount eats up your own disk space too. CloudMounter offers a smarter solution, a combination of super easy mount options and zero local disk drive footprint accessibility.
Forty gigabytes. That’s how much space the mirrored folders on my Dropbox cloud account eat up on my local disk drive so I have quick access and can work offline. Except I am rarely actually not hooked up to the Internet and don’t actually work with those files so much. 40GB is a big price to pay for a service that I often just use as a backup and file transfer mechanism. Still, that’s how it works, right?
Wrong. Turns out that if you’re on a Mac system, you can get a very cool application called CloudMounter through the App Store and even in the free mode, completely change how you work with your cloud storage systems. Not only does it allow you to work with all your favorite services without eating up a byte of local disk storage, it keeps all your data encrypted so if someone rips off your computer, they can’t get to the online content without the appropriate passwords.
Let’s go through the process. First off, once you download CloudMounter, the first launch will pop up this request:
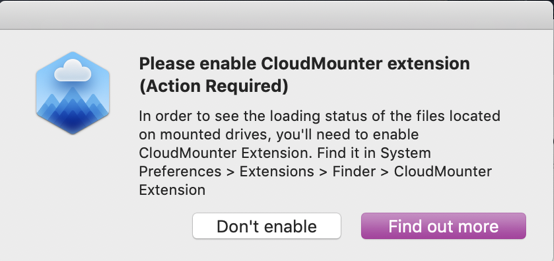
You’ll want to do this, though the extension will work without it. Click on “Find out more” and you’ll pop directly to this window in the MacOS X System Preferences:
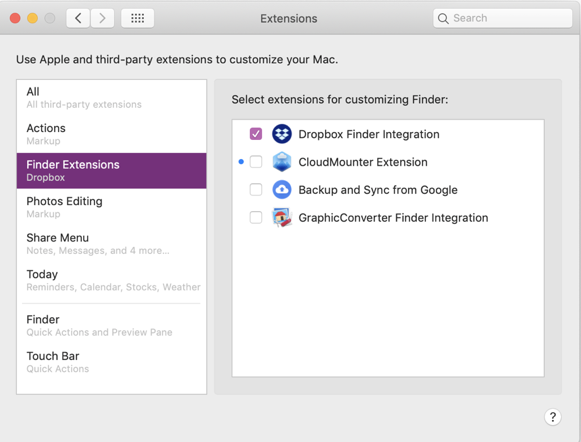
Make sure you’re in “Extensions” > “Finder Extensions” then make sure that CloudMounter Extension is checked (as Dropbox is checked, above). Done. Now you’re ready to get started with this handy little utility.
CloudMounter will ask – just once! – what kind of subscription you want, outlining the additional features for a paid sub:
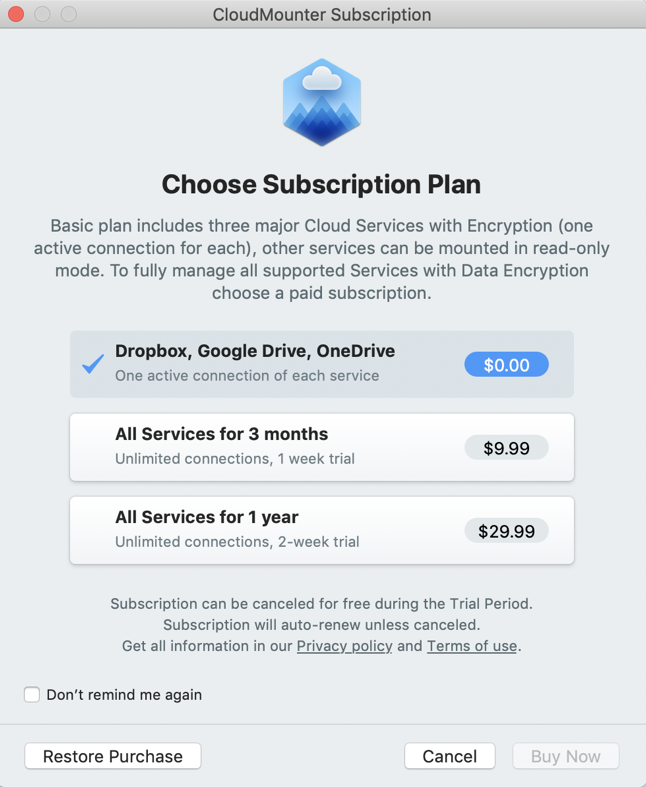
If all you’re going to use are FTP or SFTP servers, Dropbox, Google Drive and OneDrive, it’s free. Nice! If you’re a developer, however, gaining access to Amazon S3, Box, Blackblaze B2, WebDAV and OpenStack Swift might well be worth the $30/year. It really does make your life easier if you’re working with multiple cloud storage services.
And, finally, you can get to the main Connections window. As you can see below, I’ve already set up a Google Drive, OneDrive and SFTP connection:
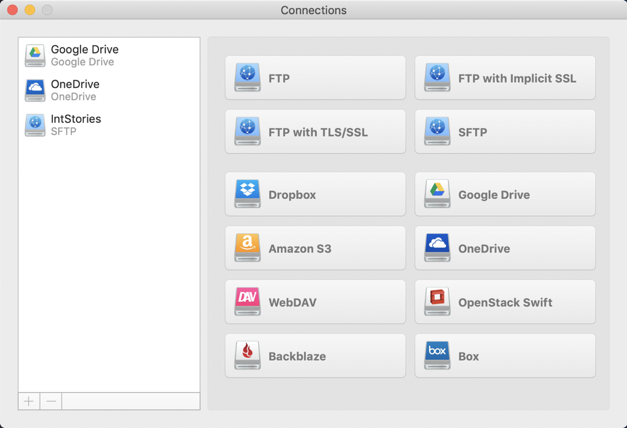
Most of the lower set of cloud options are the paid subscription, but the basic concept is straightforward enough. Click on a service and you’ll validate access or, in the case of FTP type connections, specify account and password information for the app.
Once I mount all three drives, here’s how it ends up looking on my Mac:

Certainly a nice, simple way to access my Google Drive account without any fuss. Notice that OneDrive and IntStories (SFTP) are also both showing up as drive icons to the Finder and then as regular folders in the window. Super easy to work with, and no copying data onto your local drive required.
CloudMounter also shows up as a new icon along your menubar, so it’s super easy to access and control each cloud service or add a new drive (e.g., cloud drive) to your configuration:

That’s it. After just a few days of use, I’ve become a fan of CloudMounter because it simplifies accessing the many online cloud service I use on a daily basis. Next up, to configure my Dropbox access and free up that pesky 40GB of space on my local drive!
Learn more about CloudMounter in the App Store or on the company Web site: cloudmounter.net
Pro Tip: I have a ton of free Mac help and support here on the site. Please take the time to check it out!