
You don’t have to be a technical writer to want the ability to take a screenshot or capture a video of something you’re doing on your PC. Recording directly from your webcam? That should be doable too, but on a Windows computer, these tasks can be darn tough. Enter RecExperts…
Shortcuts: Get Started | Record Screen | Record Audio | Record Webcam | Settings
Recording video from your Webcam can now be done in the Camera app, but that’s a different program than you’d want for a screenshot on your Windows 11 computer, and recording a video of what you’re doing on your screen? Capturing just audio so you can sing “happy birthday” to your niece? Why are all these tasks so difficult on a PC? Fortunately, third party software developers have stepped in and solved the problem with various tools and utilities. One of the best is RecExperts from EaseUS.
As it happens, RecExperts is available for both Windows and Mac systems, so while you can use QuickTime Player for many of these tasks on the MacOS side, it’s still easier to have a single unified solution to simplify your life. Better yet, it has lots more output formats for both audio and video – including the ability to save the audio track of your video as a separate file – which makes it easier to produce truly portable media that works for everyone, whether they’re Mac, PC, Linux, Android, even iOS or iPadOS users. If you’re a teacher, gamer, small business, or just want to gain greater control and flexibility over your captures and recording of what’s happening on your computer, RecExperts is a solid choice.
Let’s have a look at how it works on the Windows side, including demos…
GETTING STARTED WITH RECEXPERTS SCREEN RECORDER
You can experiment with the program as a free download, no license required, by grabbing a copy from EaseUS RecExperts Screen Recorder. Launch the program and you’ll quickly see that it offers four basic functions:
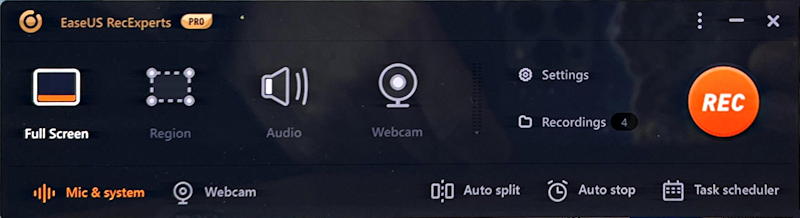
You can capture what’s on the screen, either as a snapshot image or as a video, you can capture audio, or you can capture from the webcam. There’s a tiny window that appears at the top of the screen that shows F9 begins a video recording and F11 takes a screen capture image. Choose Region, then F11 and you have a screenshot of a specific area on your screen. Choose Region then press F9 (or the orange REC button) and you’re recording a video of what’s happening in the defined region. Super easy.
When you’re recording a screen video sequence, another toolbar appears that lets you control start/stop, pause, take a snapshot, set a timer (automatically record 5 minutes, for example, without having to worry about remembering to stop it again), and more:
![]()
The toolbar isn’t in the final video recording, so not to worry. In fact, let’s record the screen…
RECORDING THE PC SCREEN WITH RECEXPERTS
It’s hard to see in the screenshot below, but the top left shows the shortcuts of F9 = start recording, F10 = stop recording and F11 = take a screenshot. Notice that there’s a dashed orange line around the entire screen to indicate that it’s the defined region for the capture:
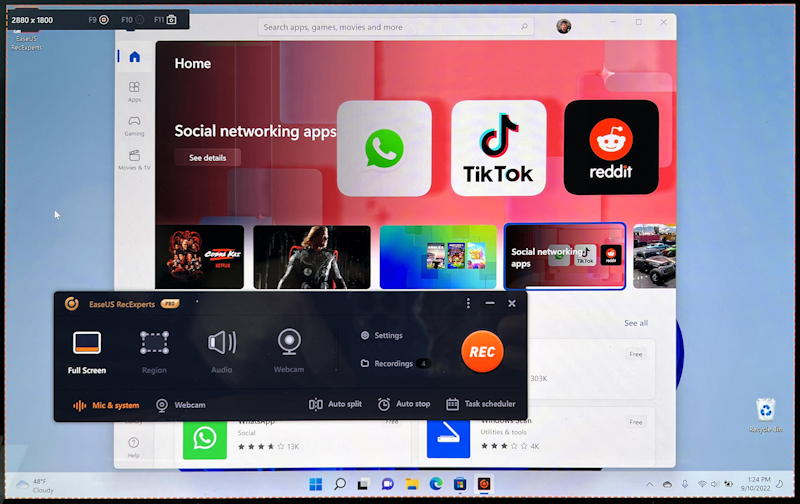
Notice on the toolbar that I have “Mic & system” shown in orange (on the lower left), but “Webcam” is in grey. This means that when I record the screen, it will also record any audio from the system microphone, but will ignore the Webcam. If I wanted to also capture video from the Webcam as I recorded the screen, a common video effect you see from gamers on YouTube and Twitch, I can simply click on “Webcam” and enable it. So easy!
If I specify Region, the program lets me click and drag to define a region. On a touch-screen, of course, I can do that with a finger!
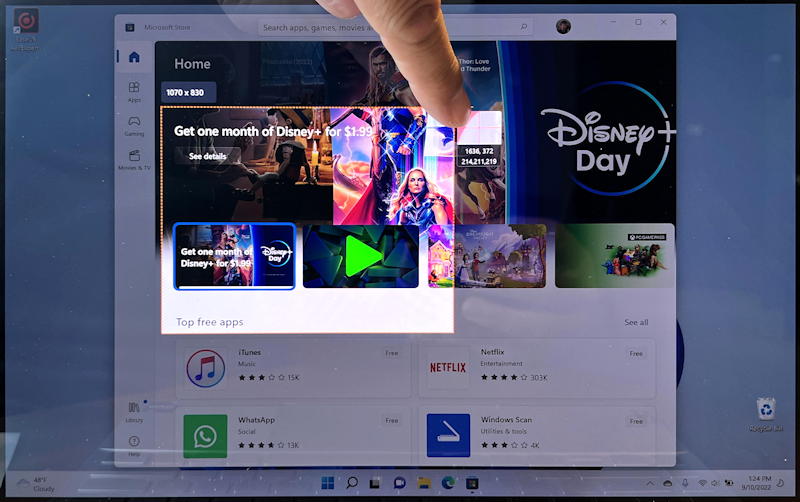
How does this all work together? Here’s a demo of a short video capture where I talk through what I’m doing in Microsoft Store:
Pretty slick, isn’t it?
RECORDING YOURSELF TALKING OR SINGING IN RECEXPERT
The program can also record just audio, in which case the interface changes rather dramatically as soon as you tap or click on the “Audio” button in the center:

Before you press REC to record, talk and make sure that you’re seeing a waveform. If you aren’t, then you might need to go into Settings to ensure that the correct audio device is selected. Ready to sing? Click or tap on “REC” and talk, tell jokes, sing, play your guitar, whatever floats your proverbial boat. Then click on the “STOP” button and it’s recorded and automatically saved to your computer’s hard disk. Could it be any easier?
RECORD YOUR WEBCAM VIDEO ON YOUR PC
The last feature I want to highlight is the ability to capture the video signal from your Webcam. This is great because it’s basically a high quality video camera that’s just sitting at the very top of your computer screen (on a laptop, at least, but also on most desktop systems too). You might have used it for Zoom or Microsoft Teams, but it can be used for anything!
Click on the “Webcam” button in the center of the main RecExperts toolbar and it will open up and display the webcam video feed, along with offering an interface that looks a lot like the audio recording interface:
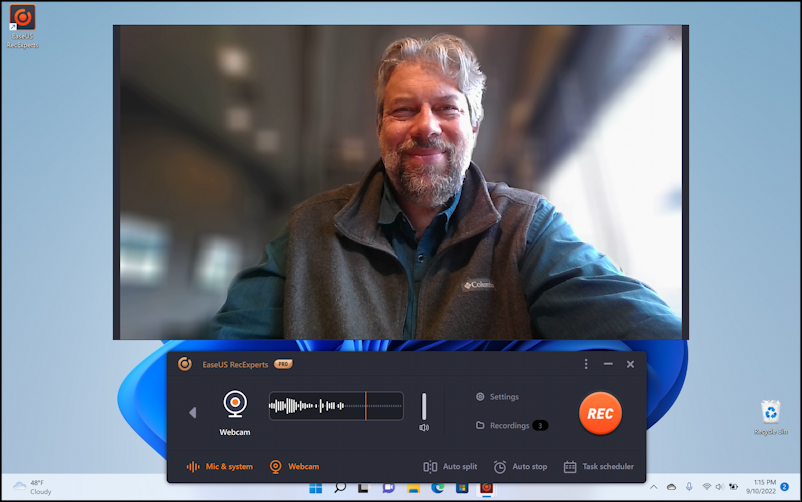
Adjust your webcam to look good, make sure that the audio is working by looking for a waveform in the small audio signal display, then press REC when you’re ready to record yourself. Here’s my demo:
Not too difficult at all and it looks pretty darn good, even after I uploaded it to YouTube and let it recode the video format!
Once you stop the recording, RecExperts moves you into the video editor window:
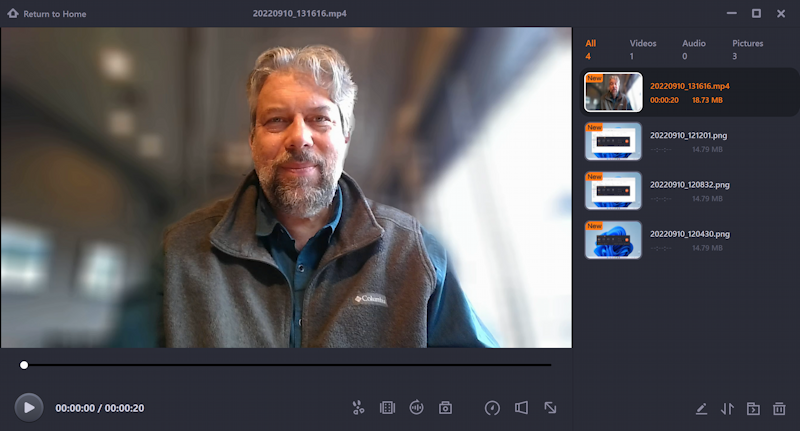
You can see that I have four files, three screenshots (in PNG format) and the video I recorded (which is different to the one I shared above). There’s a lot you can do on this screen including adjusting start and stop points, renaming the video, and lots more. Right click on the thumbnail and you’ll find even more choices:

You can even add opening and closing titles and credits if you’re so inspired. Don’t like this recording? Click “Delete” and you can try again. Easy.
FINE TUNE YOUR RECEXPERTS EXPERIENCE WITH SETTINGS
The only other thing to consider is the many settings and preferences in the program, especially for the various output formats. Click on the “•••” link on the main toolbar and you’ll move into the Settings window. Settings are broken down into four categories: General, Video, Audio, and Advanced. For Video you can choose one of over a dozen different output formats, as shown:
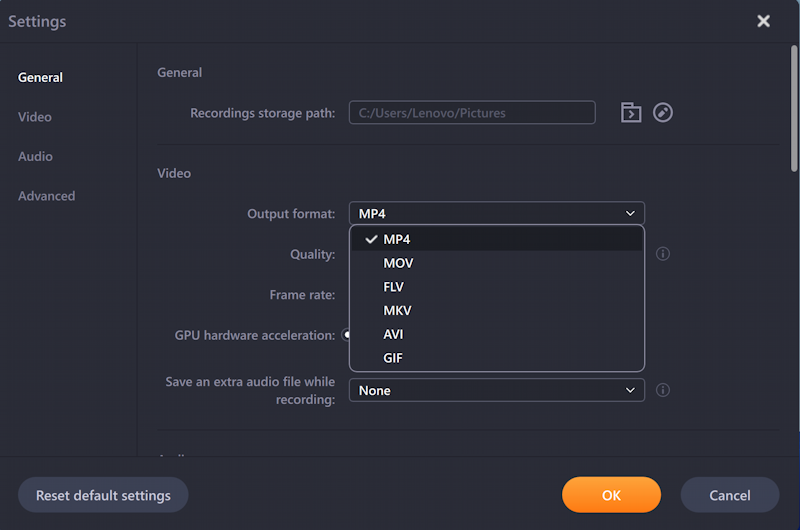
Hidden underneath the pop-up menu are the ability to change your frame rate and whether to utilize GPU hardware acceleration or not. I encourage you to try 30fps for framerate and to enable the GPU acceleration unless you get some glitching or problems.
Scroll down a bit and you’ll see that there are also a lot of output audio formats from which to choose:

If you don’t know what’s what, then stick with MP3 as it’s a well-known audio file format and widely compatible.
Finally, just a bit lower and you’ll be at the Advanced settings, which offer a lot of interesting, albeit somewhat technical options:

If you’re in a noisy environment, “Microphone noise reduction” can be a great feature to enable. You can see all the others, and there’s lots to tweak so you can get the perfect recording environment for your own needs.
That’s it. EaseUS has done a great job with RecExperts. It’s easy to figure out, powerful, flexible, and the output files are in the right formats and easy to email, add to documents or presentations, or even share via social media. The program works on Mac or PC and is $39.95/year for individuals or a lifetime license is $69.96. The company also offers business pricing for multiple devices if that’s closer to your needs.
Pro Tip: I’ve been writing about Windows since the beginning. While you’re here, please check out my Windows help area for hundreds of other useful tutorials and how-to articles. Thanks!