
I just bought a Palm Treo 650 and am pretty happy with it, but I can’t help wondering about what different ways I could connect to the Internet with it. I know I can pay through the nose for a data service from my cellular provider, but I’m wondering if there are any ways to connect via bluetooth or wifi. Any tips for me?
As I’ve admitted before, I don’t have a Sony Clie or any other Palm device in my offices, so I can’t share hands-on tips, but fortunately, I do have access to the splendid book Palm & Treo Hacks, and one of the hacks in this popular O’Reilly Media book addresses this exact question, Hack #34: Connecting to the Internet. Here’s what book author Scott MacHaffie has to suggest in terms of connecting your Palm Treo to the Internet:
All Palm devices can connect to the Internet via modem or serial cable and most can connect via infrared (IR). Bluetooth-equipped Palm devices can connect via Bluetooth. Other options for connecting to the Internet include Wi-Fi (802.11b) and using your cellular data service on a smartphone.
Palm Internet Connections via Modem
You can purchase a regular modem for most Palm devices that connects to a standard phone line. For older devices, you might need to look on eBay or at a computer swap meet to find a modem.
Configuring your Palm device to use a modem is easy. Go to the Preferences application and select the Network category. Select your service and enter your username and password. Select Standard Modem in the Connection list. Enter the phone number for your ISP. The Details button brings up a dialog box that lets you select additional options –> connection type (defaults to PPP, but you can choose SLIP or CSLIP if necessary), an idle timeout that will hang up after a specified period of inactivity, whether or not to do DNS queries automatically, and whether to use a static IP address or a dynamic address. The dialog box also provides the ability to write a simple script. You can use this to automate certain tasks.
Set additional parameters for a modem by selecting Edit Connections from the connection list. Select a connection from the dialog box, and then press the Edit button. Then you will be able to modify settings such as what you are connecting to (PC, modem, or LAN) and whether you are connecting via cable or IR. Also, you can choose between TouchTone and rotary dialing, and set the volume for dialing and connecting. If you select Details, you can set the speed of the connection, the type of flow control, and any initialization string.
Palm Internet Connections via Serial Cable or Cradle
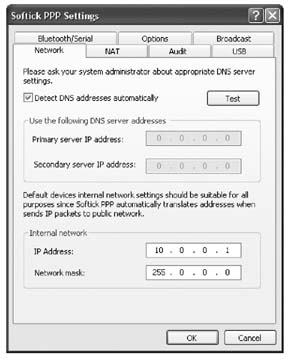
Setting up a connection via a serial cable or cradle is similar to setting up a modem, except that you don’t have to enter a phone number, username, or password. Choose Cradle / Cable from the Connection list. Note that you need to be running a PPP stack on your desktop machine to connect via cable. For Windows machines, you can get a PPP stack called Softick PPP. This stack supports USB, Serial, Infrared, and Bluetooth connections. Configuring Softick PPP is fairly simple, as you can see in Figure 6-1.
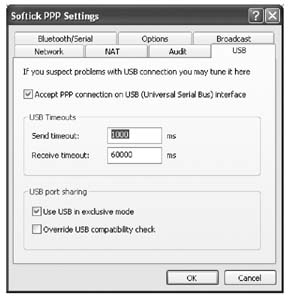
The one tricky setting depends on what kind of device you have. For Sony Cliés (and some other devices — check the Softick web site for more details), you will need to set the PPP stack to operate in exclusive mode. This means that you can’t HotSync while connecting to the Internet. Most devices can do this, but for the ones that can’t, you need to select Use USB in exclusive mode from the USB tab in PPP, as you can see in Figure 6-2. You will need to enable Softick PPP explicitly when you want to connect to the Internet and disable it when you want to HotSync.
Another choice for connecting with a cable is to buy a cable to connect your Palm device to a cell phone. You can find cables online at various sites such as http://www.thesupplynet.com. Your cell phone must be set up with data access through your wireless service provider. A cell phone can act as a modem (follow the modem instructions) or as a direct network access point. You will need to check your wireless service plan for details.
You can also edit the connection (as with a modem) to select what you are connecting to.
Palm Internet Connections via Infrared (IR)
You can use an infrared connection to a desktop computer or to a cell phone. For a desktop computer, the setup is similar to setting up a connection through a serial cable, except that you will choose IR or IR to a PC/ Handheld from the Connection list. Connecting to a phone depends on whether the phone acts as a modem or as a direct network access point. Check your service plan for details. Select the appropriate connection type— IR to a GSM Phone, if that is applicable, otherwise choose IR or IR to a PC/ Handheld. If you are using the phone as a modem, then follow the modem instructions.
Palm Internet Connections via Bluetooth
You can connect to the Internet via Bluetooth, if your Palm device has it installed. If your Palm device doesn’t have Bluetooth built-in, you may be able to buy an adapter [Hack #53], depending on which device you have.
You need a Bluetooth-enabled access point to get on the Internet. That can be an access point, a cell phone, or your desktop computer.
Bluetooth LAN access point. If you are connecting through a LAN Access Point (either your office or some other business like a coffee shop), then you will need to get the network information from them. If you are in a public place that has Bluetooth access, this information is usually posted somewhere convenient.
If you are connecting to an access point, select Trusted Devices and Add Device. Your Palm device will then search for Bluetooth access points. You may have to search more than once to find the network you are looking for.
When the network is found, tap on it and hit OK. You need to enter in a passkey — this is something that you set up when you were configuring your desktop, or it should be available from the provider of the access point.
Cell phone. You will need to find out from your cell phone service provider whether or not you have data service set up on your cell phone, and if so, how should you access it. Some cell phones can be used as modems [Hack #31]. Your wireless plan also needs to support this. Other plans will let you use your cell phone as a direct network access point. You need to make sure that your wireless plan allows you to connect other devices to your phone. This is usually called tethering.
If your phone and plan support it, then you can connect your Palm device to your phone. From the Bluetooth Preferences, select Setup Device. You will also probably want to set your Palm device to not be discoverable, unless you want people trying to connect to your Palm device.
From the Setup Devices form, select Phone Setup and then Phone Connection. Make sure your cell phone is set to be discoverable, select your phone model, and type in a passkey to pair the devices (as with a desktop connection). You will have to type the same passkey into your cell phone when prompted.
After you have paired the phone and your Palm device, your Palm device will ask you if you want to set up your device to connect to the Internet. Answer yes, and then follow the remaining prompts. When you are finished, go to Bluetooth Preferences and tap the Connect button to finally make the connection.
At this point, you should be able to access the Internet.
Use a Windows XP computer as an access point. If you are connecting through your desktop machine, you will also need a Bluetooth adapter on your desktop. Make sure that your drivers are up-to-date.
Start by making sure that Bluetooth is set up and working on both the PC and Palm. Then, create a COM port for the Bluetooth connection.
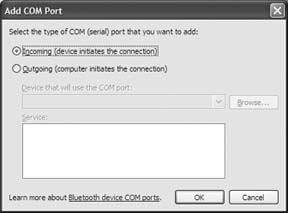
- Double-click on the Bluetooth icon in the System Tray, and then click on the COM Ports tab. Click Add to add a new COM port. Select the Incoming option in the Add COM Port dialog box (as you can see in Figure 6-3), and then hit OK.
- Windows will install the serial port. Wait a minute or so for it to finish up. When you return to the COM Ports tab of the Bluetooth settings dialog box, there should be a new COM port — in my case, it was COM7, as you see in Figure 6-4. Yours may be different, so write down what you see in your tab and click OK to close the dialog box.

Now you need to create a modem that lives on this COM port.
- Open the Control Panel and make your way to Phone and Modem options. You’ll see a list of modems. Click Add to add a new modem.
- From the Add Hardware Wizard, select Don’t detect my modem and click Next.
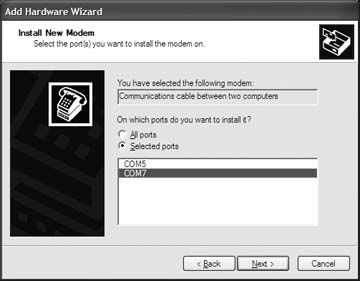
- You’ll see a list of choices. If your system is similar to mine, the choice you need will be at or near the top. Choose (Standard Modem Types) under Manufacturer and choose Communications cable between two computers under Models, as you can see in Figure 6-5.
- Click Next to proceed to the next screen, where you will select the COM port you created earlier (COM7 in my case). Click Next to move to the last screen and click Finish. You’ll return to the Phone and Modem options control panel, where your new modem should appear, as in Figure 6-6.

Now you need to create the incoming PPP connection.
- Start the New Connection Wizard (Click Start, Connect To, Show All Connections, and then choose New Connection from the File menu).
- Use the following settings across the next few screens:
- Set up an advanced connection. Click Next.
- Accept incoming connections. Click Next.
- Select Communications cable between two computers (COM7) as the connection device (the actual COM port should be the one you created earlier). Click Next.
- Do not allow virtual private network connections. Click Next.
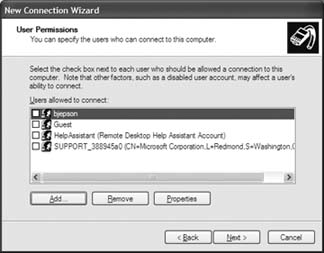
- At this point, you should have a dialog box similar to Figure 6-7.
- You need to choose a user, so I suggest you click Add to create a new user that will be dedicated to this connection. Name it palm and give it a password for security’s sake, as in Figure 6-8. You are setting up a user that will be able to connect to your computer via Bluetooth, so all of the usual cautions about strong passwords apply here.
- Make sure palm is the only user selected and then complete the New Connection Wizard.
- Make sure your Windows XP system is discoverable (double-click on the Bluetooth icon in the System tray, select the Options tag, Turn discovery on, and click OK).

Once the other side is set up and you have the connection information, you need to enable Bluetooth on your Palm device:
- Run the Preferences application, select Communications, and tap Connection. Tap New to create a new connection.
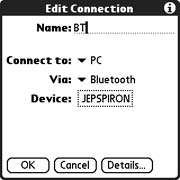
- Name the connection BT (or whatever you want) and specify that you will Connect to PC, Via Bluetooth. Click Tap to Find, which will initiate the Bluetooth discovery process.
- Choose your PC from the list that results and perform the Bluetooth pairing. You shouldn’t need to pair again once the devices have paired.
- When you return to the New Connection dialog box, your PC’s name should replace the Tap to Find button (my PC is called JEPSPIRON as shown in Figure 6-9). Click OK to finish.
Next, you need to create the Network connection.
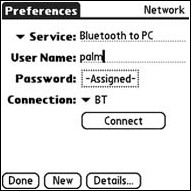
- From Preferences, selection Communications, and tap Network. Create a new connection called Bluetooth to PC (or whatever you want) that uses the Connection you created earlier. Specify the username and password you set up on the desktop side. The dialog box should look similar to Figure 6-10.
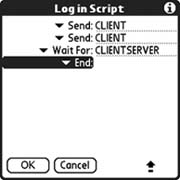
- Tap Details, and then tap Script. Set up the script as shown in Figure 6-11.
Send: CLIENT
Send: CLIENT
Wait For: CLIENTSERVER - Tap OK to return to the details page, and then tap OK again to return to the Network preferences. Tap Connect to make the connection. Once you are connected, select Options / View Log from the menu to see your connection details, as in Figure 6-12. You can also test the network connection from this screen by running the ping command.
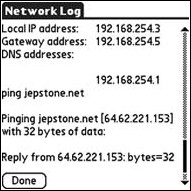
Notice that the subnet of the local IP address (the Palm device) and of the Gateway Address (the desktop side) are the same. That’s because the desktop isn’t using Internet Connection Sharing (if it’s a Windows box) which would normally set up a Network Address Translation (NAT) network. Instead, it puts your Palm device right on the same network as the desktop.
Troubleshooting. I hate to say it, but when I had problems connecting to my Windows XP box, the only solution that worked was to reboot the Windows machine.
Also, while you are connecting, you can press down on your Palm’s five-way navigation pad. This will show you what the Palm is sending over the network, so you can get an idea of whether the Palm is even talking to anything.
Palm Internet Connections via Wi-Fi (802.11b)
Getting set up for Wi-Fi depends on whether 802.11b is built in (e.g., the Tungsten C) or whether 802.11b access is coming from an add-on card.
Setting up internal Wi-Fi. To get started with built-in Wi-Fi, select Wi-Fi Setup from the Palm Launcher. Tap Next and your Palm device will search for all available networks. If the application finds the network you want to connect to, then you are set—just tap the network name to continue.
If the network you were looking for was not found, then you need to tap the Other button. You will need to enter the network name (SSID) in the corresponding field. Finally, tap OK and Done, unless you want to set up a VPN first.
You can also configure WEP encryption. This will help make your connection more secure, but it is not guaranteed to be completely secure. When you enter the network name under Other, you have an option to turn on WEP encryption. You can also select this option by editing the network connection. If you check the WEP Encryption box, then you can set an encryption key. Tapping on the encryption key control brings up a dialog box with options for choosing a key type, specifying up to four keys, and also a key index that specifies which of the four keys to use. Set these as appropriate to match the network. The dialog box also has a text field for entering in your WEP keys. Tap OK when finished.
After the basic network has been set up, you can configure the standard Internet settings. Launch the Preferences application and select Wi-Fi. Select Edit Networks from the Network list and then choose the network you want to edit. Tap Details, then Advanced — it seems like all the interesting stuff is always hidden behind an Advanced button. The Advanced button brings up a dialog box that lets you choose between a static and dynamic IP address (and lets you configure the subnet mask and router for a dynamic address). You can also choose to use the default DNS server or to use a DNS server at a specific IP address.
Setting up a Wi-Fi card. Launch the Preferences application and select the Wi-Fi category. Select On in the list. The Wi-Fi card will automatically search for available networks. The Wi-Fi card will try to connect to the first network it finds. If you want to connect to a different network, then you need to tap on the Network list. If the network you want to connect to appears in the list, then go ahead and select it.
If the network does not appear in the list, you will need to set it up manually. Launch the Wi-Fi Setup application. Tap Next, and then tap Other to bring up a dialog box for creating a new Wi-Fi network. Enter the network name (SSID), and select WEP encryption if desired. If you select WEP encryption, then you will need to tap on WEP Key to set up the encryption keys.
To change the IP or DNS settings, bring up the Wi-Fi Setup application and select the network to edit. Press the Details button, then press Advanced in the next dialog box, and you will be able to choose between a static or dynamic IP address. You can also select whether to automatically choose a DNS server or to use specified primary and secondary DNS servers.
Palm Internet Connections via Smartphone
To start with, you may need to activate a Subscriber Identity Module (SIM) card in your smartphone (the provider who sold you your phone should have done this, but in some cases you will need to call the carrier to activate it). If you have a CDMA device (Verizon and Sprint), then you won’t have a SIM card. Your phone (or SIM card) should have been activated when you signed up for wireless service. If not, you will need to contact your service provider to activate it. To support an Internet session, your wireless plan must be set up for data services. A few sample plans are listed in Table 6-1.
That’s all you need to do to get set up. You should be able to access the Web [Hack #37] and check email [Hack #35].
This excerpt from the book Palm & Treo Hacks is republished with the explicit permission of O’Reilly Media and is © 2005 by O’Reilly Media, Inc. All rights reserved.
why i cannot browse internet or data even if i connected to wi fi and network.?always appear an error”IE the address is not valid.Please check the address and try again”.Pls help.
When bought my palm treo.its internet explorer was working but when change its locale its stop working.
i have a palm treo 700 and i want to find out how to get online with it…..there is currently no service to the phone but I do have a wireless router at my work I would like to use.
It worked perfectly 🙂 I have a Palm Centro originally from ATT that i unlocked for T-MOBILE
Holy Crap. It took me a good 4 hours to finally stumble upon your page. Thank you. You need to publish this somewhere. Oh wait, yeah you have, on your page.
Thanks again.
At home I can use ICS, but at work, I can’t. Also I realized this will work without the widcomm bluetooth drivers, which I spent another 1.5 hours finding ones that would work with my cheap 25 cent bt dongles.
Dave,
Cool. Can you do it again for Windows VISTA? I got close with this instruction. I have a Sprint Palm Centro.
Thanks.
Is the internet free if you use the cradle/cable method?
I cannot connect my palm treo 650 to comp. Is it exist any com port settings or anything else…??
What softwares and hardwares do I need to connect to the internet and what are their functions respectively?
thanks a million mate!! you’ve just saved me a whole lot of headache
Dave, you’re the man! I just connected my Treo 650 to the internet via bluetooth using your step by step instructions above. Thanks.
I cant thank you enough, a very easy step by step tutorial which helped me enormously to connect my Palm T3 to the internet via my wireless connecting
a very happy Dazza 😀