
We have a Chromebook. We understand that we can use it as a tablet and get the keyboard onto the screen. The manuals are rather vague on how to do this, however, saying “Tap any text box to show the on-screen keyboard. Tap handwrite.” What’s a text box look like and what’s ‘handwrite’ look like?
Though there aren’t a lot of them, the “detachable” Chromebooks are pretty darn cool, particularly those from ASUS and Hewlett-Packard. The idea’s compelling: you use it as a regular notebook computer with separate keyboard, but can also simply pop the screen off and use it as a tablet as desired too! The system should automatically work with the on-screen keyboard and the idea of “tap any text box” is that the keyboard only shows up if you’re being prompted to enter some text. Test it by tapping in a search query box on a Web page, for example, or the search box on the Taskbar (“Shelf”).
You can also use the on-screen keyboard with any Chromebook, however, so let’s go through that process and I’ll point out where a tablet device should be working automatically with the on-screen ‘board. Before we go further, you might notice a difference in the user interface: If you haven’t updated to ChromeOS 117 yet, you really should. Here’s a handy tutorial: How to Update Your ChromeOS.
ENABLE ONSCREEN KEYBOARD IN CHROME OS
The controls for the on-screen keyboard are tucked away in the Accessibility settings area, which might make sense, but since they are also critical for tablet mode, it seems that a more obvious spot would make sense. To get to Settings, use the shortcut off the Notifications window:

The arrow points to the Settings shortcut if you’ve never tapped or clicked it before. Select it and the Settings window pops up:
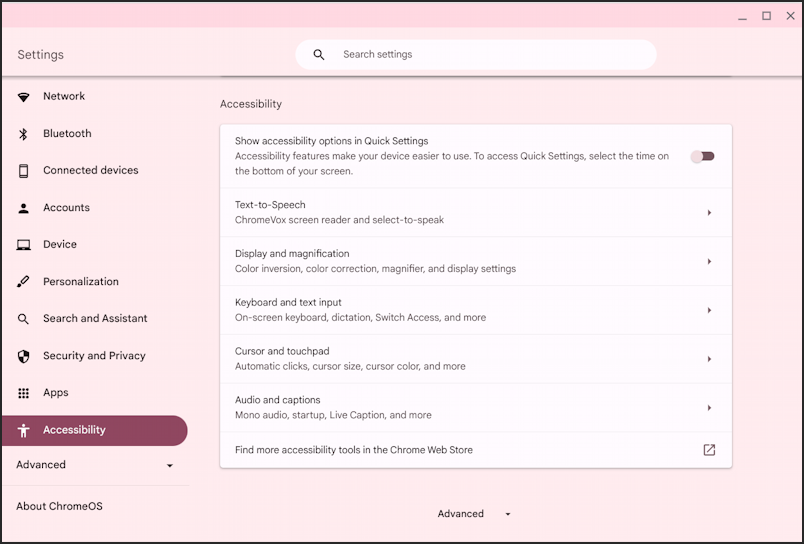
Choose “Accessibility” on the left side, then notice that the fourth option in the main area is “Keyboard and text input”. Click on it to proceed.
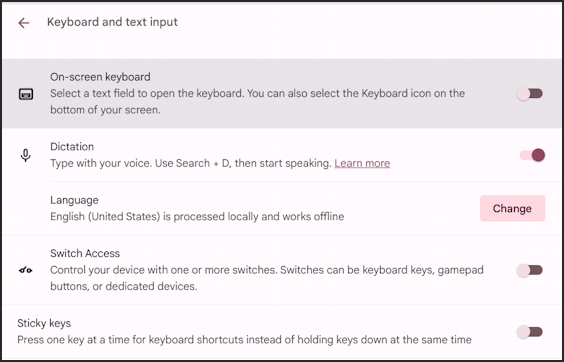
Here, finally, is where you can turn on – or turn off – the on-screen keyboard. Click on the slider.
USING THE ON-SCREEN KEYBOARD
Once you’ve enabled the on-screen keyboard (or if you’re in tablet mode) then a new icon has appeared on the lower right of the Shelf (Taskbar) without you probably noticing:

That keyboard button does indeed allow you to show the on-screen keyboard! A tap and…
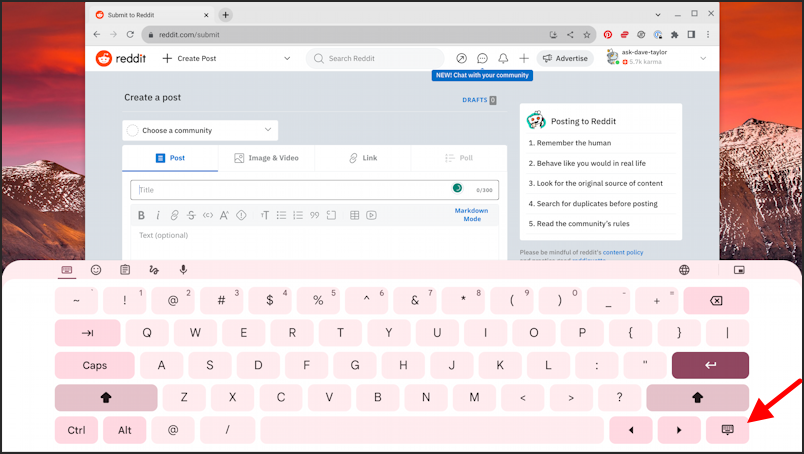
For regular data entry, it’s easy to tap on the button to produce the corresponding key. Ready to hide the keyboard again? Tap on the lower right key (highlighted, above).
Notice along the top of the keyboard window that there are lots of icons. Here’s a closeup:
![]()
The leftmost icon is keyboard mode (as shown). Then, left to right, the icons allow you to switch to an emoji keyboard, interact with the copy/paste buffer, write directly on the “keyboard” window to produce a graphical squiggle, signature, etc, and a microphone icon to access the dictation system.
The globe icon is also important:

It lets you choose a different language keyboard, as shown. Finally, the rightmost icon, the box within a box, switches the big keyboard to a mini-keyboard that just appears on the lower right:
All the same functionality, 1/4 the screen real estate. A win!
Finally, remember, if you want to permanently remove the on-screen keyboard because you’ve docked your display again, that setting is in Settings > Accessibility > Keyboard.
Pro Tip: I’ve been writing about operating systems for many years. You can find a lot more useful tutorials about Chrome OS in my Chrome OS and Chromebook help library here on the site. Why not check it out while you’re visiting?