
Of all the dumb things that Windows 10 does, asking me to confirm that I want to empty the recycle bin has to be near the top. I am choosing “Empty Recycle Bin” from a menu: why does it need confirmation?!? Can I disable this feature, Dave?
User interface designers tread a fine line between making it easy for users to (proverbially) shoot themselves in the foot and having so many confirmations and protections that the same user goes just a bit bonkers trying to accomplish anything. One person’s “too many prompts!” is another person’s “thanks for saving me from my own ignorance”. Nonetheless, I think that the confirmation of emptying the trash can, uh, recycle bin, is perhaps one of the more famous annoying confirmation prompts in Windows, and it’s still in the very latest version of Windows 10!
Fortunately it’s easy to disable this prompt, but before I show you the trick, let me ask: have you ever accidentally deleted a file, folder or photograph that you then couldn’t recover? Do you ever temporarily save files in the trash or run any programs that are perhaps over-enthusiastic about trashing data? I mean, it’s just a single click or tap, and then only if you have more than a single item in the recycle bin (sorry Microsoft, I think of it as the “trash” or “rubbish bin”) when you go to empty it…
No? You don’t care? You hate that $#@% prompt? Okay, okay, let’s disable it.
First off, you know the drill, right-click on the Recycle Bin to pop up the context menu. You’re used to choosing “Empty Recycle Bin”, of course:

I don’t know why people would want to pin the Recycle Bin to their Start menu, but that’s a whole ‘nother subject.
Go to empty the bin with more than a single item within and that dreaded prompt appears:

I get the frustration. Prompts to avoid doing something really dumb accidentally are good, but this? Every darn time? Ugh.
Instead, go back to the context menu and choose “Properties“, the very last of the options. You’ll get this somewhat confusing window:
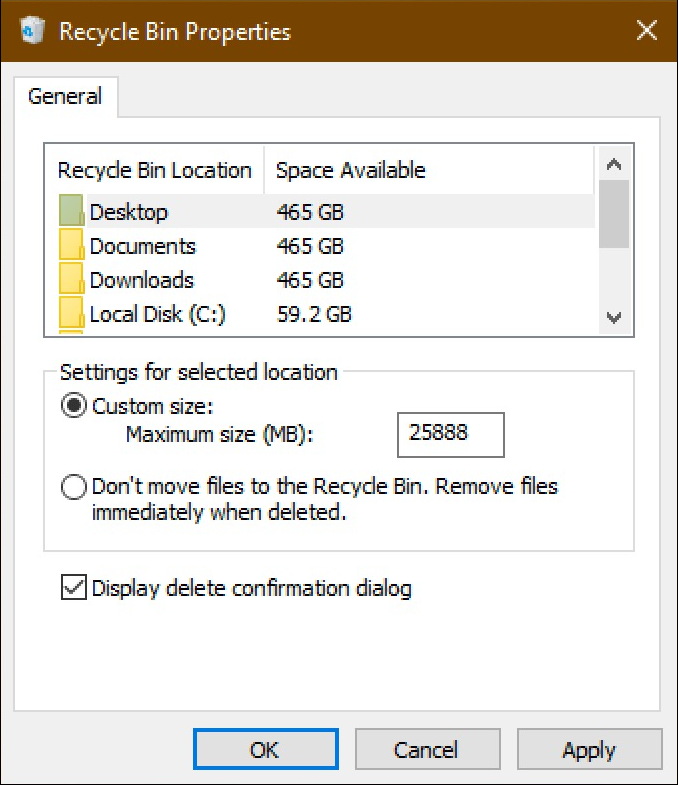
Don’t touch the scroll area, that’s (apparently) related to where on the file system that the Recycle Bin is stored. The default setting of Local Disk (C:) is just fine for 99% of users.
You can specify a maximum size for the Recycle Bin, however, which can be handy if you never, ever delete files. Remember, if they’re sitting in the Recycle Bin, they’re still taking up space on your drive! Or, if you’re really confident that you never, ever pull things back out of the Recycle Bin after accidentally marking them for deletion, you could choose “Don’t move files to the Recycle Bin. Remove files immediately when deleted.” That feels pretty dangerous for most users, however, so I recommend against that option unless you’re a power user and the kind of personality that does a crossword puzzle with a pen 🙂
And so, finally, we get to the option you seek: “Display delete confirmation dialog“. Uncheck that. Click or tap “Apply”. Done.
Not too bad, really. Now be careful out there because you really can’t undelete files. Well, there are some apps…
Pro Tip: I’ve been writing about Windows since Win3.1. Check out my Windows help for lots more tutorials while you’re here!