
I’m worried that someone is sneaking onto my Windows PC and accessing my files. How can I shut down all remote access to ensure I’m safe?
There’s a concept in cybersecurity that once you’re online, access flows both outward to the Internet and inward to your computer at the same speed. Most people just think “ooh, fast Internet” and never stop to think about the fact that someone from elsewhere on the Internet – even a continent away – could theoretically be gaining access to your computer, your files, your photos, and even your saved taxes and PDF bank statements, even as you watch Netflix and check your email. Alarming? It should be. Indeed, it should be motivation to ensure that your computer is protected from the outside world through a variety of tech including a good firewall, a router that can block common attacks, and more.
But the easiest protection is to ensure that you have file sharing, remote desktop sharing, and Windows Quick Access sharing all disabled. Then run a deep malware scan with Windows Defender (included with Win10) or your own anti-virus program. Or both. Let’s step through these remote access settings so you can check your own PC and ensure you’ve got all those metaphorical hatches battened down.
DISABLE REMOTE DESKTOP ON YOUR PC
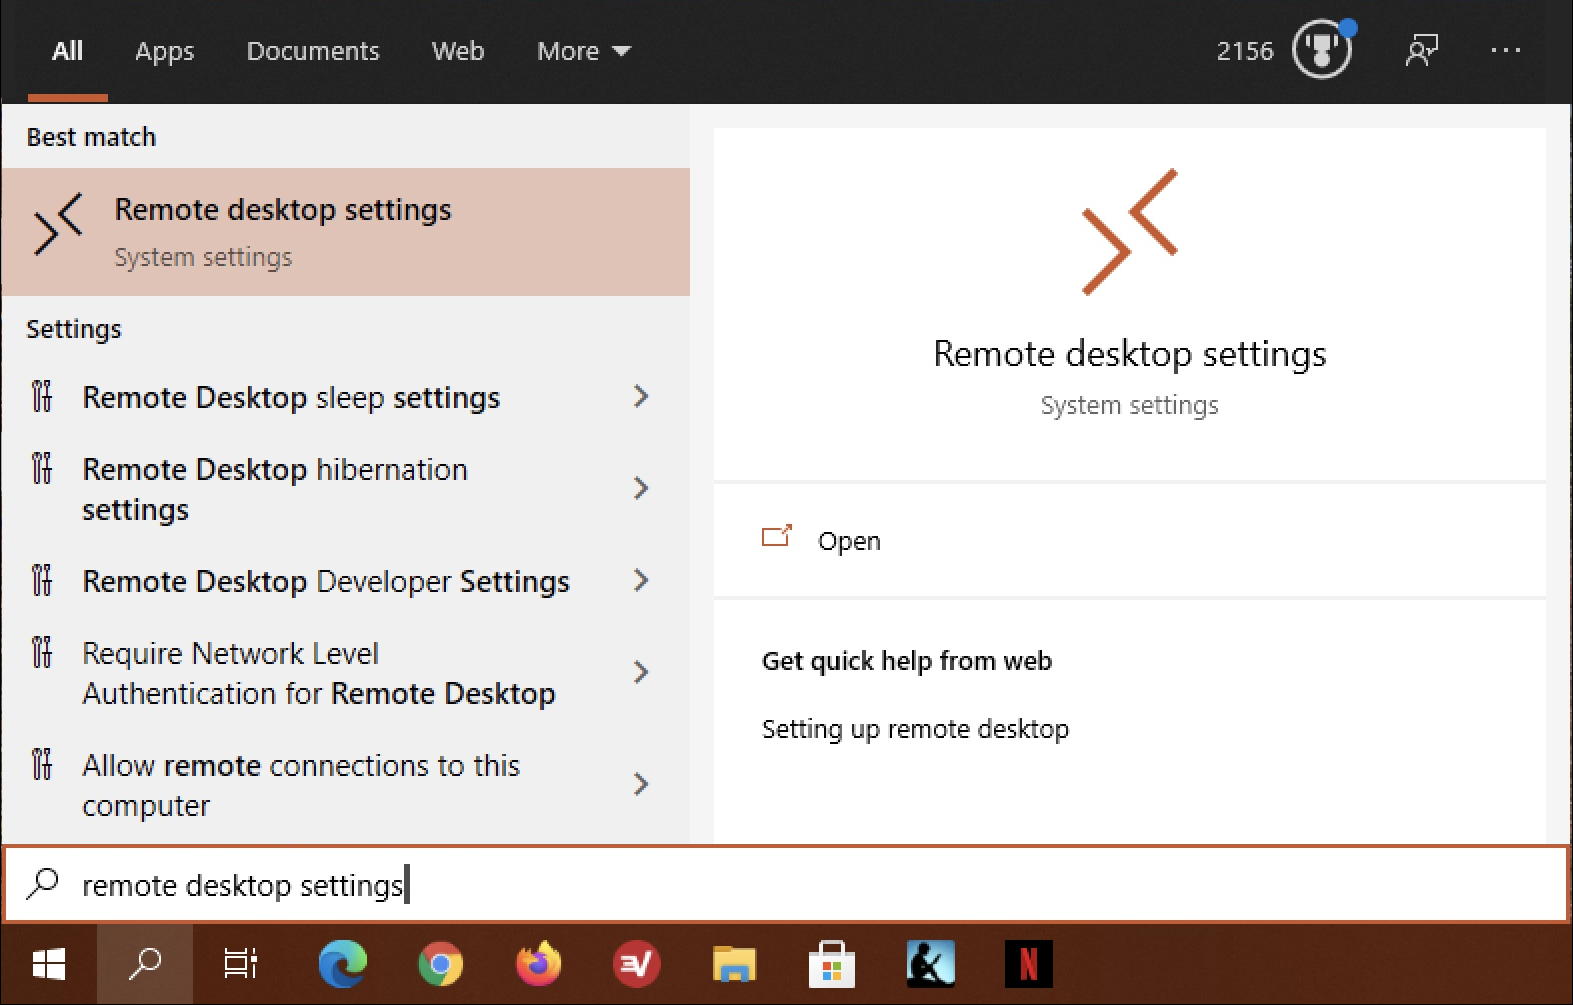
The easiest one to disable might not be an option on your PC in the first place: If you’re running Windows Home Edition then you can’t run Remote Desktop at all. Check by searching for “remote desktop settings” in Win10 Taskbar search:
If you’ve got Windows 10 Home Edition, you’ll click and then see something like this:

It might be a bit hard to read, but it says “Your Home edition of Windows 10 doesn’t support Remote Desktop.” Okay, that’s good.
If you have the Pro version of Win10, however, you might find that it does support Remote Desktop and that it’s enabled!
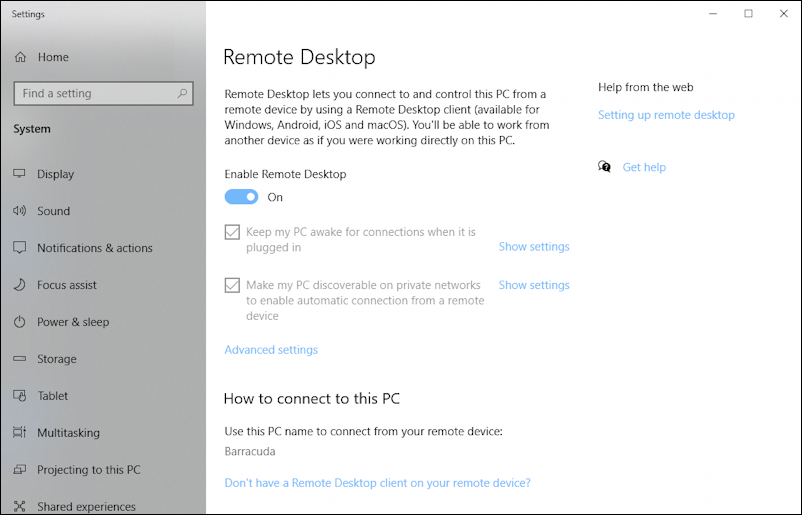
There are a variety of reasons you might want to enable Remote Desktop, particularly if it’s a company PC and they do remote administration, but for most non-corporate users, this should not be “ON”, as shown above, but “OFF”. Click or tap on the slider button to disable remote access.
Remember, if you do need someone to occasionally do remote admin, they can always ask you, you can enable it, and then disable it when they’re done. Safer than just leaving this access open and available.
HOW TO DISABLE MICROSOFT QUICK ASSIST IN WIN10
While you have the Control Panel open, search for ‘remote assistance‘ in the search box in the upper left corner. You’ll get this result:

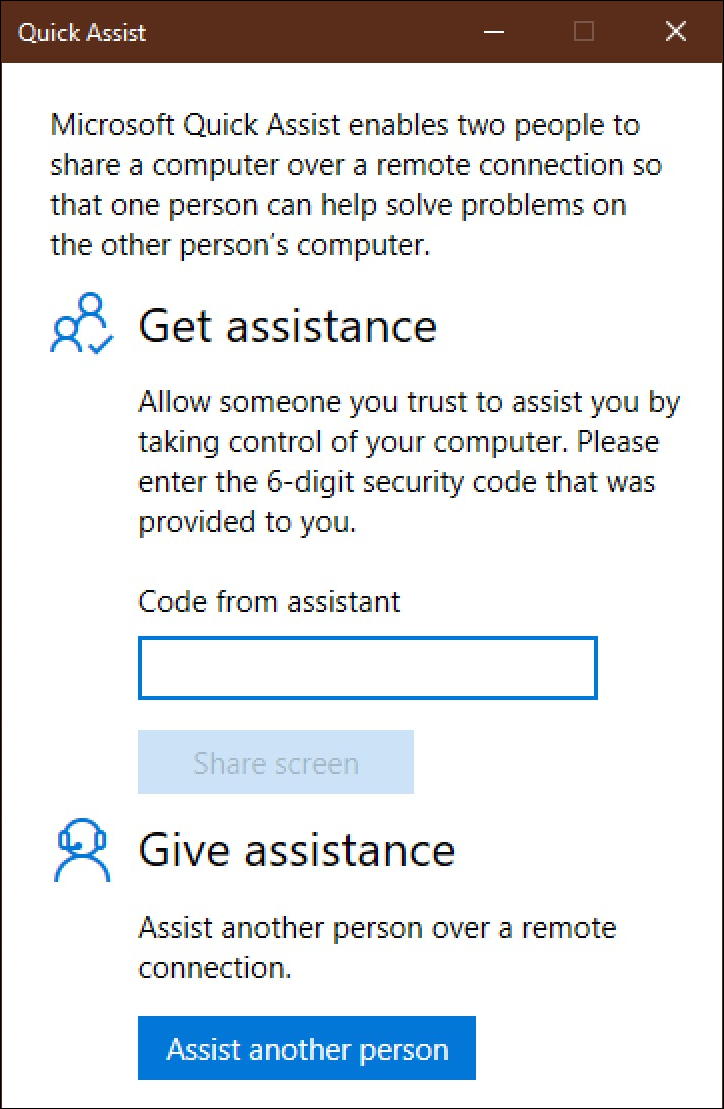
This is somewhat like Remote Desktop Lite and can be helpful, but generally speaking, I recommend that you disable it unless you need it. Remote Assist – known more generally as Microsoft Quick Assist – lets you temporarily grant someone access to your computer and is a separate app in Windows 10, as you can see here:
To disable it, go back to the Control Panels and choose “Allow Remote Assistance invitations to be sent from this…” in the search matches pop-up as shown earlier. Here’s what you’ll then see, an old school Windows settings window:
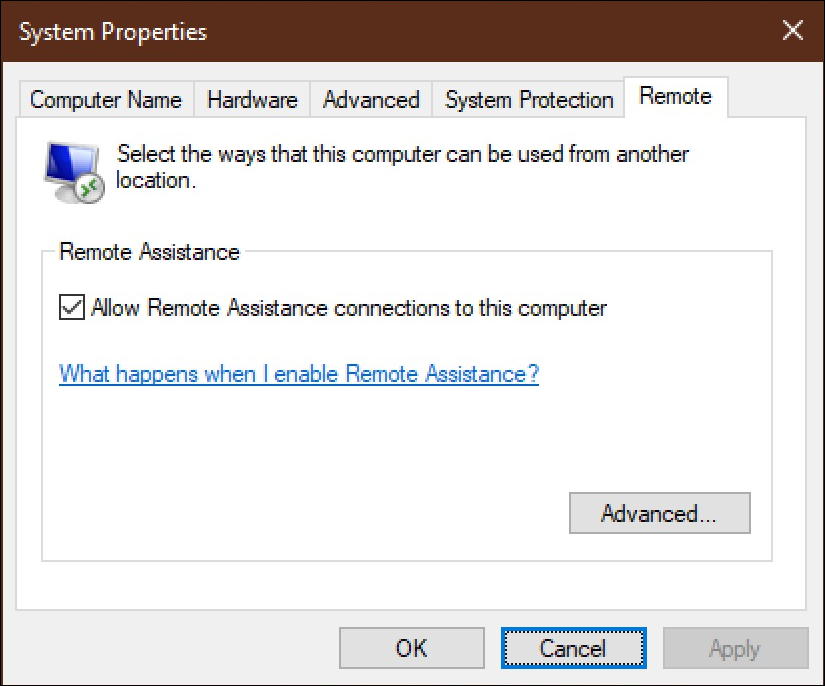
Again, I recommend you uncheck the box labeled “Allow Remote Assistance connections to this computer“. Another hatch battened down!
One more thing to check…
HOW TO DISABLE REMOTE FILE SHARING IN WIN10
The other possible access point for remote users is through file sharing. Generally speaking, file sharing is a terrific benefit and can offer lots of benefits, but obviously, you want the right people to be seeing your content, not the world at large.
The easy way to check and see if all is good is to go into File Explorer and right-click on a folder. Like the Local Disk (C:) drive itself:
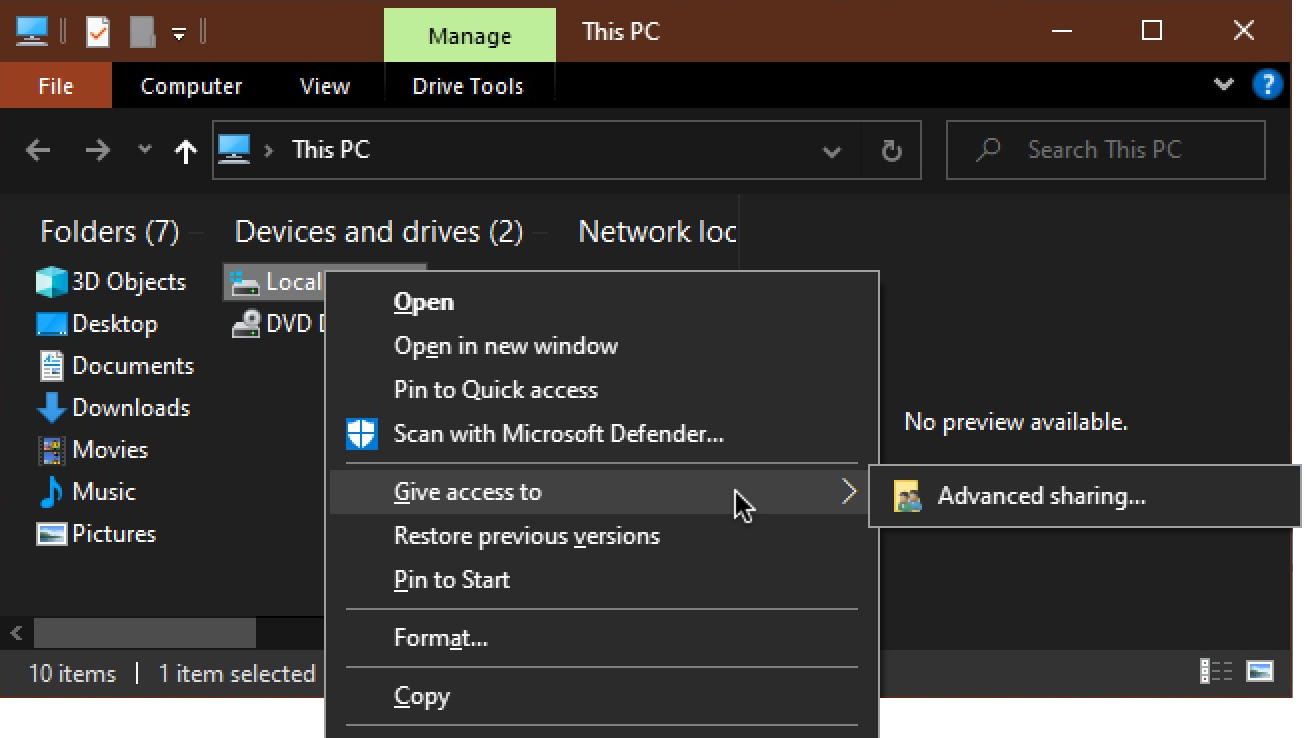
As shown, the latest version of Windows 10 offers a “Give access to” menu option which then leads to “Advanced sharing…“, as shown. Choose “Advanced sharing…” and you can quickly assess if that particular folder or device is opened up for sharing or not:
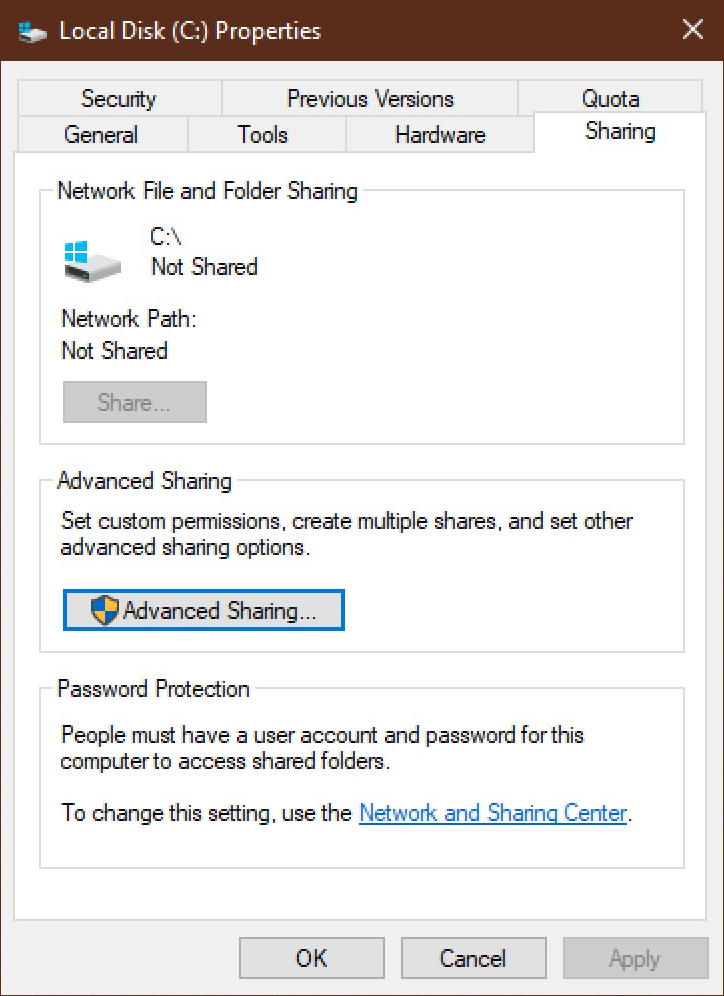
This one’s safe. Phew! If you have a folder or two with critical personal information, you can duplicate these steps to ensure that it’s not being shared without you realizing or even disable sharing.
Finally, once you’ve gone through these steps to ensure that the obvious doors onto your system aren’t open, it’s time to run a malware scan and remove any and every program that you are no longer using. That fun game you haven’t played for four years? Delete it. The cute cursor utility and fancy new toolbars for your Web browser? Definitely want to axe ’em. The best way to do so, remember, is through Control Panels “Add or Delete Programs”, which will ensure all traces are removed, not just the main program.
That’s it. Between all of these steps, you should be able to rest assured that the chances of someone creeping onto your computer have just been greatly diminished through your efforts. Hatches all battened down.
Pro Tip: I’ve been writing about Windows since way before Windows 10. Heck, I’m a Windows Insider MVP too. All this means I have a lot of really helpful Windows 10 tutorials here on the site, so please do check ’em out while you’re visiting. Thanks!
How safe is file sharing with specific users on a home computer network group?
Just one question: What about a FIREWALL?!