
I got a new Samsung Flip 5 Android phone and really love it, but I notice that when I show the shortcuts screen, it has tons of shortcuts I’ll never use. Can I get rid of them to clean things up?
Congrats on acquiring what’s more formally known as the Samsung Galaxy Z Flip 5 smartphone. I’ve been testing one out myself and it’s a really cool design with that great half-size front screen (which you can customize quite a bit, see my tutorial: Customize your Flip 5 Cover Screen Design). Like all Android phones, however, there are lots of otherwise hidden shortcuts and features you can access with a swipe from the very top of the display. Swipe twice and you’re looking at the Shortcuts Screen, chock-a-block filled with handy feature shortcuts.
Of course, which shortcuts make it onto that screen is absolutely a function of what Samsung figures the average user wants to access, layered atop what the Android development team thinks are the most useful shortcuts too. Have too many of them and they’re not really shortcuts anymore, so it’s a tricky balance. The current design offers up 12 shortcuts per screen, which is already rather a lot of choices, but if they’re at least ordered based on your preferences, it’s much better than nothing!
FINDING THE SHORTCUTS SCREEN IN ANDROID 13
Grab your Samsung Flip phone, unlock it, and swipe down from the very top of the screen. You’ll see a quick view of your Notifications:

This is super handy and a view I reference endlessly, particularly if I notice a Notification but don’t have time to read it fully. Better, each is tied to the associated app or feature, so tapping on it will take you to the right spot, even if it’s in the Settings app. Too many email notifications? Tap on “Clear” on the lower right to get rid of ’em.
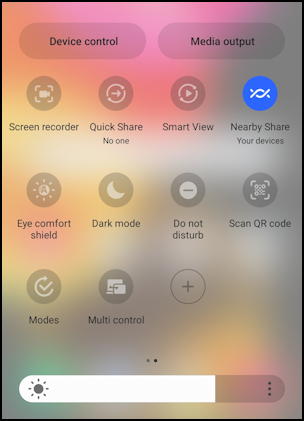
But this time, swipe down from the top a second time and you’ll find that there’s even more of value, the Shortcuts Screen:

Lots of these are really useful, including being able to turn on and off Wi-Fi, Sound, Bluetooth, etc. Generally, if it’s blue, it’s enabled and a tap will disable it. If it’s greyed out, a tap will enable it. Some you can tap and hold to get further options. For example, tap and hold on the Wi-Fi shortcut and you can switch wireless networks with ease!
See the two tiny dots along the bottom of the shortcuts area? Those denote that there’s more than a single screen of shortcuts: Swipe right-to-left to view the second screen, and so on if you have three or more.
REMOVE AN ANDROID SHORTCUT
Let’s get rid of the “Wi-Fi Calling” shortcut since I know I’ll never need access to that as a separate shortcut. To do that the easiest method is to swipe across to the last of the Shortcut screens, which reveals a “+” button:
Even though we’re going to remove a shortcut, tap on “+” to go into the Edit mode. It’ll show lots more shortcuts you could add, but for now, just ignore them:
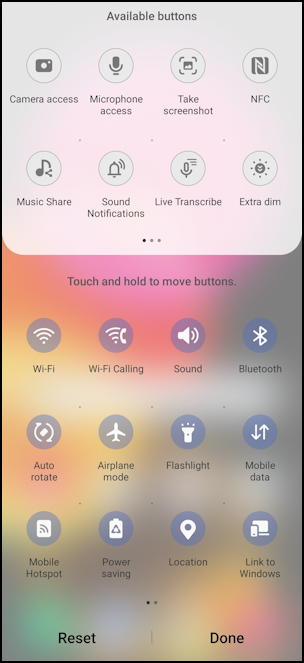
Notice that while the Edit screen was displayed, I swiped left-to-right to move back to the first screen of shortcuts. This reveals the “Wi-Fi Calling” shortcut. To remove it, I simply tap and hold my finger on the shortcut icon until it wiggles, then drag it up into the Edit window. All the other shortcuts will automatically shift to fill in the hole. Done.
To reorder shortcuts, by the way, you can use the same gesture: Tap and hold, then once it’s wiggling, simply drag the shortcut to the spot you’d prefer. A minute or two of reordering these can yield lots of saved time later!
ADD A NEW SHORTCUT BUTTON
Instead, what if you want to add a new shortcut? Peruse the many options and pick one. I’ll choose “Live Transcribe”. Again, tap and hold on the icon (yes, in the Edit window) and once it’s wiggling, drag it onto the main Shortcuts area. Lift your finger and poof! it’s added:
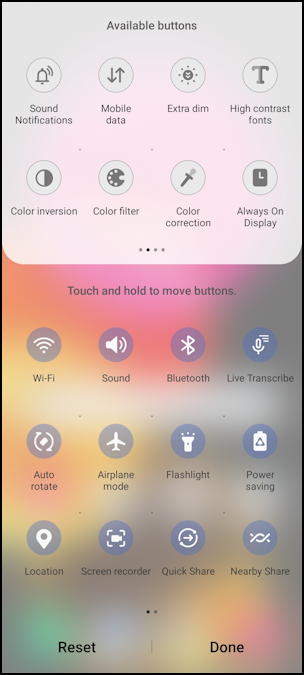
Can you see “Live Transcribe” on the top row? Once you’re done with your editing, simply tap on “Done” on the bottom of the screen to save the updates.
To test it, simply drag down from the top twice. The result after my edits is definitely more useful:

That’s just the tip of the iceberg related to ways you can customize your Android 13 experience. Keep experimenting and please do check out my extensive Android tutorial area for lots more articles on cool and useful tweaks and updates while you’re here too!