
Every time I join a Zoom meeting with my earbuds, the audio comes from my computer speaker. Is there some way to switch speaker and microphone in Zoom before joining the actual meeting? And what if I have a separate camera?
While the most common error I see in Zoom meetings is that people start talking without noticing that they’re still on mute, having the wrong audio source has to be a close second. The sad fact is that most built-in webcam and microphone setups on modern computers are pretty poor or downright crummy. Undoubtedly laptop and computer designers never anticipated we’d spend a year or more on video calls instead of meeting face to face for work, school, and personal entertainment. I definitely expect that the next generation of laptops is going to have significantly better built-in cameras and microphones, but that’s another discussion entirely.
The rise of personal audio gear, particularly wireless Bluetooth earbuds and headphones that include a built-in microphone, coupled with the increasing popularity of “gamer” headphones with little boom microphones for maximal audio quality, means that quite a few people have better audio gear, they just have to plug it in. And figure out how to configure Zoom to use that gear, of course, because it’s hard to anticipate what the program will choose as your default speaker and microphone when launched. Add an external webcam (one of the best ways to improve your appearance on video calls) and it can get pretty complicated!
CHOOSE SPEAKER AND MICROPHONE BEFORE YOUR ZOOM MEETING
Next time you’re poised to join a Zoom meeting, instead just launch the program itself. In other words, don’t click on that handy Zoom URL in your calendar invite or email message (yet). Launch the program from your Programs or Applications folder and you’ll see something like this:
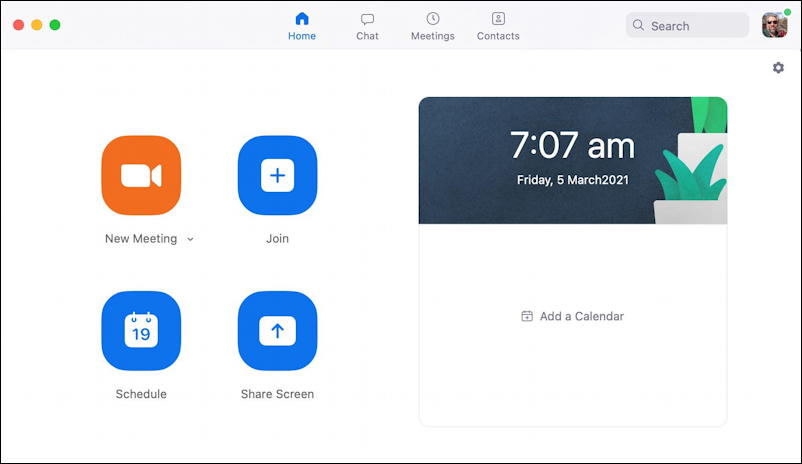
What most people don’t realize is that the tiny gear icon on the top right is accessible even before you start up your own meeting or join someone else’s meeting or webinar. A click on the gear icon and you’re in Zoom’s preferences and settings area:

In this instance, I’ve chosen “Audio” on the left side to get to not just Speaker and Microphone options, but additional useful settings too. Notice that Zoom has the ability to suppress background noise at varying levels, for example. Didja know you could enable that and avoid bothering others if the dog barks or other ambient noise? Handy.
More importantly, though, you can choose your audio output device – the speaker – and your audio input device – the microphone. Again, notice that I have the default for the mic of “Automatically adjust microphone volume“, but, as you’ll see momentarily, you can test and adjust the level manually too. I was on a Zoom meeting just yesterday where one person had their mic turned up to max which not only made them far louder than anyone else on the call (really annoying!) but they sounded horrible too because the mic was clipping. Not good and something he could have easily fixed from this settings window.
To choose a new speaker, simply click on the name of the current speaker shown. A menu pops up with choices:
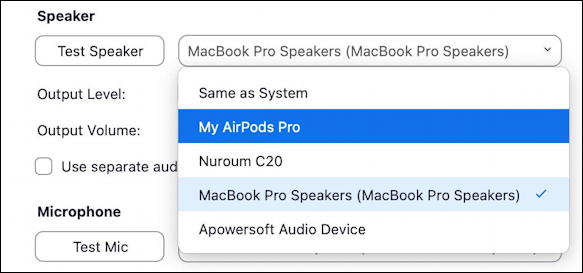
You can see that I have a large number of speaker options! “Same as System” lets the operating system itself decide, then I have my wireless Bluetooth AirPods Pro, the Nuroum C20 external conference device (you’ll see it in action in a moment), my MacBook Pro speakers (currently selected, as denoted by the subtle checkmark) and an internal “loop back” audio device for recording called “Apowersoft”. Choose the preferred output device and that will remain the default as long as it’s available.
For microphones it’s the same sort of process:
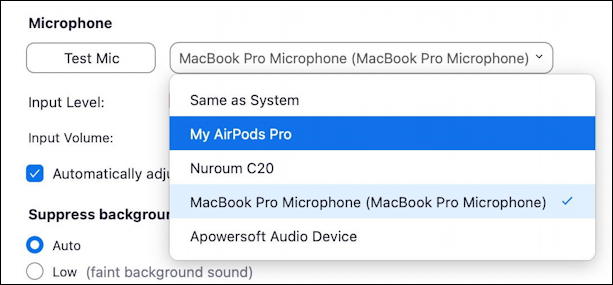
If I choose “My AirPods Pro” for both input and output, then the audio of my subsequent Zoom meeting will happen through that device. Note also that I can split things too, using my AirPods Pro for a microphone, for example, while having the audio output through my Mac speakers.
While you’re choosing a microphone for audio input, don’t miss that you can talk and see your input level from that device on the bar graph:
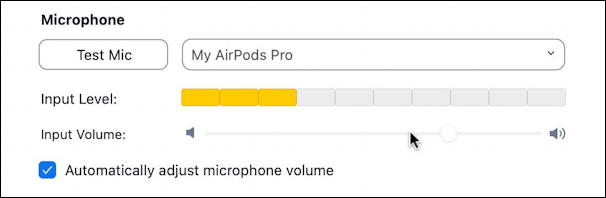
The best practice is that your normal speaking volume should be about 1/3 to halfway at most. The guy on my Zoom call with the terrible mic? If he would have just gone to this screen and tried his mic, he would have immediately realized it was set too high and slide the “input volume” down to fix it. Oh well. 🤨
HOW TO SWITCH CAMERAS BEFORE YOUR ZOOM MEETING
What about if you have more than one camera available? Given that you can buy a pretty decent external clip-on Webcam for under $50 (like this one) it’s a fairly painless way to improve your appearance in Zoom and any other program that uses video input. For this pre-meeting change, go to the “Video” option on the left menu:
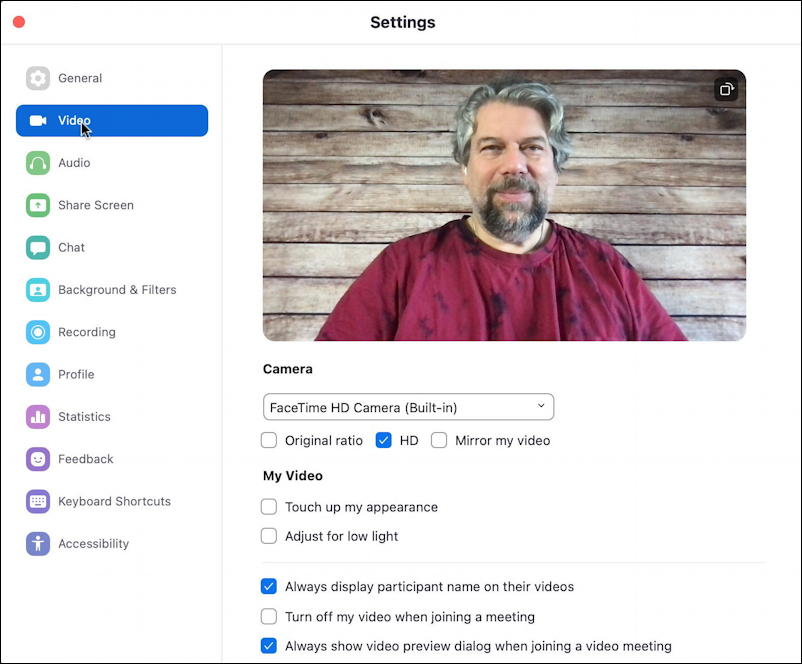
As you can see, I have the MacBook Pro webcam (known as “FaceTime HD Camera”) as my video input source and I’ve checked “HD” to have the best possible picture resolution used. Again notice the other options here, including “Touch up my appearance“, “Adjust for low light” and “Always show video preview dialog when joining a video meeting“. It’s easy to change these to match your own preferences.
But this is also where you can choose from multiple video sources:
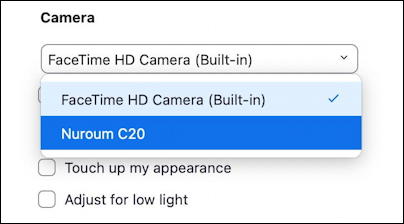
The video preview window is live, so you can easily confirm it switched as you desire.
But what if you’re already in your Zoom meeting?
SWITCH SPEAKER, MICROPHONE AND VIDEO IN A ZOOM MEETING
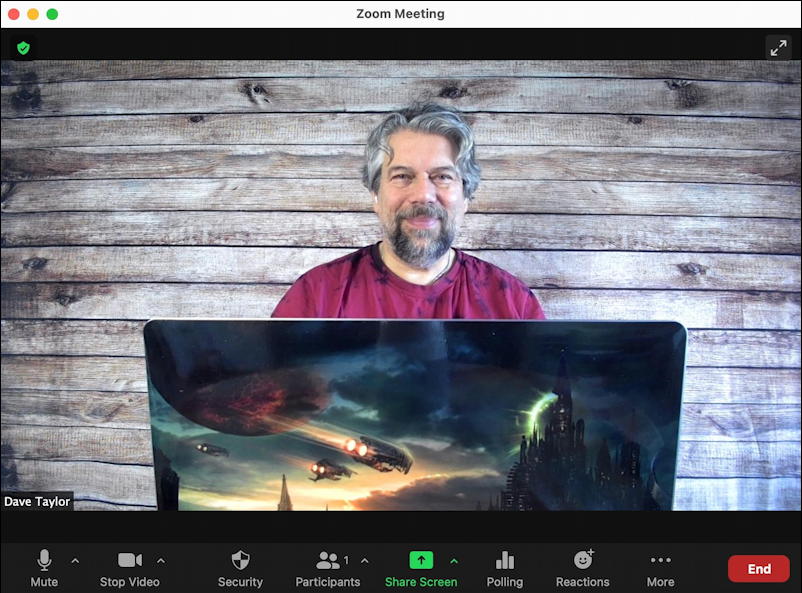
If you’re already in the meeting, you can still easily switch all of your various input and output devices. Indeed, it’s all accessible directly from the Zoom toolbar. Here’s my Zoom meeting up and running, waiting other people to show up:
People don’t notice that adjacent to both the Mute and Stop Video icons on the lower left of the toolbar are little up arrows. Those are really important! Click on Mute and your mic is muted on/off, but click on the up arrow immediately to its right and an entire menu pops up:
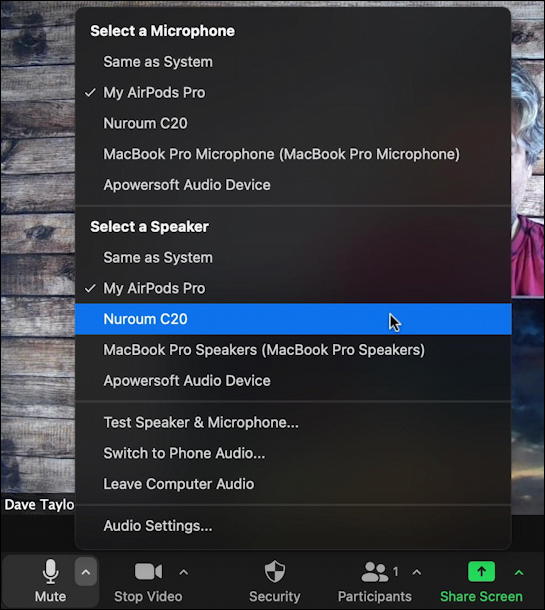
As shown, it’s here that you can choose a different microphone and speaker while live in a Zoom meeting. You can even jump to the settings window where you can test both audio input and output devices. Darn handy, actually.
Not only that but the up arrow just to the right of the Stop Video (which is the video equivalent of “Mute”, right?) also brings up a menu, this one offering access to different cameras and more:
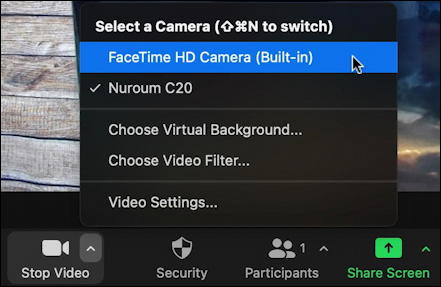
You can also explore Zoom virtual backgrounds and Zoom filters, but most importantly, you can switch cameras. Heck, there’s even a keyboard shortcut to jump from camera to camera if you want: On the Mac it’s Shift-Command-N.
So that’s all your various options. This should get you up and running with the right microphone, speaker, and video camera combination every time! Now about that mute button…
Pro Tip: I’ve been writing about Zoom – and teaching Zoom classes! – since the rise of Zoom as a popular video conferencing tool. Please check out my ever-growing Zoom help area for lots more useful tutorials while you’re here. Thanks.
Dave,
I purchased a NexiGo USB Webcam. I had to down load OBS software. I am able to turn off my laptop camera and view the Nexi cam. I have yet to use it in a Zoom meeting. When I do join a meeting, my laptop camera turns on. Do I have to wait until I am in a meeting to switch to the external webcam? Can I do it prior?
Thank You
Stay safe
Depends on the meeting software settings, but you might end up having to change it every time you restart your meeting app.
Hey Dave
Thanks for this article. I (almost) found the answer to my problem with ‘a keyboard shortcut to jump from camera to camera if you want: On the Mac it’s Shift-Command-N.’
I run my Zoom meeting on PC. Do you happen to know the Windows shortcut equivalent?
Thanks
Mo
Go into Settings > Keyboard Shortcuts to see what your options are with Zoom on Windows. Bonus: You can customize the shortcuts too, if you really like the Mac sequence. 😁
Alt-N is given as the shortcut for switching cameras under the Settings