
I want to create a folder on my Mac that always shows me the largest files on my system. I believe that’s what “Smart Folders” are for in MacOS X, but I have no idea how to work with them. Can you give me a quick tutorial, Dave?
MacOS X has a lot of really cool features that are possible because both the file system and the computers themselves are so darn fast nowadays. Back in the day you’d have to do a search for files by size, sort them, limit the results to just the largest and then slog through the list file by file. Today, however, your Mac includes a feature in the Finder called Smart Folders that let you use all sorts of criteria to keep track of what’s in your file system by size, date, permissions, filetype and much, much more.
The problem is, it’s not very obvious how it works – mostly revolving around a tiny, unlabelled button – and easily overlooked by even sophisticated Mac users. Heck, I have been on Mac systems since the 512K Macintosh (yes, the “fishbowl”) and I had to dig around in Apple’s online help system to make sure I was setting these up correctly. But you already have one on the Finder Sidebar without it being advertised as such: “Recents”.
What you seek is actually probably one of the most common uses of Smart Folders in MacOS X too: keeping track of the very biggest files on your file system.
To start, go into the Finder and choose “New Smart Folder” from the File menu:

A Finder Window will show up that looks barely at all different from the regular Finder window, other than that it’s empty:

The difference is the Search bar. What’s important is the most subtle of items on this entire window, however: That tiny “+” to the right of the Save button. That’s the key to this entire task, and why it’s so dang small I can’t explain.
Click on “+” to proceed and some criteria for a search shows up:

You can specify Kind is PDF, or Application, or Movie, but instead, click on the word “Kind”.
Note: Your Mac might have a different default criterion for your Smart Folder search. In that case, click on it instead; sometimes it’s Name or Last Opened.

You can see all the basic options here: Kind, Last opened, Last modified, Created, Name and Contents. But there are more criteria. So, so many more. Choose “Other…” and you’ll see:
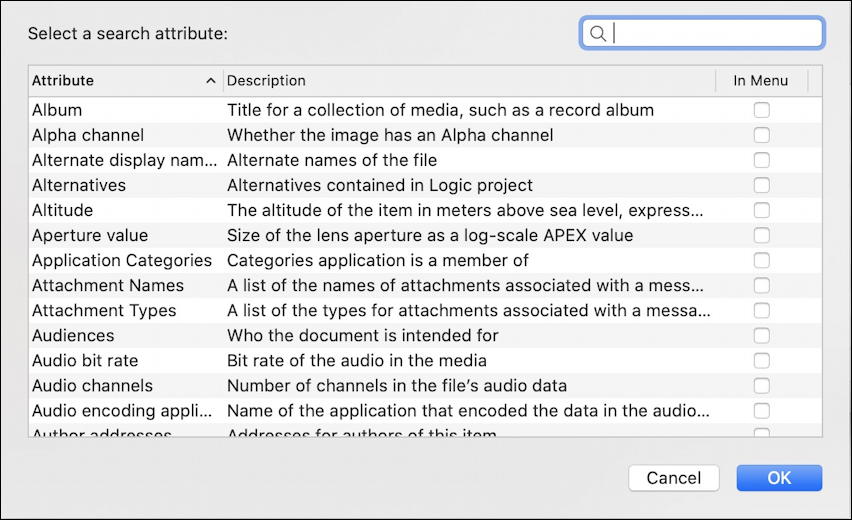
It’s quite an overwhelming list, actually, and I don’t even know how some of these are calculated. What’s Audience, for example? You can scroll through and see all the specialized criteria or just use the search box (a list with a search box!) to type in “size”:
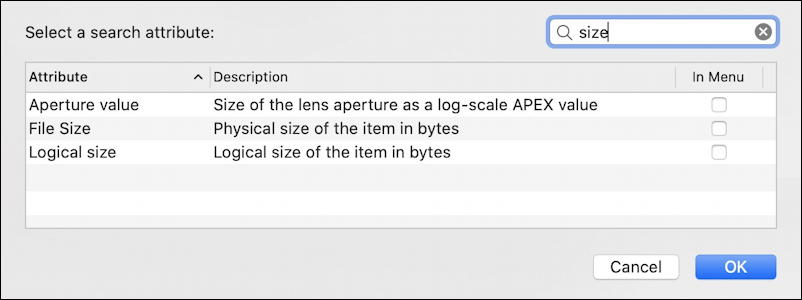
You can see that there are three size related criteria for a Finder smart search (and the resultant Smart Folder). The difference between “logical” and “file” sizes are related to the way the file system is structured, but you can ignore it. For this task, just choose “File Size” and click “OK”.

Now you can fine tune your search. I’m going to choose “greater than”, and “GB” as the unit of measure, then use ‘1’ as the actual search value:
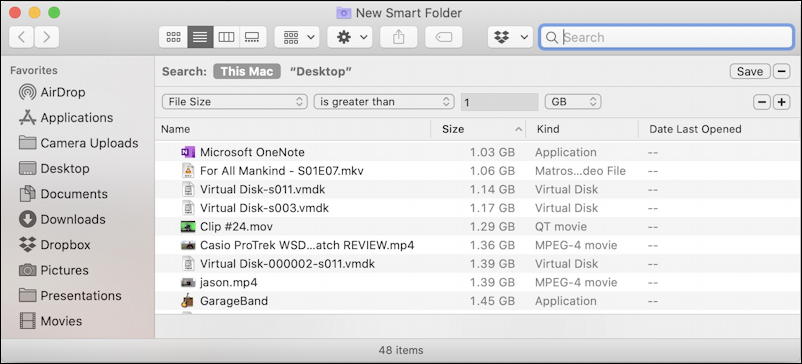
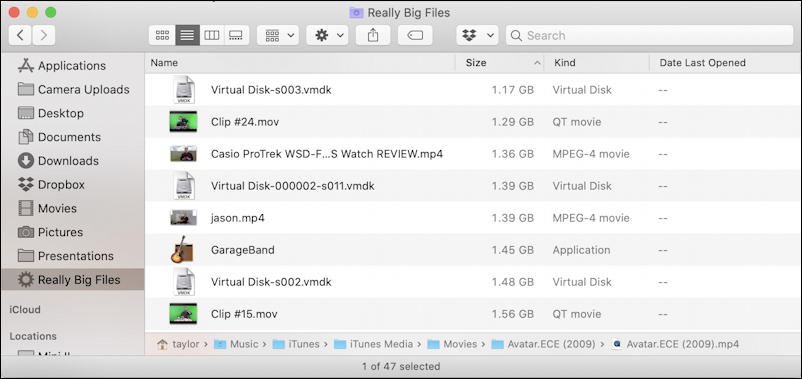
You can see my search criteria in the above, and the 48 items that match. 48 items greater than 1GB in size! No wonder I run out of disk space all the time 🙂
This is now a smart finder window, so you can click on a column head to sort differently, you can even click on an item – like “jason.mp4” to find where it’s stored on the MacOS X file system:

Ah, it’s in my Dropbox folder in the subfolder “videos”. I forget that was sitting there – taking up 1.39GB of space! – and it’s time to get rid of it. But rather than be sidetracked, let’s make this search results window a Smart Folder.
That’s easily done: See above the tiny “Save’ adjacent to the “+” button? Click on “Save” and you can specify a folder name and location:
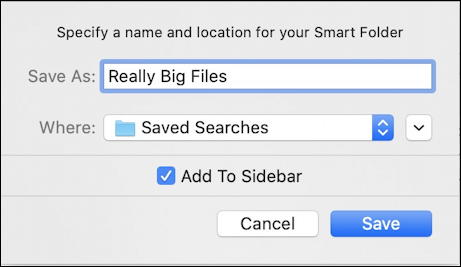
Choose the “Add to Sidebar” and it’ll also be in the Sidebar of every Finder window you open from now on:
Easy enough. Now I need to go clean up some really big files and free up some disk space!
Pro Tip: I’ve been writing about the Mac and MacOS X since, well, before the “X” was involved. Please check out my extensive Mac help library for hundreds of useful tutorials!