I was quite interested when Apple introduced its idea for temporary email addresses for iPhone users. I sign up for things online all the time and would love to keep my real email private. How can I start using the secret relay email addresses in iOS15?
There have been “anonymizers” on the Internet for many years, ways for people to have a different address to shield their identity for a variety of reasons. In the spy world, people like James Bond would call this service a “cut out”, but I digress! The problem with most of these is that they were difficult to set up and almost impossible to delete once you had an account. You could sign up for more email accounts on Gmail, Hotmail, AOL, Yahoo, etc, but then you have to move between them to check all of those inboxes. Very inefficient.
Worse, it seems like a significant percentage of the companies that invite you to set up an account for commerce, email, food ordering or similar then go and sell your email contact info to others who either spam you or send you legit email, even though you didn’t sign up for their lists. Yeah, that’s spam too, but I differentiate it because they’re real companies, not questionable enterprises often from far overseas.
YOU NEED ICLOUD PLUS
In any case, it’s a problem. And Apple has an elegant solution to it with the new Hide My Email feature that’s part of iCloud Plus. Don’t pay for upgraded iCloud storage? You might not have this feature, but don’t worry, the extra space and all these features can be as inexpensive as $0.99/mo. Go into Settings on your iPhone or iPad, choose Manage Storage, then choose Change Storage Plan to see what options there are and how much they’d cost. On a Mac? You can use System Preferences > Internet Accounts > your current iCloud account > then Manage… button on the lower right, then click on Buy More Storage.
Okay, with all that out of the way, let’s see what Hide My Email can do!
HOW TO ENABLE HIDE MY EMAIL
I’ll offer up all of these instructions for the iPhone as that’s the most likely platform people will be using. I’ll start out by going into the Settings app on my iPhone, then tapping on my name, then iCloud. Finally, I’ll be here:
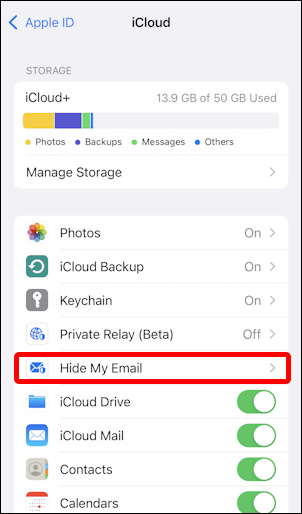
Look closely and you’ll see that I have 50GB of space for my iCloud backup. Not only that, but it’s shown as “iCloud+”.
The Private Relay (Beta) is pretty darn interesting to explore at some point, but it’s Hide My Email that’s the topic de jour, so tap on that…

By default, of course, there are no hidden email “relay” addresses set up. To start, tap on, you guessed it, “+ Create New Address“.
Tap on that and you’ll get a useful description of the service and your first relay address shown:
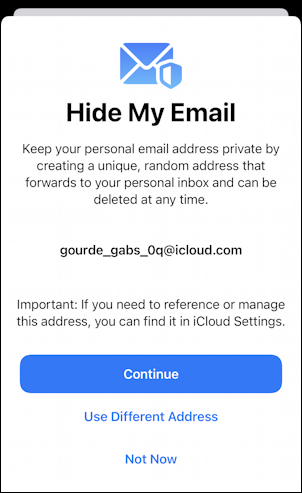
As shown, it’s offered up gourde_gabs_0q@icloud.com as a unique and random address. Don’t like it? Tap on “Use Different Address” and it’ll randomly generate a different address. Changed your mind? Tap on “Not Now” and you can back away from the setup.
But I’ll go for it. I’ll use this address for signing up for some services and lists. To set it up, tap on “Continue” and you’ll find that you can actually keep track of which address you’re going to use for which type of service:
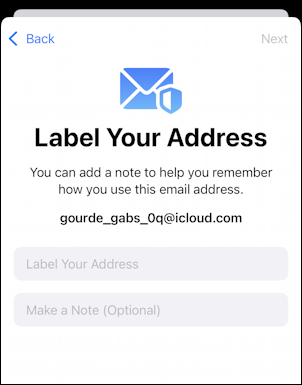
I’ll set these up by both adding a label and making a note:
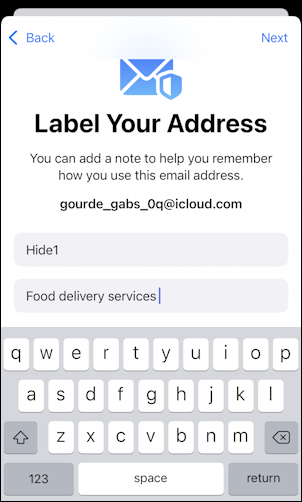
Probably it’ll work better to have addresses categorized by type or theme (e.g., “Car Lists”, “Political Groups”) but for now, I have it labeled “Hide1” and note it down as being for food delivery services.
Look good? Tap on “Next” on the top right to proceed.
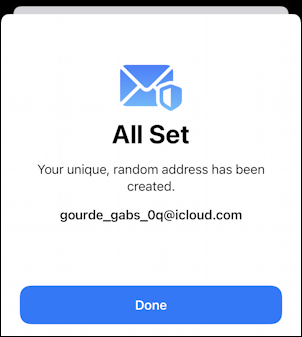
All setup! I’m now also known as gourde_gabs_0q@icloud.com.
So what does it mean? That emails sent to that address will be relayed to my existing iCloud inbox, and if I respond, it’ll be through the iCloud relay and have my email address rewritten as this hidden one.
TEST OUT THE NEW HIDDEN EMAIL ADDRESS
It’s easy to open up an email program and try sending a message to the new @icloud.com address. When I do that, here’s what I receive in Apple Mail:

Notice that the reply-to embeds the sent address (d1taylor@gmail.com) in a more complex @icloud.com address. Indeed, you can respond to this message and it will go through the relay. Not useful when you’re sending email to yourself, but you can imagine that a company is communicating with you due to a Web site where you signed up for their list; they never see your actual address and you don’t have to do anything special!
DELETE A TEMPORARY HIDE MY EMAIL ADDRESS
Decided you want to get rid of a temporary email address you’ve been using? That’s part of the service, with you retaining control of the lifespan of the temporary email address. To do that, go back into Settings > iCloud on your iPhone and get back to the Hide My Email screen. Now it’ll list the address or addresses you’ve set up:
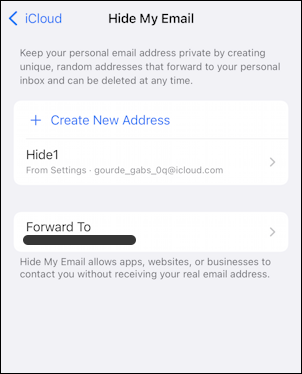
You can also now see how the label shows up but the note doesn’t. I need a better label!
Tap on the email address you want to remove and you’ll see more information about it:
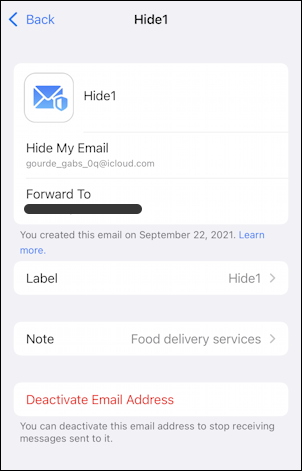
The label can be changed, the forward-to address can be changed, but most imp0ortantly, you can tap on “Deactivate Email Address” and sever the tie. Now the email address will bounce, not end up in your inbox. Try it – send an email to the address I had set up and see what happens. Yes, I deleted it.
All in all, it’s a very cool and simply implemented service from Apple for iCloud Plus subscribers. Definitely one worth utilizing if you like to sign up for things but hate getting endlessly increasing spam.
Pro Tip: I’ve been writing about the iPhone and iOS since the very first iPhone was released. Yes, I’ve owned every major iPhone model! I’ve also written quite a few iPhone help articles on a wide variety of topics, so please check ’em out while you’re visiting. Thanks!
