Ever in a spot where you have no wi-fi access but your iPhone has a strong signal? You might be able to use it as an Internet hotspot! Here’s how…
Few people realize that their modern smartphone is not only a capable portable computer and can occasionally even take a phone call, but that they’re also quite often able to act as Internet hotspots too. Now, I should mention up front that many cellular carriers require that you have a hotspot capable account, and you definitely have to be conscious of data usage: You do not want to stream Netflix at 4K with your smartphone!
I have AT&T as my carrier and am in an unlimited data account. When I use more than what’s “allocated” as my data, however, AT&T will throttle the connection (e.g., make less bandwidth available) so it’s not a good substitute all the time, but in a pinch, it works great. If you don’t have this enabled, talk to your cellphone company to find out what’s required, it’s often just a few dollars/month more.
STEP ONE: ENABLE HOTSPOT ON YOUR IPHONE
While you might already have it enabled, it’s worth starting in Settings to set a password for your hotspot connection on your iPhone. If you aren’t running the latest and greatest iOS, it’s a good time to update your phone too.
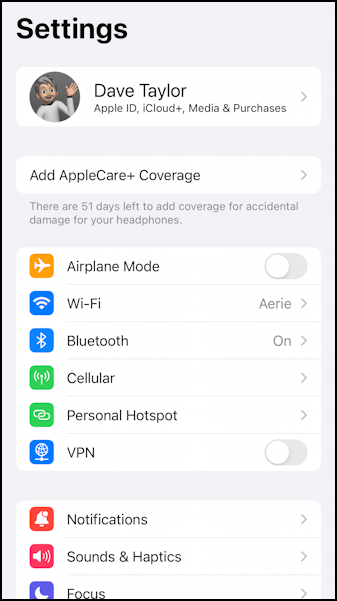
Notice in this first block of options the entry “Personal Hotspot“. If you don’t have that, you’ll need to talk to your cellular carrier about gaining that functionality. Since I do have that option, a tap on it reveals the settings:
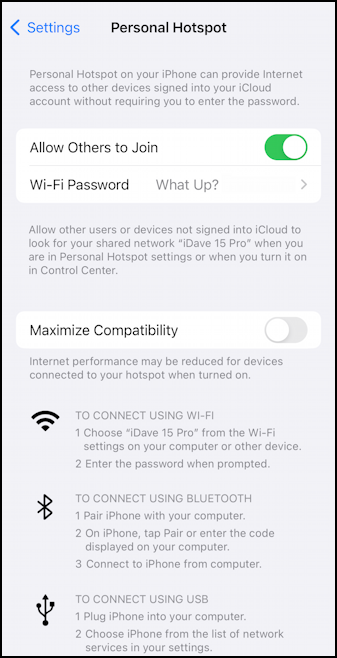
The first and most obvious step is to enable “Allow Others to Join“, which means it’ll be a publicly accessible Wi-Fi hotspot. That’s why the second and critical step is to set up a good password! Mine is cheery and easy to remember – “What Up?” – but still a decent enough password that it’ll stop curious folk nearby from tapping into my bandwidth. You can change the password by tapping on the “Wi-Fi Password” area.
Since I always connect with my Mac system, I’ve never had to explore the “Maximize Compatibility” option, but if you want to use your iPhone hotspot for Windows, Chromebook, even an Android phone, if it has issues, you can choose that to see if they’re resolved.
That’s all that’s required on the iPhone. Now jump onto the device you want to connect…
STEP TWO: CHOOSE YOUR IPHONE AS A NETWORK
The rest of the process is just as easy. Click on the wi-fi icon in the Menubar on your Mac and it’ll show up as one of the options:
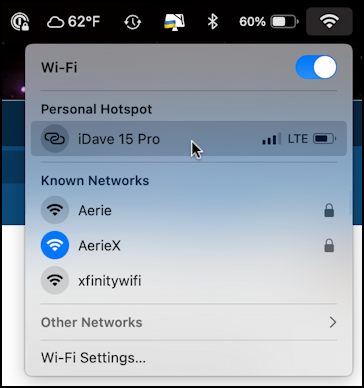
Notice that MacOS lists it as a different category of hotspot than the usual networks: “Personal Hotspot”. It also gets a different graphic, two links of a chain, rather than the more familiar three-curved-line wi-fi graphic. It also shows a lot of additional info: the strength of the signal from the phone, the network type that the phone’s access (5G is better than LTE), and the battery level of the phone. Choose it.
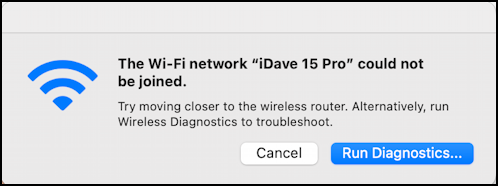
If you see an error message, you might want to forget the network on your device and try re-entering the password to ensure it’s the same as what your iPhone expects. In a moment you’ll see the “forget network” button, in case you’re unsure how to accomplish that task.
If you do connect, which should happen seamlessly, you’re ready to go! Not only that, but here’s what you’ll see on your iPhone:

Yes, it’s subtle.
CONFIGURING THE CONNECTION IN MACOS SETTINGS
The more technical way to connect to the iPhone hotspot also gives you more options for configuring the connection too, so let’s check that out. Go into Settings > Wi-Fi on your Mac system (or the equivalent on your PC, Chromebook, Linux system, Android, etc):
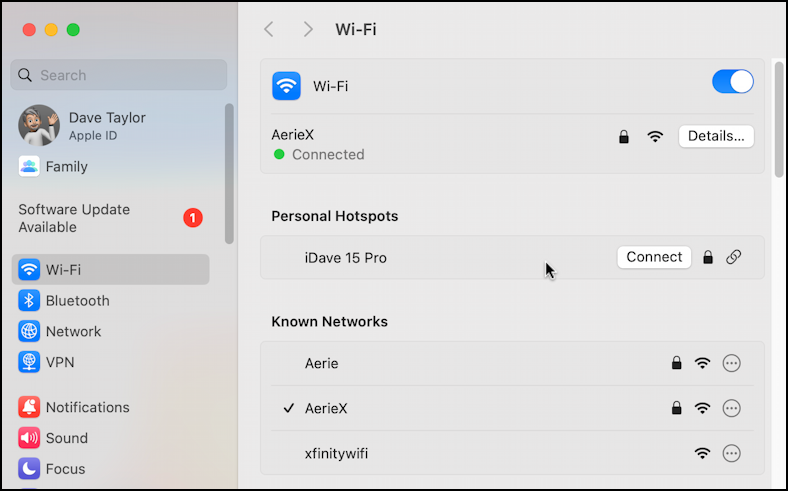
This also splits out Personal Hotspots from Known Networks, but here you can see that the hotspot also has a password (the padlock icon). A click on “Connect” will let you join… and this time you’ll be able to also access the “Details” button:

This is where it gets interesting if you’re a bit geeky. Click on “Details…” to configure your connection:
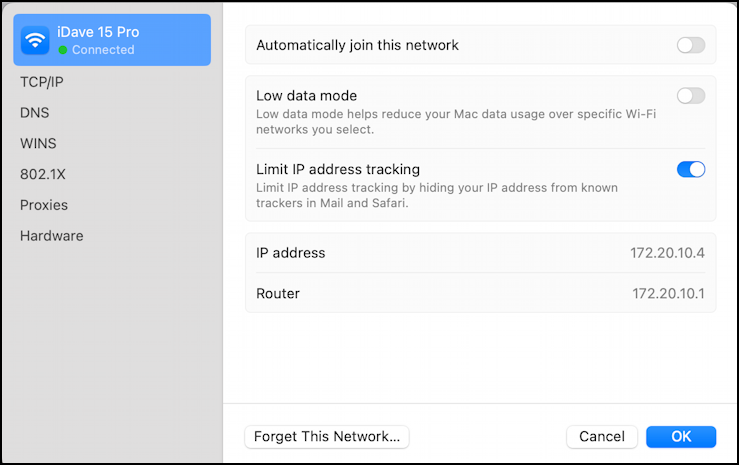
I would counsel against enabling “Automatically join this network” since you will generally get better performance from a Wi-Fi network than a cellular connection. If you are going to be relying on your iPhone for connectivity, it’s smart to also enable “Low data mode” for this connection [more info on these settings] to minimize bandwidth usage when connected to this particular network. Finally, for privacy, I always enable “Limit IP address tracking” and have never had an issue on any site or service.
Need to forget the network to try connecting again? Notice the button on the lower left.
That’s it. You should be able to use this to transform your mobile iComputer, err, iPhone, into a handy and always-ready Internet hotspot too.
Pro Tip: I’ve been writing tutorials for the Apple iPhone and the Mac since they were first released. Please check out my extensive iPhone help area and Mac help area for oodles of useful content.
