
I’m taking a class through the local junior college and my professor requires us to record our presentations and submit them as .mp4 movies. We’re also supposed to be on camera in an inset! How can I do that in PowerPoint on my PC?
There are actually a number of ways you can record yourself delivering a speech or presentation on your PC with an inset video from your Webcam. One straightforward option: Zoom. Open up a Zoom meeting in the Zoom app, share your presentation, press ‘record’ within Zoom, and you’re ready to go. Third-party apps like Loom offer similar functionality if you want to go that route too. But it turns out that Microsoft PowerPoint also has the ability for you to record a narrated slide show and can also record you on video and then export the resultant file as an mp4 video!
There are some caveats, however. Your computer needs a working webcam and microphone, and for best results, I recommend you position yourself in front of a blank wall or similar so you look good on camera. Light your face too, so you aren’t a dark silhouette (as too many people end up being on camera). Don’t worry, you can practice, test things out, record, and then re-record until you’re comfortable with this feature.
HOW TO RECORD YOUR POWERPOINT PRESENTATION
Let’s start by looking at how to find and prepare the presentation recording tools in Microsoft PowerPoint. I’m using the latest standalone app on a Gateway laptop running Windows 10. I’ve created just the first few slides of a presentation on Clubhouse, and want to practice recording my narration…
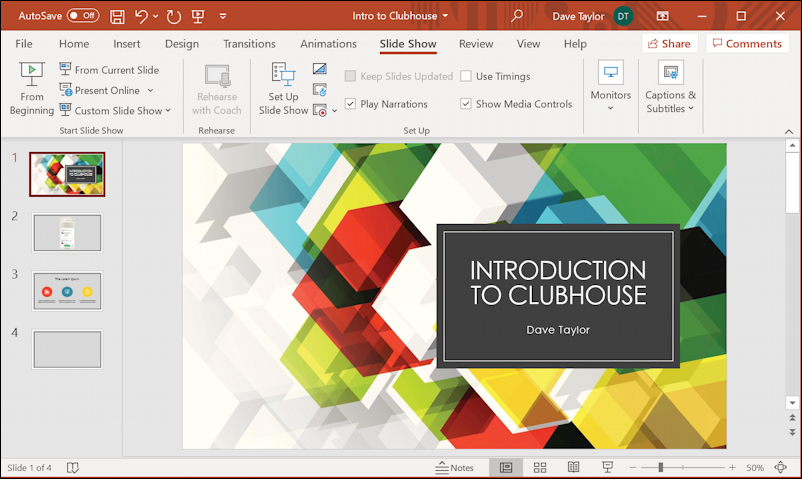
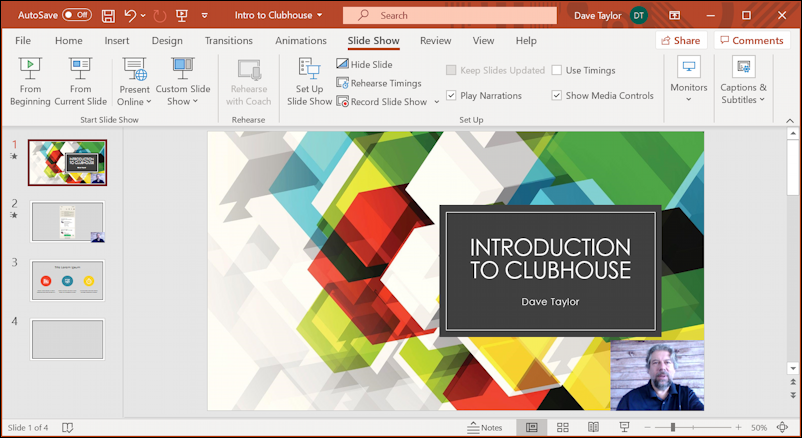
Your presentation probably looks similar. Along the top, just below the orange window frame, are the main categories of “ribbon”: choose “Slide Show“, as shown. But where is the record presentation feature? If the window were only just a little bit wider, it’d be much more obvious:
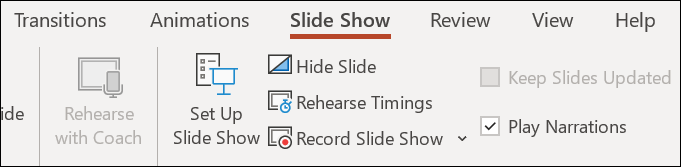
The tiny square with the even smaller red dot is Record Slide Show, as you can now see. Click on the downward facing “V” adjacent to that button and you can set up some basic configuration:
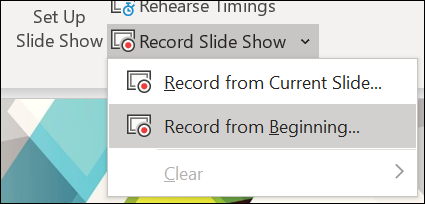
Odds are good you want to record a full presentation starting with the first slide, so choose “Record from Beginning…” and PowerPoint rather dramatically takes over the entire screen. Here’s what you’ll see:
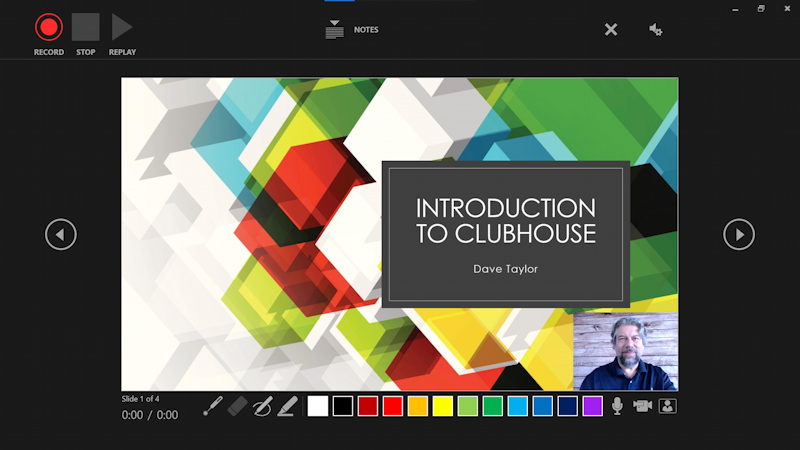
Notice along the top the standard record / stop / replay buttons, and that in the center you can choose to view your presentation notes (they won’t be part of the recording. PowerPoint is really smart about that!) and, on the right side of the top toolbar, the close “X” and audio/visual settings button. On the left is previous slide, the right is next slide and the bottom includes a running timer showing overall presentation time and time on this particular slide, followed by a long strip of annotation tools and colors. Finally, a mic, a video camera, and a tiny user icon. Want to record audio but not be on camera? Click on the user icon on the lower right corner and you can disable the camera, for example.
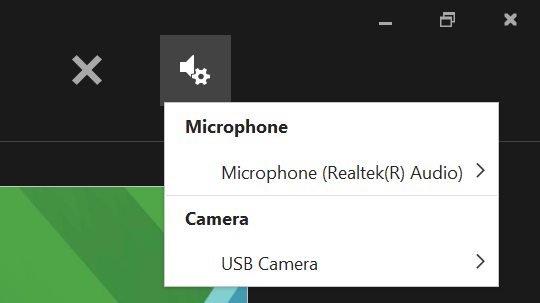
Start by making sure the camera and microphone are set correctly. That’s done by clicking on the A/V settings icon on the top right…
Looks good to me. Let’s do this!
RECORDING YOUR POWERPOINT SLIDE SHOW
To actually record yourself delivering the presentation in PowerPoint, take a deep breath, make sure you look good on camera in the little window, then press the red RECORD button on the top left. It’ll give you a 3… 2… 1… countdown and you’ll be recording!
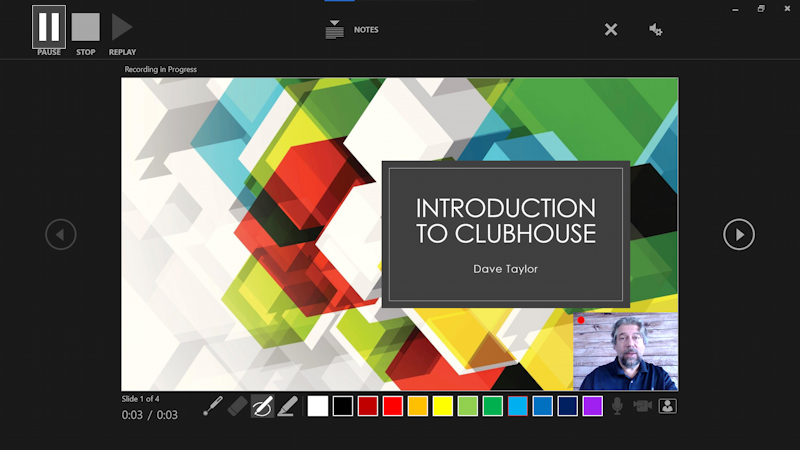
A few things to notice on the above image: The RECORD button has become a PAUSE button, the timers on the lower left are both now tracking time, and there’s a tiny red dot on the top left of the video inset window. Now, you’ll need to say something smart about your first slide and when you’re ready, click on the “>” on the right side to move to the second slide. Keep talking, it’s still recording!
Done recording? Click on the STOP button on the top left and those buttons will change to reflect that there’s a recording saved:

Press REPLAY and watch. You’ll see exactly how it all works, hear the potentially loud CLICK of you moving to the next slide, and generally get a good sense of whether your presentation is engaging and lively or showing instead that you’re distracted. Try re-recording until you’re happy with the results, and don’t be discouraged if it takes a few times through to get a good slide show.
Once recorded, click on the “X” on the top right and you’ll go back to the main PowerPoint window:
Notice now that the slide has the video inset on the lower right and that the ribbon includes some slightly different options, including “Present Online”. You can click on the “From Beginning” if you want to watch your slides show again, and why not? You did a great job!
SAVE YOUR POWERPOINT SLIDE SHOW PRESENTATION
Now that you’ve recorded your presentation, it’s time to save it. I recommend you first save the presentation as a PPTX presentation, so you can open it later and edit it as needed. That’s done by going to File along the very top and choosing “Save As…” on the left side:
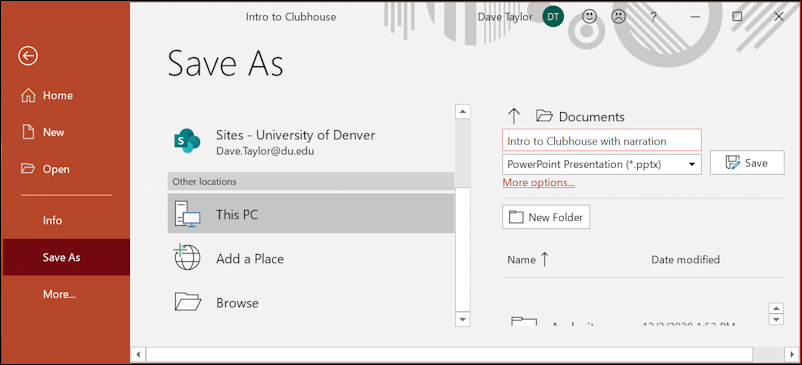
Notice that the filetype is still PPTX, the same as it would be with a regular presentation. This is confusing, but we’ll solve the problem by saving it as an MP4 movie a bit later…
I strongly encourage you to add “narrated” or “recording” or similar to the filename so you can know immediately which presentation is just the slides and which includes your narration recording. You can see at a glance the video and audio definitely adds to the file size:
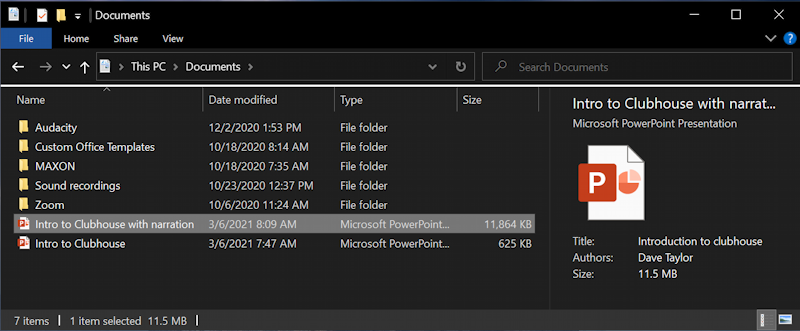
My slide show is a modest 625K, but once I narrate it, the new version explodes up to 11.5MB. Surprisingly, the MP4 will prove to be smaller than the PPTX that includes the narration.
EXPORT YOUR NARRATED SLIDE SHOW AS MP4 MOVIE
To export your recorded slide show as an MP4 movie, go back to the FILE menu, but this time choose EXPORT, as shown:
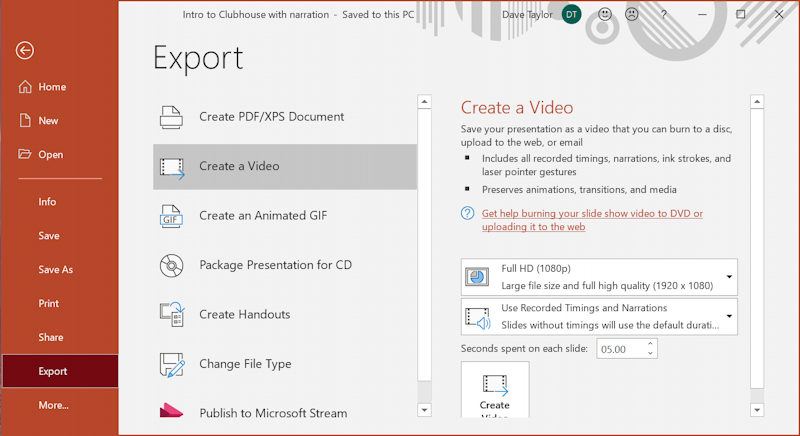
Notice that I’ve chosen File > Export > Create a Video. On the right side are two critical settings before you proceed: Video size and presentation timing. Let’s start with output resolution, which defaults to “Full HD“. Click and there are a lot of choices:
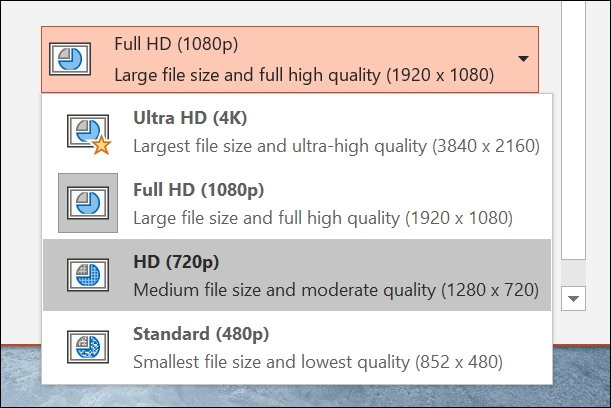
Unless you’ve been given explicit instructions to save as Full HD or Ultra HD by your professor, I strongly recommend you save in 720p. It’s good enough resolution it looks great full screen (or even on a TV or projected) but the file size is still modest. I recommend to my own students that they choose HD 720p for their presentations.
The second option to check relates to the timing of the presentation:
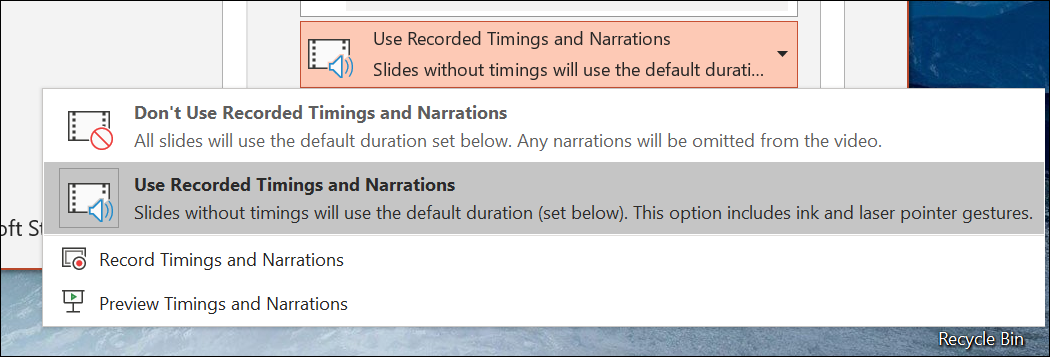
Rather long-winded options, but I definitely encourage you to choose “Use Recorded Timings and Narrations” to ensure that the recording you just made is the basis of the movie!
Once you’ve specified exactly what you want, choose “Create Video“, the button on the bottom of the screen. You’ll be prompted for a file name, as usual:
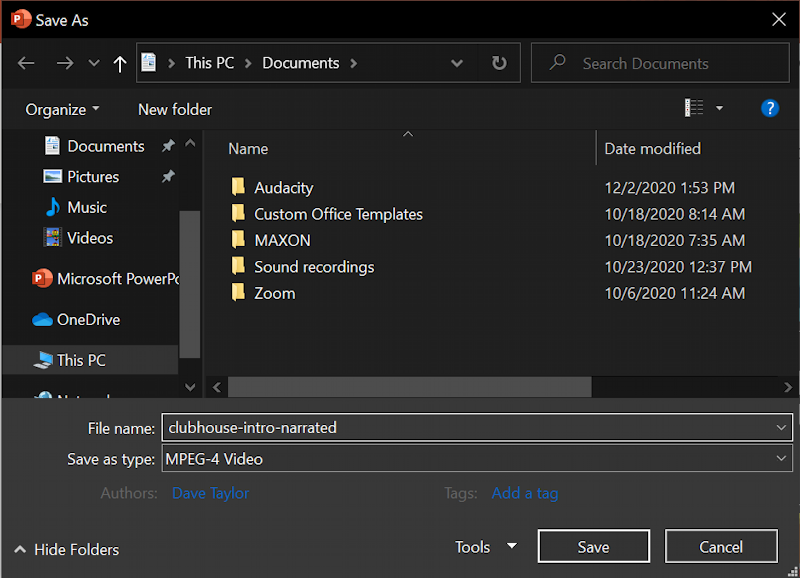
Notice that the format is MPEG-4 Video, the long, fancy name for “MP4”. Pay attention to where you’re saving it and click “Save” to proceed. Now you’ll see a progress bar along the bottom as PowerPoint does its thing:
![]()
Depending on how long your presentation is, this could take upwards of a minute or two. Patience!
Finally, you’ll have the .mp4 file that your professor requires:
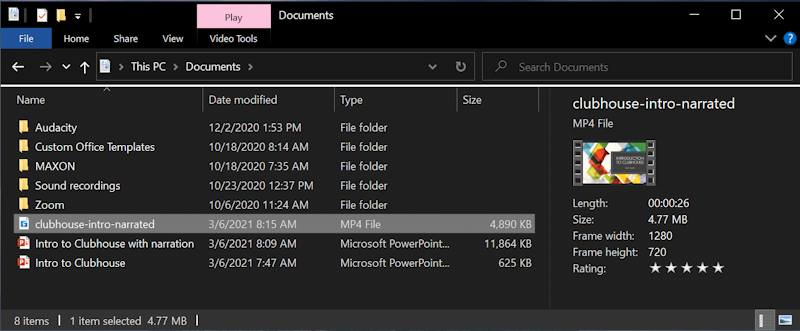
Notice that the original slides only file is 625KB, the saved PowerPoint presentation with narration is 11.5MB, but the MP4 movie is only 4.8MB. As I said earlier, it ends up being surprisingly smaller than the full PPTX file (if you choose 720p. Choose Ultra HD 4K and it’ll be quite a bit bigger!)
That’s it. Now you know how to record your presentation and turn it into a movie. Want to see the very beginning of my presentation? Here’s an excerpt of my Intro to Clubhouse:
(Don’t panic when I stop talking mid-sentence. I did that to keep the files small and easy to work with). Good luck with your class.
Pro Tip: I’ve been using and writing about Microsoft’s Office Suite for many years. Please check out my PowerPoint help library for plenty of useful tutorials, as well as additional Office help pages! Thanks.