
My son’s teacher wants him to record a short presentation about dinosaurs to share with his class but I’m confused about how to record video when not in Zoom. Is there a way to record the webcam with a Mac directly?
The short answer is yes, QuickTime Player, but let’s have a closer look. First off, I want to say that I rarely suggest that there be more applications on a computer system, but the recording capabilities of QuickTime Player should really be broken out into a separate app so people are aware of the additional features. Did you know you can record what’s happening on your screen while you narrate, for example? Or that you can easily record video captured by the webcam on your Mac system and even trim the start and stop times to make the output perfect? I might call it something like iWebcam to keep with the Apple naming conventions for applications.
Whether that separate app exists or not, however, the fact is that QuickTime has always been an underrated powerhouse of a program with far more capabilities than you would guess at first blush. Most people just figure it’s a video player since that’s part of its name, but QTP can also manage quite a lot of recording…
To start out, launch QuickTime Player and look at the File menu:
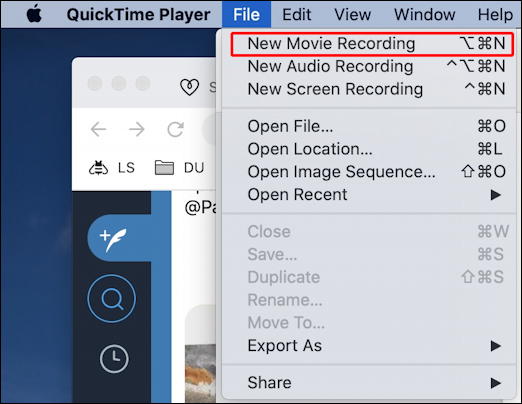
Choose “New Audio Recording” and you can capture a conversation, your son singing or your daughter practicing cello. Choose “New Screen Recording” and you can capture what’s happening on your computer screen to share with a colleague for training purposes or even to send to IT so they can help debug a problem.
What we want is highlighted: “New Movie Recording“. Choose that…
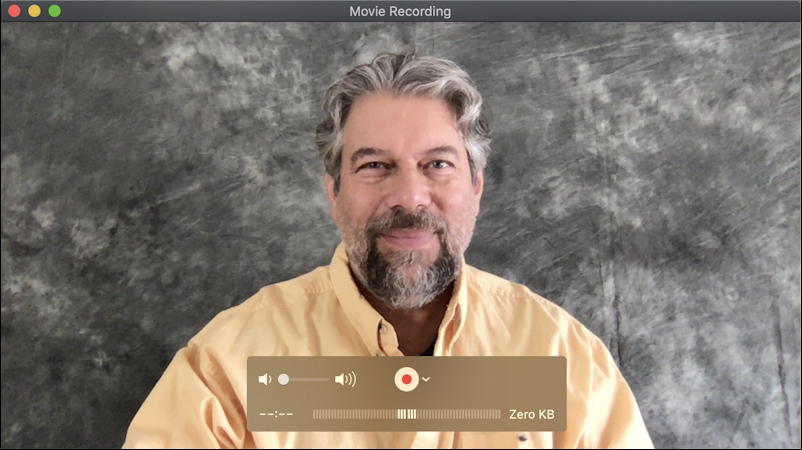
It turns on the webcam (notice the tiny green LED indicator light that’s always illuminated when the camera is in use) and you see a preview window of what’s in the shot – me, in this case! – and a floating control window.
That control window is pretty important to adjust so you ensure that you have everything set up properly. Start by talking. Does the bottom bar graph change to show the audio input? Good. Next, click on the tiny downward “v” triangle adjacent to the big red RECORD button. It pulls up a configuration menu:
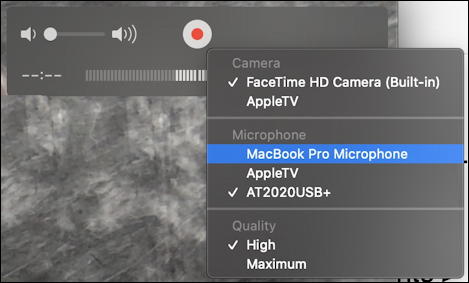
This is where you can fine-tune the settings. I use an Audio-Technica AT2020 microphone to improve audio quality and this is where I can ensure it’s properly selected. The webcam is called “FaceTime HD Camera (Built-in)” but it’s probably already selected if you can see yourself in the preview window. High quality is probably plenty sufficient for your son’s presentation, but you can experiment with “Maximum” too, if you prefer.
All set up properly? Close this menu and press the RECORD button on the control window, then start talking or let your son begin his presentation.
Tip: Remember to look at the tiny green dot on the top edge of your computer, not the middle of the screen, so the viewer sees you “making” eye contact!
Once you’re done you can do some rudimentary editing on the resultant video. Most useful is to trim the start and end points to avoid the ‘testing’ and adjustments for position, etc. Here’s a tutorial from Apple: How to Trim Video in QuickTime Player.
Done? Go back to the File menu and this time choose “Export As“:
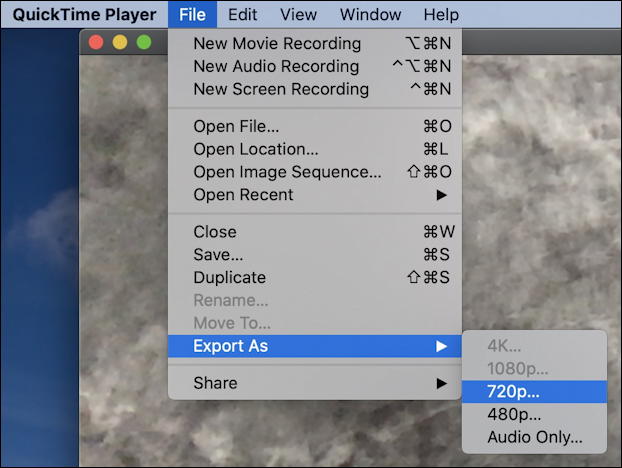
I would recommend that you export as 720p rather than the default 1080p, which will make for a smaller view window but a significantly smaller output file too. That’s it. Done. Now upload the presentation when ready and your son can go back to studying dinosaurs. And who doesn’t love dinosaurs?
Pro Tip: I’ve been writing about MacOS since the release of the very first Mac system. Please do check out my quite extensive Mac help area for tons of useful tutorials while you’re visiting. Thanks!
Hi! Thank you so much for this, I appreciate it so much! I was actually having a hard time using Quicktime because I didn’t know how to properly use it. Thanks to you, I now know how to use Quicktime because I followed your tutorial.