
My friend at work told me that she uses something called virtual desktops to keep her Windows computer uncluttered. She says it helps her focus. Sounds cool. What is it and how can I get started using it?
Implementations of so-called virtual desktops have been around for quite a long time in the computer world and it’s all based on a really simple idea: what if your computer desktop was bigger than what was displayed on the actual screen? The best analog is television: Your TV is simultaneously receiving hundreds of different screens of information (channels) but at any given time you’re focused on one channel and that’s what’s being displayed on the screen itself.
If you’ve ever changed the resolution of your screen in settings, you’ve seen that virtual desktop suddenly resized – and the resultant rearrangement of icons on the desktop that goes with it. Virtual Desktop support for Windows actually started a while ago, but until Windows 10 it was limited to people who installed the “Windows Toys” utility set from Microsoft. Now it’s baked into Windows 10 and is something every user should be familiar with for optimal efficiency.
It’s all accessed from the Task View button on the TaskBar. You should hopefully have something very similar to this on your own TaskBar:

Earlier versions of Windows 10 had a Task View button that was more horizontally oriented but this is the latest. Don’t have anything like it on your TaskBar? Right click on a blank spot on the TaskBar and ensure you have “Show Task View Button” selected:

Got it? Great. Now let’s have a look at my own desktop prior to clicking on that button. As you can see I have three apps running, a word processor, a Web browser and the Microsoft Store program, all overlapping, all competing for attention:

Now I’ll click on the Task View button and… be prepared to be amazed. It’s a whole new way to look at your Windows desktop!
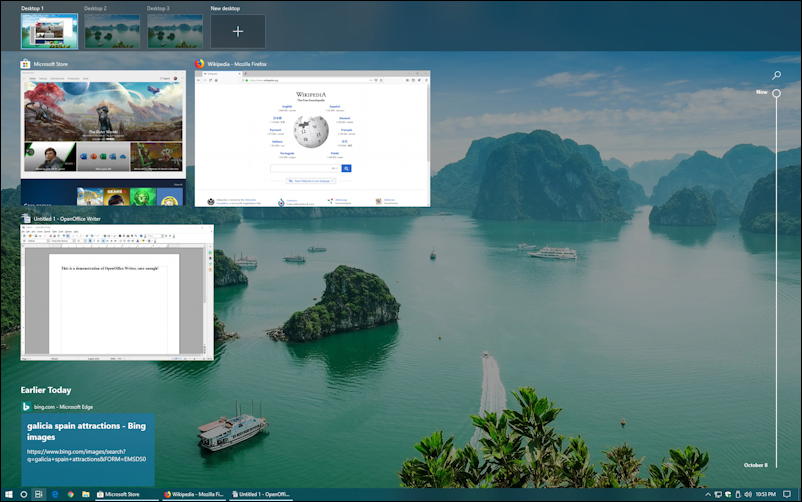
Notice that line on the right? That’s your timeline and it lets you browse through some of your app usage history (you can also disable it if you prefer not to have that recorded, though I recommend you leave the default settings). Try scrolling down to see what happens. Then scroll back to the top.
Check out how each program’s window has become a tile without any overlapping. However far down the pile an app window might be, popping into Task View makes it a breeze to find it and, with a single click, have it become the frontmost program.
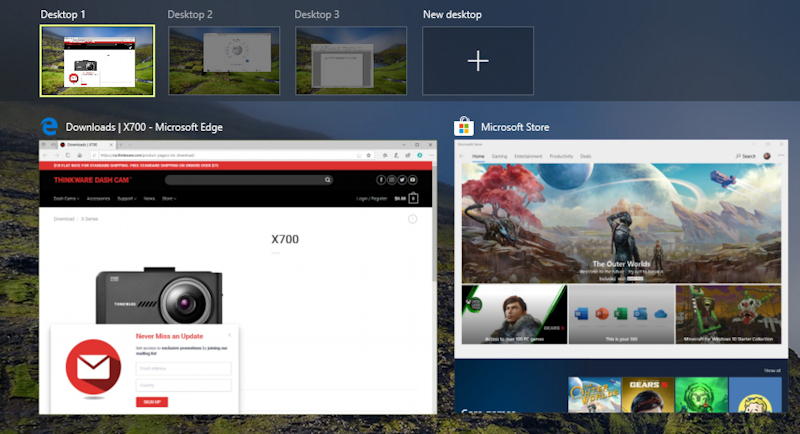
But what you really want to focus on is the very top portion, because that’s where the virtual desktops show up. I already have three set up, as you can see in this closeup:
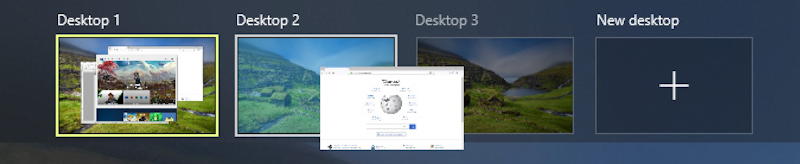
What’s really cool is that you can see I’m dragging a program’s window to a new desktop so that it has a space all its own to work with. Instead of the programs all piled up on a single desktop, I can actually neatly move them so that each has its own Virtual Desktop. Want more? Click on the New desktop “+” as many times as you want to create ’em.
And those items in the timeline? A single click and you’ll be right back where you were – and then you can move then to whatever Virtual Desktop you’d prefer. I demonstrate this with my Thinkware Dashcam X700 history entry, which launches Microsoft Edge and loads up the page I was viewing when I click on the timeline history entry:
It’s really pretty easy. Now click on the Task View button to go back to your most recent Virtual Desktop, or click on one of the desktops on the very top ribbon of virtual desktops to jump directly to that one instead. Want to move between them smoothly? You can use the super handy Windows+Ctrl+arrow keys: Windows + Ctrl + <– to move “left” on the ribbon, Windows + Ctrl + –> to move “right”.
That’s it. I’ve been using virtual desktops for years and wouldn’t be without it, so it’s great that it’s such a core part of Windows 10 with the latest updates and tweaks. Get to know it, you might just find it super helpful too.
Pro Tip: I’ve been writing about Windows since the dawn of the operating system. Please check out my extensive Windows help library for lots more tutorials while you’re here!
Great stuff always. Thanks Dave.