
Dave, I have a domain for my new Web site, but want email messages sent to that address to actually end up in my Gmail inbox. How can I set that up so it works properly? Thanks.
With its over one billion active users, Gmail has become a de facto standard for email, and with its simple Web-based interface and flexibility, it’s no wonder! I’m definitely a fan and have other email addresses that I use for my various sites – including here on AskDaveTaylor.com – forward into my Gmail account too. But I don’t want everything mixed together, so I take advantage of a great and relatively unknown feature in Gmail: “+” notation addresses.
Turns out that whatever your Gmail address, you can append a “+” symbol and any string of letters and numbers that’s then ignored by the Gmail software, with the result that it all ends up in your inbox. In other words, my standard Gmail address is d1taylor@gmail.com but I can also use d1taylor+hiMom@gmail.com and d1taylor+support@gmail.com as aliases too, knowing that both will be routed properly without hassle.
This opens up a world of capabilities and makes it easy for you to glance at an email message and know to what address they sent it. If I had a “customer support” email link here on the site, for example, I might show it as “support@askdavetaylor.com” and have it automatically forwarded to the d1taylor+support@gmail.com address.
Even better, you don’t have to set anything up or pre-register any of these plus addresses, just start using them. One smart move is to append the name of the site to your address every time you sign up for a newsletter, you can see who actually sells your address to other sites!
SETTING UP EMAIL ALIASES WITH YOUR HOSTING PROVIDER
The first step, and sometimes the most difficult, is to work with your current Website hosting provider to update the “MX records” associated with your site (if needed) and create email aliases as desired. Most decent hosting companies already have an email system set up so auto-forwarding all email to a specific address should be pretty straightforward. Email your site’s customer service for help if needed, but the idea is that something like
support@askdavetaylor.com --> d1taylor+support@gmail.com
This should be easily set up and implemented. Once done, it’s time for the fun part. Start by sending yourself a test message to each alias so that they all arrive in your Gmail inbox…
TEST: SIGN UP FOR MY NEWSLETTER WITH A PLUS ADDRESS
I’m going to test my own setup by signing up for the weekly AskDaveTaylor email newsletter with a plus-notation Gmail address:

Easy enough, and you can see I used “+askdavetaylor” so I can track if that nefarious Dave guy sells or shares these email addresses (I don’t, by the way!)
RECOGNIZING PLUS ALIASES IN GMAIL
Now when the next newsletter is sent, it’ll also go to d1taylor+askdavetaylor@gmail.com. This will appear in my regular Gmail inbox looking like this:

It’s small, but notice the “to d1taylor+askdavetaylor” just below the sender information on the top left. That worked great, and it also shows you how you can visually identify these messages to differentiate them from those sent to your regular email address.
SET UP A PLUS NOTATION FILTER
Gmail uses something called “Labels” to help you organize your email, though I really think of them as folders since they work identically. Let’s set up one of these for the plus notation messages! That’s most easily done by clicking on the three-dot icon along the top when you’re viewing one of the relevant messages that should be filtered:
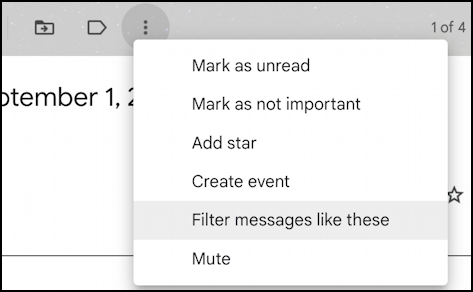
As highlighted, choose “Filter messages like these“. A search box will pop up with lots of criteria, with one already filled out:

Most people apparently filter by the sender’s email address, but we want to filter by the recipient address. Change the form to look more like this:
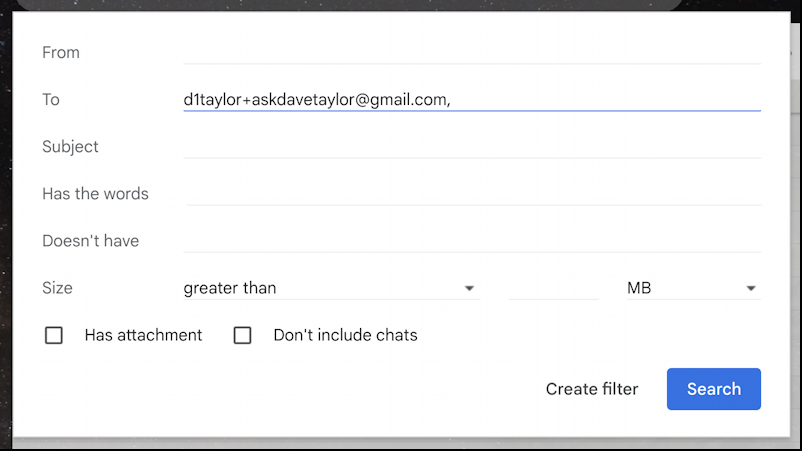
At this point there’s a common mistake people make: don’t click on the Search button. Instead, choose “Create filter” to proceed. A new, and much more complicated form appears.
SPECIFY WHAT HAPPENS TO MATCHING MESSAGES
You’ll need to now specify what should happen any time an email message matches the specified criteria:
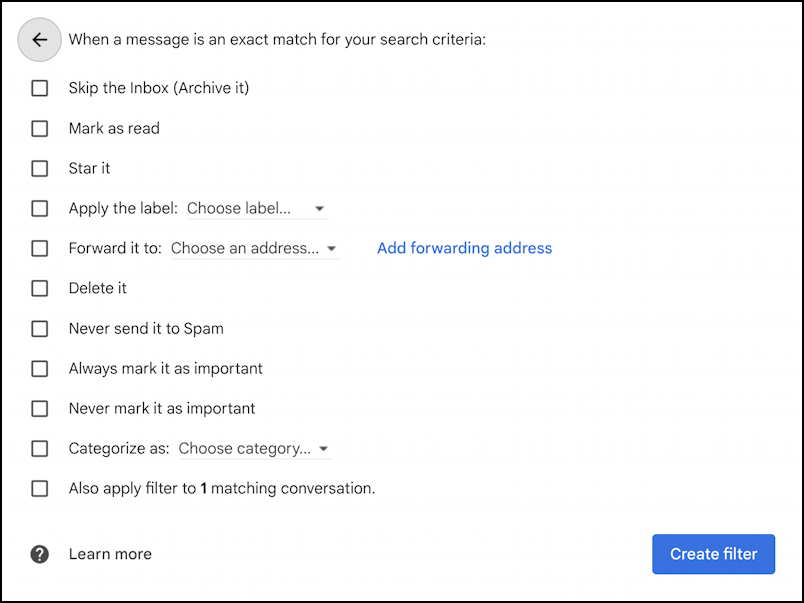
There are lots and lots and lots of choices, for sure. What I recommend for this particular filter is to skip the inbox, not mark it as read, never send it to spam, and most importantly Apply the label…
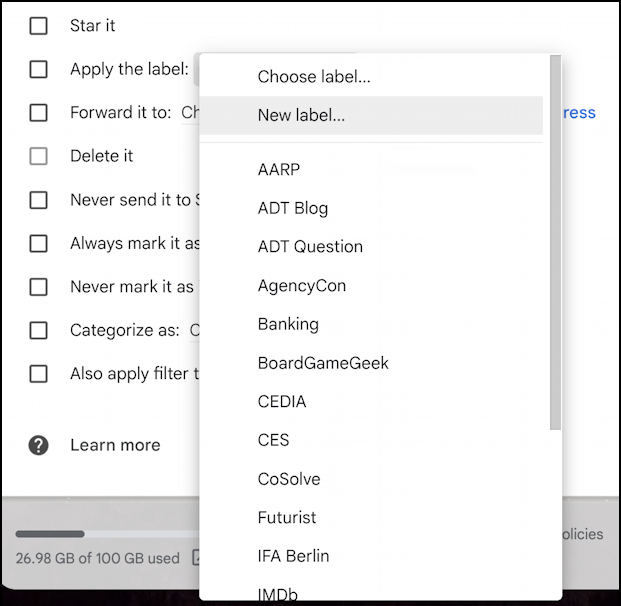
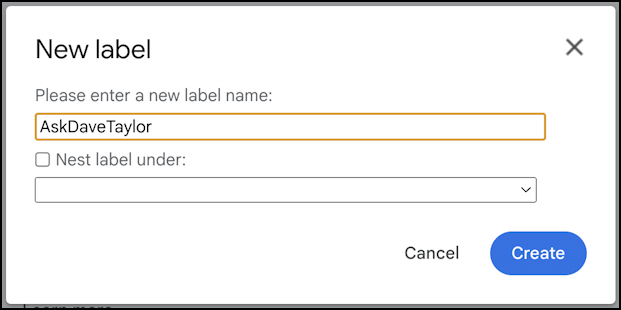
I already have lots of labels, as you can see, but we’re going to create a new one just for +askdavetaylor email messages. That’s done by choosing “New label…” from the menu, as highlighted.
Now just specify a new label name (note you can use spaces in the name too, if desired):
Remember, Gmail might call them labels, but they’re really folders. Here’s my final filter setup:
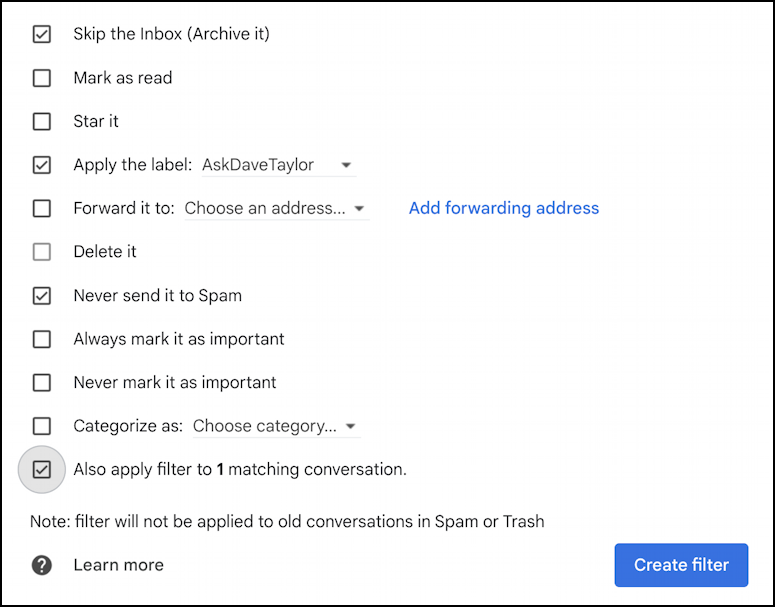
Notice that I also chose the last option: “Also apply filter to 1 matching conversation.“. Why not, right? A click on “Create filter” and it’s all set up and the current message is moved into that folder too!
For bonus points, find it on the left side of your Gmail window and click on the tiny “•••” button to bring up the label configuration menu too:
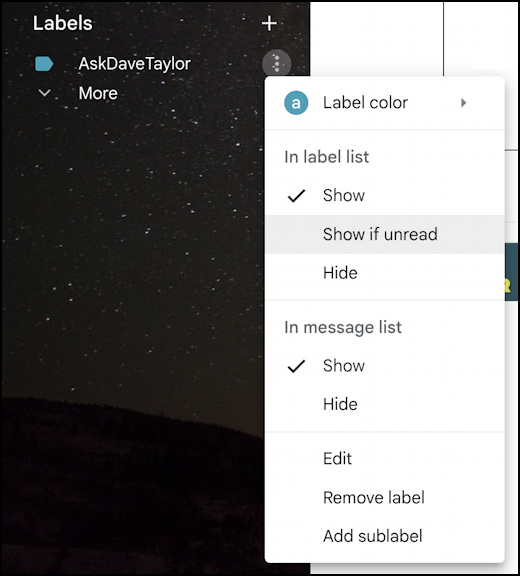
You can change the label color, but what I really like to do is choose “Show if unread” so that the label appears if there are new, unread messages, but is hidden otherwise. You can always just search Gmail for “label:askdavetaylor” to jump into that folder (uhh, label) as desired.
That should get you set up as desired. Take your time, test as you go, and you should have the perfect email setup. Remember that when you reply to these plus notation email messages, the return address will just be your regular Gmail address. There are ways to tweak that too, but it’s far more complicated. Good luck!
Pro Tip: I’ve written quite a bit about Gmail and Google services. Please check out my Gmail help library for lots more tutorials while you’re visiting!