
My older Mac system keeps warning me that I’m running out of disk space, but I don’t know how to see what’s going on, how much space I have, and how to clean things up. Help! How can I fix things up in MacOS?
Computer designers are constantly wrestling with the fact that as fast as they can add bigger disks and storage to our computers, we users are downloading, creating, and saving bigger and bigger files. Back in the early days, a file that was more than a megabyte was almost unimaginably big, then that became hundreds of megs and eventually files that by themselves were more than a gigabyte in size. A gigabyte is equal to 2**30 bytes, or 1,073,741,824 bytes. If it only takes 8 bytes to store a single letter, what the heck’s in a file with a billion letters? 😲
Of course, these enormous files aren’t text, they’re movies, data for open world computer games, and similar. Things that require an incredible amount of space. Fortunately, more modern computers now come with 256G, 500G, even 1TB or larger (and 1 terabyte = 2**40 bytes, or 1,099,511,627,776 bytes!). And even with all that, we can still fill up our disks, whether we’re on a Mac or a Windows PC.
The Mac operating system, currently macOS Ventura 13.4.1, has a lot of tools to help you both identify the capacity of your drive and how the space is being utilized. There are even built-in tools to help you maximize the available space by automatically emptying your trash or migrating unused files and documents onto your iCloud account. Let’s check it all out…
HOW MUCH DISK SPACE DO YOU HAVE?
One of the best ways to ascertain available disk space is to open up an Apple program called “Disk Utility” that you can find in the Utilities folder in Applications. It will not only identify information about your drive, but show details about protocols in use and more:
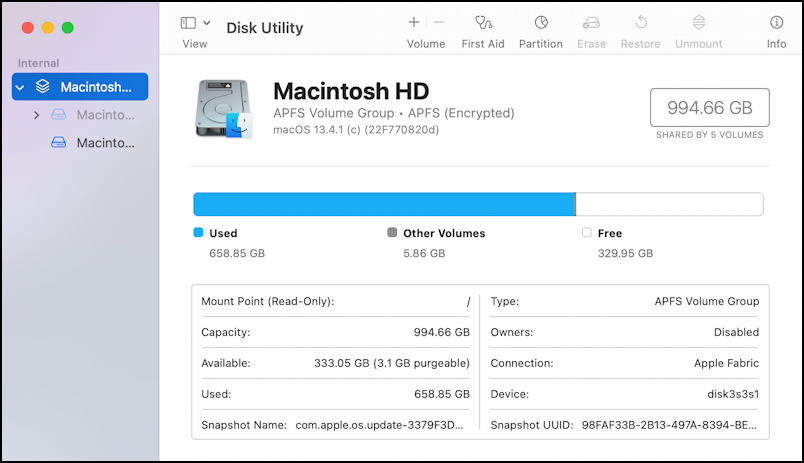
Notice that my root disk on this particular MacBook Pro is running APFS (APple File System) encrypted. If someone were to steal my computer, rip out the drive, and plug it into a new Mac, it would be unreadable. Nice little security perk, for sure. You can see that it’s a 994.66GB drive (1TB, but the file system itself eats up a bit of the storage capacity) and that, as the bar graph shows, I’m using 658.85 GB, leaving me with 329.95 GB free.
Wondering about “Apple Fabric”? It’s apparently a specific language being used by the hard drive controller on my M1-based Mac system. Nothing we mere mortals need to worry about, my Apple contacts assure me.
Want even more technical information about your drive? Open up “System Report“, also found in the Utilities folder in your Applications folder. Once launched, find “Storage” on the left side:

This is undoubtedly far more information than 99% of users need to know, but the one interesting item in this listing is “S.M.A.R.T. Status”. SMART is Self-Monitoring, Analysis, and Reporting Technology and it’s a self-test monitoring system built into most hard drives. With it verified and running (as shown above) you should get a warning before your drive fails and becomes unreadable.
TIP: If you ever get a SMART warning from MacOS, stop what you’re doing, and quit all your running programs. It’s time to immediately do a full backup and address the problem.
System Report also shows that the “Medium Type” is an SSD or solid-state drive. This means that the “hard drive” is really a cluster of memory chips with no actual “disk” involved. Much faster, and much more reliable!
LEARNING ABOUT DISK SPACE WITH FINDER
If you don’t want to run the Mac power user utilities, no worries, you can find out about your drive within Finder. Simply go to the very top of the file system (press Command-↑ until you’re at the top). Here’s what I see:
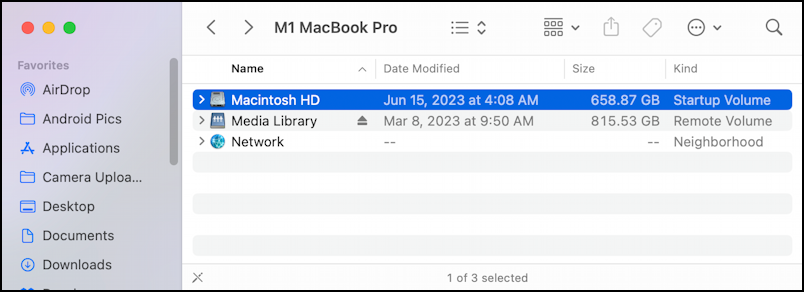
Here I can see that Macintosh HD has 658.87 GB used. Control-click on that in the Finder window and a menu pops up with a number of useful choices:
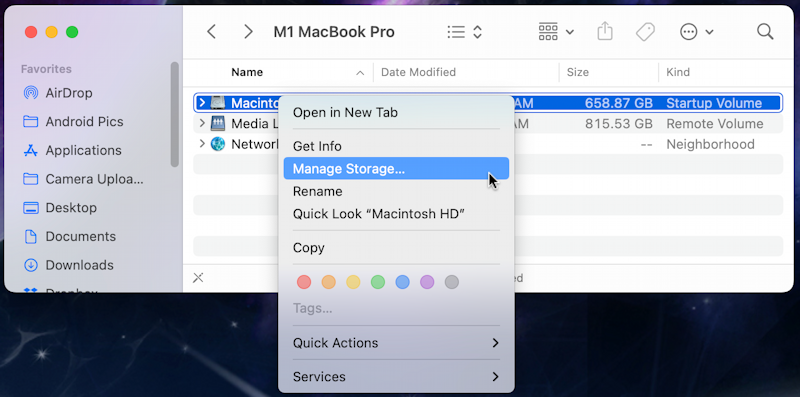
You can try “Get Info” for yourself: It offers more useful info too. Afterward, choose “Manage Storage…“.
MANAGE YOUR MAC STORAGE WITH SETTINGS
Turns out that within the Settings app there’s a really slick Storage management system, even including the ability to display your utilized storage by category:
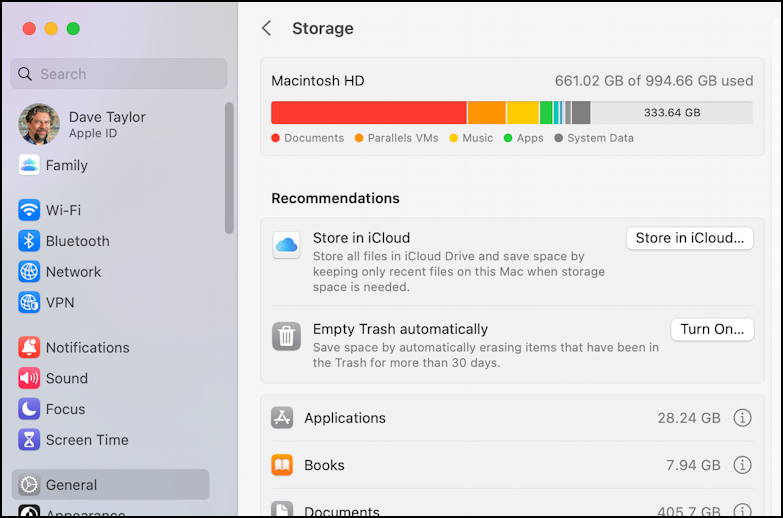
This is perhaps the most useful display of all the options in terms of understanding both how much space you have and what’s eating up all your disk resources. You can see that Parallels virtual machines (VMs) are one of the biggest culprits on my system!
There are also two really helpful options you can enable here too: Store in iCloud and Empty Trash automatically. Each explains what it offers:
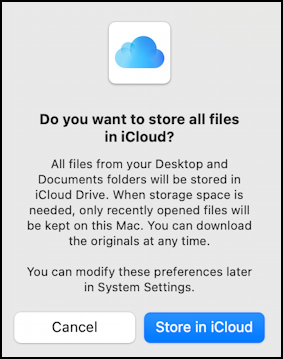
I prefer locally stored files with a cloud backup rather than having them automatically migrate to iCloud and back onto my computer based on usage, personally. Plus, if you’re offline and need to access an older file, it might not be available. Then again, if you bounce between computers, this is a good way to retain access to your full set of files regardless of which device you use. Pros and cons, for sure.
Now, be honest, do you remember to empty your “trash” on your computer every few weeks? If not, this might be a huge benefit for file space management:
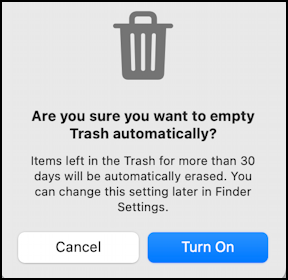
The only risk with enabling this is if you do occasionally find yourself digging through your digital trash to recover something you’d previously discarded. If that never happens, this is a good one to enable.
While you’re in the Manage Storage area, click on one of the “i” with a circle icons adjacent to a category of storage in the display too. It will show you a list of files, sorted from largest to smallest. If I view “Documents” here’s what I see:
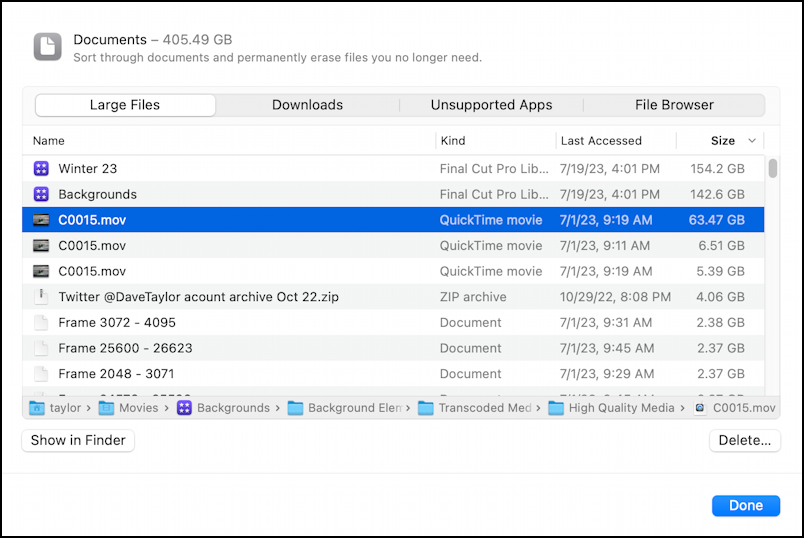
C0015.mov is 63.47 GB? Sheesh! That’s a lotta space for a file whose name I don’t even recognize. Notice by clicking on the filename the very bottom shows the folder path, revealing that this is a video stored in my Movies folder. I can delete it directly from this view with the “Delete…” button on the lower right, or go into that folder (or the Final Cut Pro app that created it) to clean things up.
Hopefully, all of these different tools will help you identify your available storage space and clean things up as required for a healthy, happy operating system. Good luck!
Pro Tip: I’ve been writing tutorials for both the Apple iPhone and Mac since they was first released. Please check out my extensive Mac help area and iPhone help area for lots and lots of useful content.