
I’ve noticed that some of my colleagues have fairly complex signatures at the end of their emails. Do they type those in every time or is there a way to automate the process?
Good news! Every email program I’m aware of includes some sort of support for automatic signatures. Whether it’s a separate file that’s read and incorporated into your outgoing messages automatically or a part of the settings and configuration (much more common) you should be able to get this all set up and working without a fuss. Since you didn’t tell me which email program you are using, I’ll show you how to set up your default or automatic signature for three popular options: Gmail, Outlook.com and Apple Mail. If you use an app based email program on your mobile device or tablet, you should find it’ll offer the same featureset, though perhaps in a different location.
Now, a bit about email signature etiquette… First off, keep your signature short. 3-4 lines is ideal, and typically it’s left aligned and succinct. I have a few colleagues who use their signature as a mini-resume and when it stretches on to a dozen or more lines, I think it comes across as a bit daft and desperate, though obviously your perspective may be different. You can use font styles, include graphics and more, but the general watchword for email signatures has always been “short and to the point” so have a look at what other people in your organization use. Generally speaking, you can’t go wrong modeling your email signature after those of the people in the organization who are most respected!
SETTING UP AN AUTOMATIC SIGNATURE IN GMAIL
To start out, let’s just jump into Google’s popular Gmail system. With its over 1 billion active users, it’s easily one of the most popular email programs in the world! As always, to get to settings click on the gear icon on the top right (in a Web browser. The mobile version has its settings in dramatically different places depending on whether you’re on an Android or iOS device) to bring up the quick settings menu:
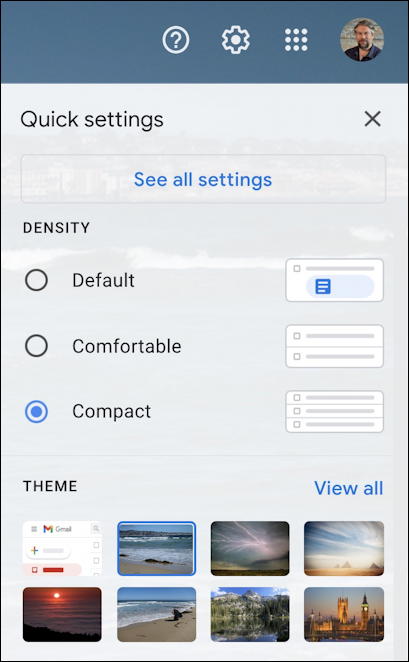
Conveniently, Google has placed the link to find all the menu settings right at the top. Click on “See all settings” at the top of this menu. You then go to a settings area that literally hasn’t been updated since Google first released Gmail way back in April of 2004!
In the “General” area scroll down until you see “Signature:“, as shown:

While we’re at this point, note you can adjust how Gmail matches advertisements for you with the “Importance signals for ads” setting. Worth exploring once you’re done setting up your signature.
To set up an automatic default signature for Gmail messages, click on “+ Create new” since you probably don’t have one set up yet. If you do, click on it to update it so it matches your needs. If you are creating a new signature, Gmail will invite you to name it (which can be helpful if you want to set up more than one signature from which you can select on a per-message basis):
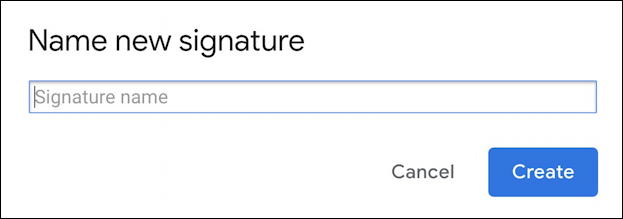
I’ll call mine “Default”. Once that’s done, the default signature edit area shows up right in this page, no need to go anywhere else or have anything pop up:
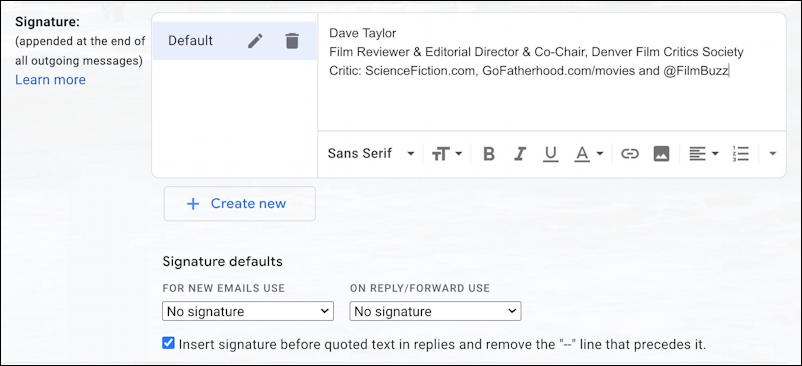
As you can see, I’ve already added my default signature above. Key to adjust for your own needs are the Signature defaults at the bottom of this section. I suggest that you change both For New Emails Use and On Reply/Forward Use to your newly named default signature. Click on “Save Changes” at the very bottom of the page and you’re done!
SETTING UP AN AUTOMATIC SIGNATURE IN OUTLOOK.COM
What about in Outlook.com if you’re more on the Microsoft side of things? Turns out that’s even easier to set up once you get to the right spot.
Just like Gmail, click on the gear icon on the top right and a menu pops up with some shortcuts:
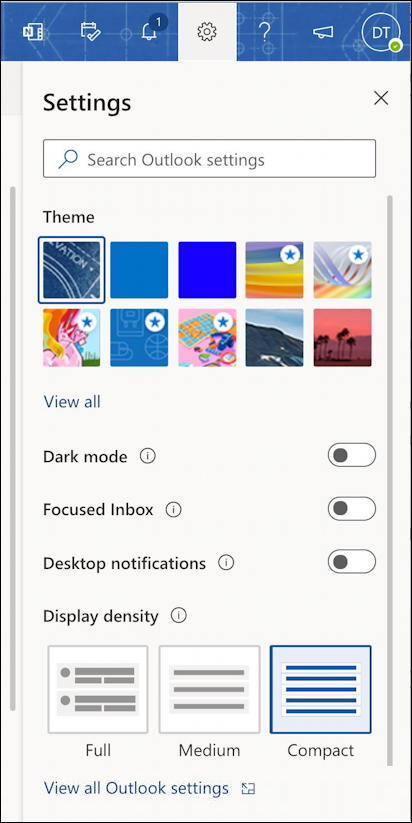
Unlike Gmail, however, access to the main settings is at the bottom of this menu, not the top. Find “View all Outlook settings” at the bottom (the menu’s longer than shown above!) and click on it. You’ll move to the rather extraordinarily complex settings area in Outlook:
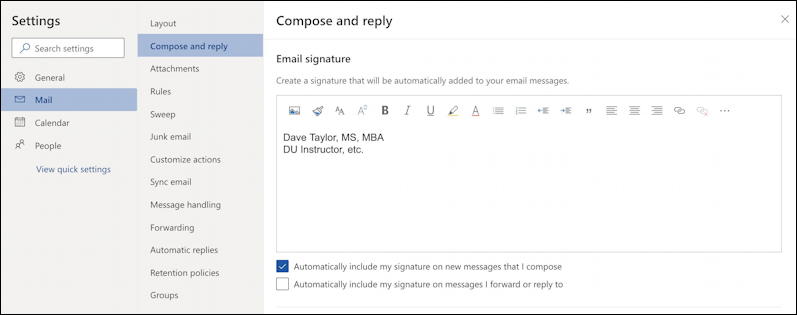
Some of the complexity just comes from the fact that it’s one place to adjust a lot of different Outlook tools, not just mail. As shown above, however, choose “Mail” in the left column, then “Compose and reply” in the second column. Then front and center is the area where you can either create an email signature if it’s blank or edit your existing email signature. Mine is pretty modest in this instance!
Notice especially the two checkboxes at the bottom. Like Gmail Outlook.com lets you choose to “Automatically include my signature on new messages that I compose” and “Automatically include my signature on messages I forward or reply to“. I suggest you check both boxes to streamline your email efforts, but if you decide later you’d rather not have your signature on replies, for example, you now know where to make that change.
SETTING UP AN AUTOMATIC SIGNATURE IN APPLE MAIL
Perhaps you aren’t a fan of Web-based email programs and prefer instead to use the default email program included with every Apple computer: Apple Mail. A solid option, it’s slightly less sophisticated in its use of signatures because it won’t automatically include it in any email you create, whether it’s a new message, a reply or a forward. It does, however, create a menu of signatures that’s directly accessible from the compose window, so it’s just a single click away. Still worth setting up.
That’s done by going to Preferences > Signatures off the Mail menu while in Apple Mail. You’ll see something like this:
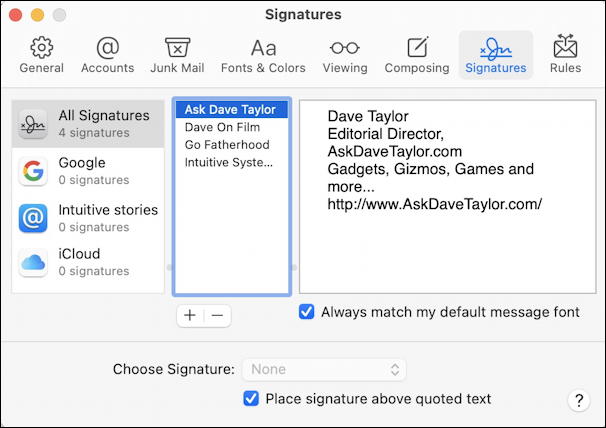
I’ve set up four signatures under the “All Signatures” option, which means they’ll be available to me across these different accounts. You can also set up specific signatures for one account that isn’t visible with others if you have a work signature that you only use for work emails, for example. Notice also that this isn’t a particularly rich environment for creating signatures either; no font changes, no graphics, no links. That’s because the default is for plain text email messages too. Rather 1999 if you ask me, but… if you use Apple Mail, at least you know where to look.
Then once you’re composing a message of any sort, a Signature menu pops up:

Fairly straightforward to work with even if it might be due for a bit of an update to match other popular email programs.
And that’s it. If you are using yet another email program, dig around in the settings and preferences to find “signature” or “automatic signature” or similar and you should be able to get things set up and working for you with just a few minutes work!
Pro Tip: I’ve been writing about Outlook, Gmail and related email programs for quite a while. Please check out my Gmail help and Outlook help while you’re visiting too. Thanks!