
The last few versions of iTunes for Mac OS X have included support for a lot of different user interface configurations, whether you want the tiniest possible display or something that takes over your screen. Herein, a tour of some of the hidden features in iTunes 12 for Yosemite…
Once you get used to a program, it’s common for people to never really explore and find out what additional capabilities it may have hidden in the wings or under the hood. The music player and general iOS control program iTunes is definitely like that, particularly for the Mac OS X world.
Just about everyone I know uses iTunes in what I call “big window mode”, having it take up a significant percentage of their screen. Fine if you need access to everything, but if you just listen to music and want access to the most basic information and controls, there are a lot — a whole lot — of other ways you can interact.
At the most basic, you can just use the function keys on your Mac system or laptop: Along the top are six function keys that give you access to the core features of iTunes: previous track, next track, pause/play, mute, and volume up or down.
Here’s what I’m talking about:
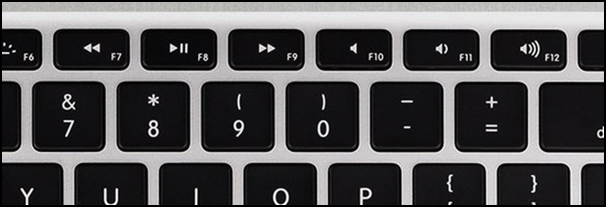
The top row of keys (F7-F12) offer prev track, pause/play, next track, mute, volume down and volume up. That’s easy enough!
But let’s look at iTunes 12 itself, since it has so much power. Here’s the program in album cover display mode:
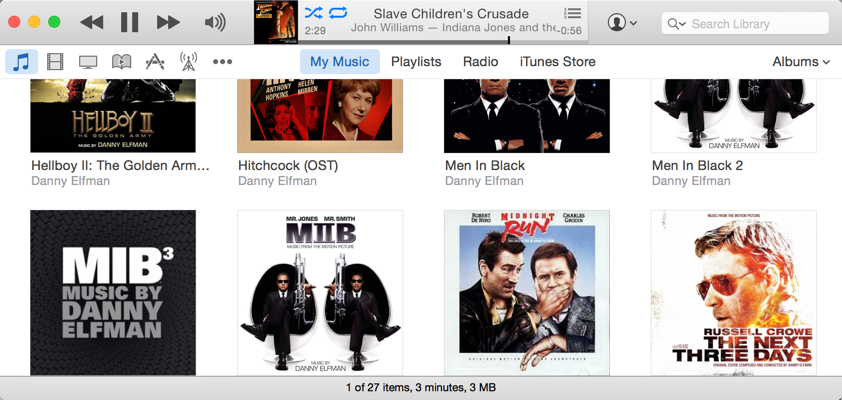
This is probably the view you have for iTunes, right? The top gives you those same prev, pause/play, next, and volume controls, and additionally shows a tiny album cover for the current track, as well as information on the track, time played and remaining, access to loop or shuffle, and more. Below it you can quickly access your music, movies, TV, books, apps and online radio favorites (left to right just above the Hellboy cover), as well as predefined areas in the music section: My Music, Playlists, Radio and iTunes Store.
But what’s hidden here? First off, move the cursor over the currently playing information area and a new button shows up, a grey circle with three dots. Click on it and a menu of interesting options appears:

The very top menu choice lets you rate the track but notice some of the other options. In particular iTunes now includes an entire online radio with custom music a la Pandora or Spotify, and you can launch an entire radio station based on the current artist or even the current track by choosing “New Station from Artist” or from Song. That’s easy!
There’s another menu here too, the one associated with the three horizontal lines that’s just to the right of the grey circle menu button (I wish they had better names!). Click on it and…
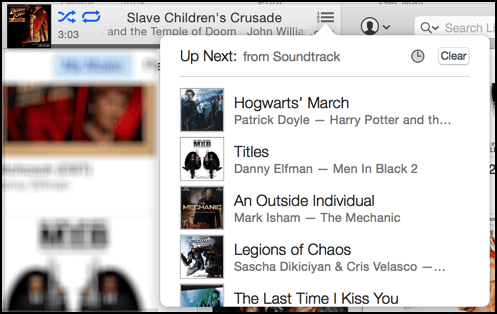
You can see it shows you what’s in the queue to play. You can “clear” it if none of them sound good, or you can choose a specific track to jump directly to that one.
Oh, and there’s a third menu too. The tiny silhouette in a circle? Click on it:

That’s handy if you buy a lot of stuff through the iTunes Store or want to check on your Family Purchases occasionally.
All useful to know and all of these menus can make working with iTunes more enjoyable and efficient. But let’s turn our focus back to the different interfaces!
Remember how things showed up when you moved your cursor over the currently playing track info? There’s another shortcut if you move your cursor over the album cover art:

Here you can also see the circle with three dots I mentioned earlier. But the cover graphic has two squares superimposed atop, a big square and a little one. This is the insider secret shortcut to getting to what iTunes calls the “Mini Window” and it’s great. Click on the small square.
Now on the lower right on your screen (unless you drag it elsewhere) instead of the really big window you’ll see this little one:
![]()
The three-dot and three-line shortcuts are both here, as is a tiny album cover and the information on the currently playing track. But it’s now discrete and easily tucked away, ready to supply info as needed but quite unobtrusive otherwise.
Worried about those handy controls? No sweat, just move your cursor over the track info:
![]()
Now click and drag on the left edge of this window to make it narrower though. You can make it even smaller, if you want, in which case it looks like this:
![]()
But here’s something very few people realize: you can make it narrower yet! Keep dragging the left side inward…
![]()
With the cursor over the window, it’s just the controls. Move the cursor out, however, and you’ll get the track info in the smallest possible window:
![]()
Now see the button on the lower left of the window that is a tiny pair of triangles pointing up and down? Click on it!

But we’re not done yet! Move the cursor out of the tiny album art window and wait a few seconds for the track update info to vanish (if necessary) and you’ll get just the album art with nothing else visible:

Again, move the cursor over it and lots of controls appear. Or just use your function keys to control what’s going on. I listen to music — usually movie soundtracks, as you can see — all the time, so learning about all the hidden mini windows and features in iTunes 12 has been a real boon. Play around with it, see which suits your screen and personal style!
Great stuff, this is now in my top ten of the favourite content pieces, thank you!