
I have seen a lot of Web pages – including your own – where there are tons of screen shots from different versions of Microsoft Windows. I run WIndows XP and need to include screen shots (screen captures?) in some documents I’m writing. Is there some way to do this without having to buy and install any additional software?
Good news! The feature you want is built in to Microsoft Windows XP. The bad news? It ain’t so easy to work with. The problem is that the screen capture feature in WinXP takes the screen image and saves it in your copy/paste buffer, not as a file.
So what you need to do is basically three steps: you take the screen capture you want, then you use Microsoft Paint to paste the saved image into a graphic buffer, then you save the resultant image as a file and you’re good to go!
Now if you’re working in an editor like Microsoft Word, you might find that you can sidestep part of this by simply pasting the images into Word directly. The problem with that, however, is that I find that I often want to crop the images so I can focus people’s attention on a specific window or even an area in a window. To crop the image, you’ll probably want to end up using Paint anyway.
But let me show you the basics and you can experiment for yourself and figure out the best way to proceed. Deal?
First step is to find the PrintScreen key on your PC keyboard. It might be labelled PrntScrn or PrtScr or it might even be a function key, the key is labelled “F11” or similar, and to get the alternate functionality you need to press the Function (or Fnc) key and the specific function key. For example, Function+f12.
The entire screen is now saved into the copy / paste buffer.
Next stop: Microsoft Paint.
More likely than not, it’s found as Start –> Programs –> All Programs –> Acessories. Launch it and you’ll have a pretty boring blank screen:

Now you should Paste the saved screen grab image into the blank space by choosing File –> Paste:
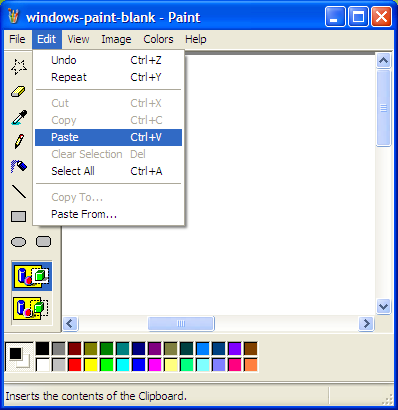
Now your screen image shows up in the buffer, which can be a bit confusing when you first get started!
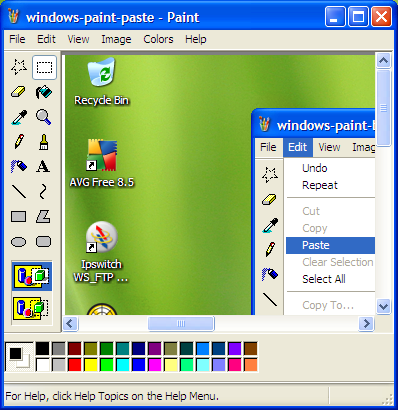
If you want to chop it down, here’s where you can select a specific region and crop the image down to a specific window or area of a window. Practice doing this a few times to get good at it, it’s kind of fun, actually!
If you want to paste the cropped image directly into a Microsoft Word file or similar, then use Edit –> Select All then Edit –> Copy. Now flip to MS Word and choose Edit –> Paste and you’re rockin!
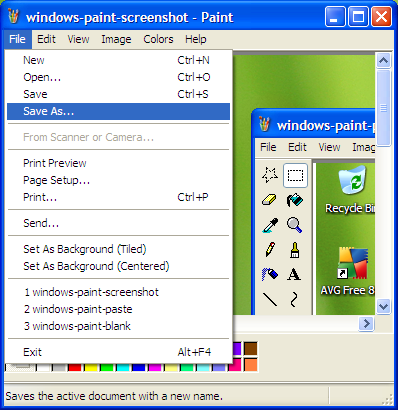
Let’s save this image as a specific file, though. Choose File –> Save As:
If you’re going to use the image online, you’ll want to switch from a Bitmapped file (.bmp) to something else. I suggest that PNG is your best bet, but JPEG (.JPG) is a good choice too. Click on the “Save as type” menu and you’ll see that there are lots of choices:
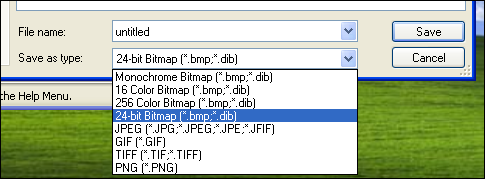
Pick the one you want, type in a good file name (without spaces if you want to use it online), and press “Save”.
Done!
Congratulations, you’ve saved your first screen capture in Windows XP!
Thanks for the tip, worked great in xp. I can now do so much more
I use the Mac OS X screen shot capability when I’m running Parallels or VMware: it can see the Windows screen just fine. In terms of when you’re in Boot Camp, not 100% sure how you can simulate a PrintScrn button, but if you grab one of the many PC window capture utilities and install it, you can assign whatever keyboard sequence you’d like, including one of your function keys.
What keyboard command should I use to take a screenshot on Windows if I’m running Windows on a Mac (either Boot Camp or VMWare) using a Mac keyboard?
Thanks
The free version of WinSnap is a whole lot easier and does much more on the fly.
http://www.ntwind.com/winsnap/
I’m surprised you didn’t mention the ability to also press “Alt+PrtScr” to capture only the current active window. That doesn’t necessarily eliminate the need to crop, but it can sure save a lot of time if you want to capture just a single application window!