
It’s true, the latest update to Windows 11 changes the default behavior of the PrtScr [Print Screen] button in the OS. Now the default will be to utilize Snipping Tool, which is an improvement. But want to change it back? Here’s how…
Microsoft Windows has been evolving since the first day it was released, all those years ago. Some changes are huge (Windows 95 -> Windows XP, for example, or Windows 10 to Windows 11) but most are subtle tweaks and improvements designed to make the system safer, smarter, more secure, and easier to use. About 90% of them do just that, but sometimes there are changes that prove a bit much to accept, most infamously the Start Menu -> Start Screen change, also known as the-interface-change-that-shall-not-be-mentioned in some PC circles.
The latest update that’s coming with the spring update to Windows 11 is that after many years, Microsoft is changing the default behavior of the Print Screen [PrtScr] button on your keyboard. By default it has always allowed you to grab a screen capture and have it in the copy-paste buffer, allowing you to add it to an email, share it with a colleague, etc. What it never did, however, was also save that screenshot as a file on your system, meaning it was impossible to go back and reference earlier images.
The new keybinding for PrtScr is that it’s going to launch the handy Snippet Tool, a utility included in Win11 that’s actually quite a bit more powerful and functional. I’ll show you some of its cool features, then show you how you can change things back to the earlier default if you really want to. Let’s check it out…
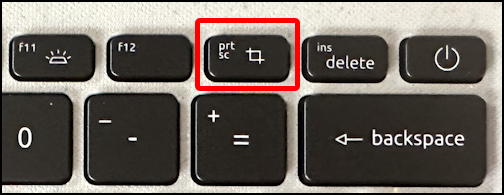
THE PRINTSCREEN KEY ON YOUR PC KEYBOARD
First things first, here’s the key we’re talking about. On many PCs it’s the f12 key, but on the below, it’s an additional key:
If you’ve never pressed it, well, then you won’t notice that it’s remapped in the latest Win11 update, right? But while many people like the default action of it taking a screen capture and putting it into the copy/paste buffer, others have figured out that you can remap the key to launch Snipping Tool.
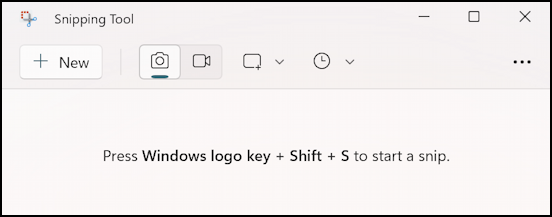
THE SNIPPING TOOL SHORTCUT WINDOW
If you have, or you have the latest update, pressing this key won’t just generate audio feedback, it’ll display this tiny window at the top of your screen:
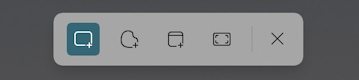
What’s handy is that if you move your cursor over any of these, you’ll get a tooltip reminder of its functionality:
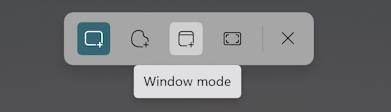
Left-to-right they are defined-rectangular-region, freeform-region, the top window, or the entire screen. But there’s much more that Snipping Tool can do, so let’s launch the app directly…
THE FULL SNIPPING TOOL IN WIN11
Easiest way to launch any app is to just search for it on the Taskbar:
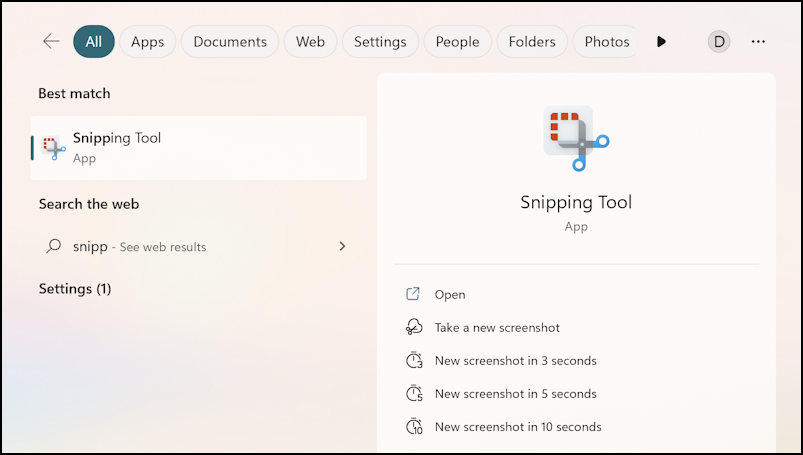
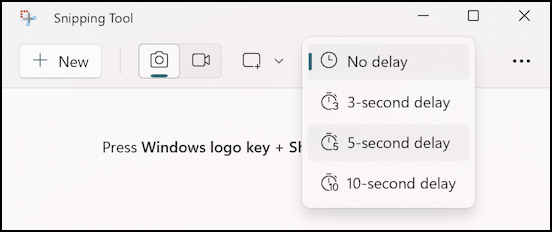
What’s particularly of note is that the shortcuts are actually useful, allowing you to easily take screenshots after a 3, 5, or 10 second delay. Just enough time to set up a window or reveal a menu or similar. Quite helpful!
To launch the app, however, just click on the app icon or “Open”. When it launches, Snipping Tool has a slightly expanded window versus the sleek minimalist window from the PrtScrn key:
In fact, here’s a useful shortcut if you want to leave the default action of Print Screen to be “Screenshot to Clipboard” but still occasionally utilize Snipping Tool: Windows + Shift + S launches the program, ready to capture what’s on your screen!
Also note that as of very recently, Snipping Tool supports screen recording as a movie, accessed by clicking on the tiny movie camera icon (the box with the triangle on its right, adjacent to the camera icon). You can also access those delayed screenshots too:
Where it gets particularly interesting is when you go into Settings.
SNIPPING TOOL SETTINGS FEATURES AND OPTIONS
Click on the “•••” link on the right and a menu appears. Choose “Settings” and you’ll see lots of useful options:
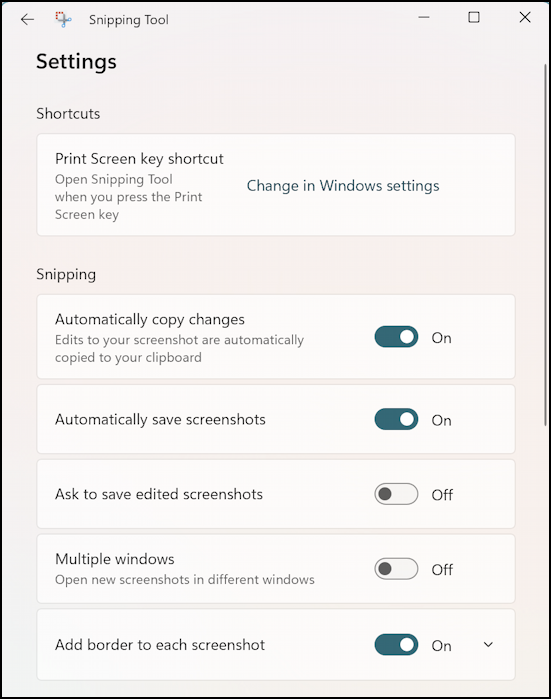
We’ll come back to the very first one, so just jump down to the Snipping block of settings. I’ve written in the past about how to add borders to your snipping tool screenshots (the last option) but notice the other options too, including the ability to turn off the automatic screenshot saving feature.
Scroll down even further and you’ll see another very useful setting:
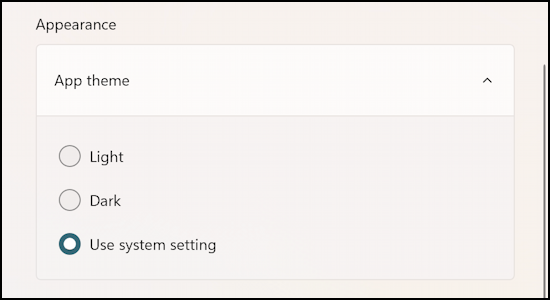
Honestly, I suggest you just mimic the settings I display here, they’ll likely work just great for you. So there’s only one more thing to consider: how to change the default PrtScrn behavior.
CHANGE DEFAULT PRINT SCREEN KEY ACTION
You can use the link in Snipping Tool settings as a shortcut or just go into your PC’s Settings and find Keyboard in the Accessibility area:
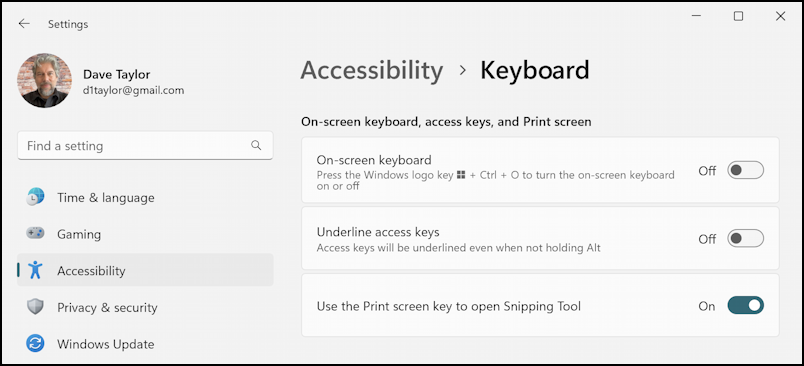
You’ll likely have to scroll down to find the entry I have shown, but it’s “Use the Print screen key to open Snipping Tool” that you can enable or disable, as you prefer. The long-time default behavior on Windows is to disable this feature, but the new default and more featureful alternative is to enable it. Your choice.
That’s it, now you can take screen captures and screenshots on your PC to your heart’s content!
Power User Tip: I’ve been writing about Windows for many years and have an extensive Windows 11 help library here. Please check it out while you’re visiting. Thanks!
When I press prtscrn key, I don’t get a menu, I get a cursor, I have to select an area. Seems my copy of windows is even more buggy.
Thanks, Dave. I just wanted PrtScn to do what it always did, and now it does.
Good article but what I want is my Snagit back. Before this last update, Print Scrn would capture via Snagit (which, in my own opinion, is a far superior app!!) I want it to go back to starting a capture in Snagit when PrtScn is clicked. Is there a spot is Accessibility or somewhere else that lets me change what app is used when PrtScn is clicked?
Thanks!!
Chris
I also think Snagit is a great utility. I would reach out to the developers to see if they have a solution for having it trigger when you push PrtScn on your PC.
Before, when I used print screen, I clicked on the tool and outlined what I wanted, then pasted into Word. I got a reasonably sized copy that fit on the page. NOW, I get a HUGE copy that has Absolute width value over 15, so EVERY TIME I need to re-size the image to 7 or less so it fits on the 8.5 width page. Where do I find the place to re-set the defaults on this? I have no clue. Very frustrating, especially when I need to take several screen shots in quick succession. Please help!
Hmm… when you say “print screen” do you mean the PrtScrn button on your keyboard? I’d launch that app then go into settings to see if there are any tweaks you can make. Sounds frustrating!
Useless, as many similar articles concerning that subject. The title does not correspond to the content.
Did you read the article, Bob? It says “go into your PC’s Settings and find Keyboard in the Accessibility area. You’ll likely have to scroll down to find the entry I have shown, but it’s “Use the Print screen key to open Snipping Tool” that you can enable or disable, as you prefer.” Can you set the button to a completely different function? No, not by default in Windows. Maybe that’s why “as many similar articles” do, I don’t offer that solution.
Yes, I totally agree. You can turn the print screen button on or off. Typical Windows. They decide what you can and can’t do. I want to use another program that is not microsoft, and better in my opinion. And yes I did read your whole article
I would like to set the print screen button to a default of printing the entire screen rather than opening the snipping tool app where I must do another action to select this option. I can’t find a way to do this.
this article helped my redefining my prnt scrn button to Screenshot. thx