
I take lots of screen captures on my Mac to document our software process and it works great. Except the cursor is always missing! Mostly that’s not a big deal, but when I show specific actions on a menu, it’s critical. How can I add the cursor to a screen capture in MacOS?
There are a remarkable number of screen capture and screen recording programs for the Mac system from ingenious and innovative programmers, but you can accomplish everything you need within the standard screen capture tool on MacOS 13 too! Turns out that adding the cursor to a screenshot is an option you can enable or disable, but it’s more subtle than that because it also depends on how you take your screen capture.
The standard way to interact with the Mac’s Screenshot program (which lives in Applications > Utilities, if you’re curious) is to use Command-Shift-3. Get the hang of that sequence and you can capture your screen as frequently as you desire. Switch to Command-Shift-4 and you’ll be able to click and drag to define a specific region of the screen instead of everything. Easy, right? Well…
SCREEN CAPTURE, NO CURSOR
Let’s go through the steps. Here’s a region capture I’ve produced with Command-Shift-4, pressed while I had my cursor on a specific menu choice in another app:
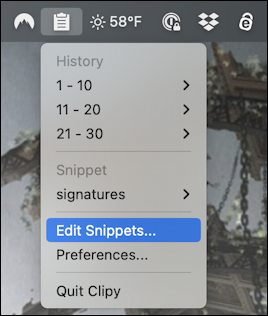
The blue background indicates which choice I was poised to make, but that cursor is definitely missing and should be added. You could theoretically add it after the fact with a bit of fiddling in a graphics editor but let’s check out the Screenshot program itself to see our options.
SCREENSHOT OPTIONS AND SETTINGS
Instead of your usual command sequences, use Command-Shift-5 (or launch Screenshot directly from Utilities). It produces a toolbar along the bottom of the screen:
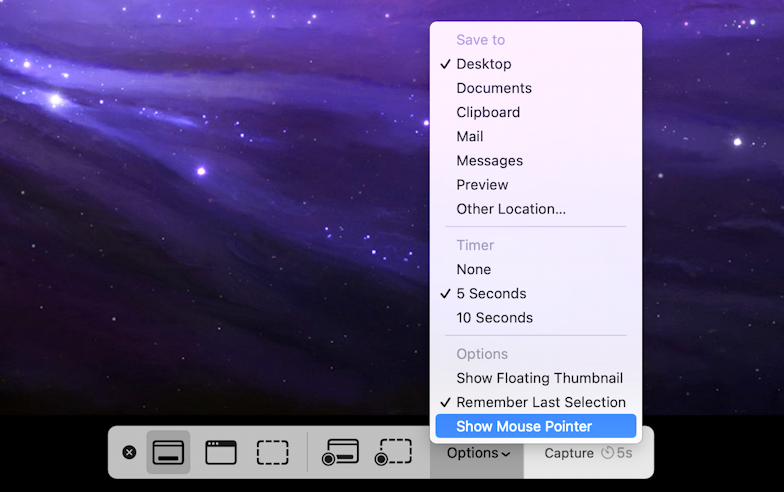
As you can see above, the bar has three screen capture options (full screen, designated window or defined region), two video capture options (full screen, defined region), and both an Options and Capture button. Few people realize it, but Screenshot can easily capture video of your screen too!
More importantly, notice the highlighted entry on the Options menu: “Show Mouse Pointer“. Enable that.
Done? Nope. Not quite…
SCREEN CAPTURE WITH MOUSE POINTER
The wrinkle is that if you do a full screen capture, it will indeed include the mouse, but if you do a region capture it will not because you’ll have to move the cursor to define your region. If I do a full screen capture then crop the image down in my editor, I get this:
Yay! Cursor included!
But that involved me manually cropping the image down to the portion I wanted. If I have “Show Mouse Pointer” enabled and use that Command-Shift-4 option to click and drag to define the capture region, look what happens:
A bit disappointing. The solution is if you need to capture the cursor too, just remember to do full screen captures – Command-Shift-3 – and you’ll be fine. And it can capture whatever cursor you see on screen too:

That’s it. Enable the required option then remember to do full screen captures and you’ll have the cursor included!
Pro Tip: I’ve been writing about the Mac since the very first system was released. Back in the era of the “fishbowl” design! Heck, I started my computing career on an Apple II. Please check out my extensive Mac Help Library while you’re visiting. Thanks!