I want to have my Android phone data automatically backed up so if I lose it I won’t also lose all my photos, videos, documents, etc. My company pays for us to all have Google One accounts, does that offer a backup option, and if so, how do I get it set up?
There are quite a few cloud backup options for every modern mobile device and Android devices are no different. You might already have a cloud storage account on Dropbox or another service that keeps your laptop backed up, for example, or your cellular provider might include it as an option (typically with a modest fee: AT&T Personal Cloud, for example, offers 500GB of storage for $9.99/mo and you can use it with laptops, desktop systems, and mobile devices)
Search in the Google Play Store for “backup” and you’ll also find about a zillion apps and options, notably including Swift Backup, Dropbox, Microsoft OneDrive, TeraBox, iDrive Online Backup. OneSync, Box, and many more. Essentially, if you already have any sort of cloud backup service, you can probably utilize it for your Android phone and tablet backups!
GOOGLE ONE IS A SOLID OPTION
Since you already have Google One, it’s definitely the best choice with its modest pricing ($19.99/yr for 100GB) and tight integration into the entire Android experience. Don’t have Google One yet? It includes lots of other interesting features and capabilities too, which is why I have a subscription. learn more: Google One Plans & Pricing.
I admit, it’s a bit confusing to differentiate between Google One, Files by Google, Google Drive, and similar, but since Google One is woven into Android and you already have it set up for your Google account, let’s proceed with that.
Start by going to Settings on your phone.
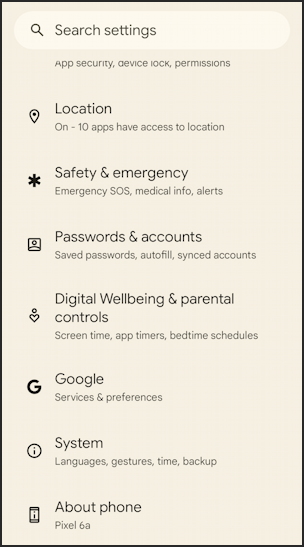
Swipe down to find “Google” (as shown above). It’s your gateway to quite a few Google services that tie into the Android experience, actually. A tap and you’ll see…
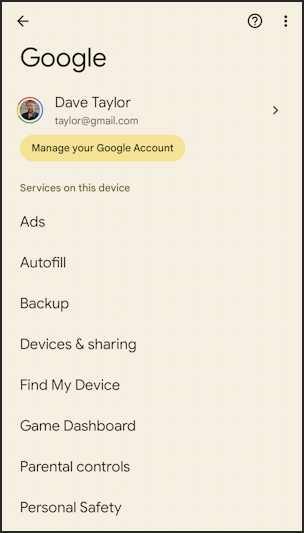
So many of these are essential to the android experience so it’s a bit puzzling why they’re tucked into the “Google” option (like Find My Device and your personal Ads settings) but that’s a bit tangential to our task today. All of these are worth checking out, however!
For now, tap on “Backup” to proceed…
ENABLE GOOGLE ONE ANDROID PHONE BACKUP
Once you tap on “Backup” you’ll either find that it’s already working or that you need to tap a few buttons to get it fired up:
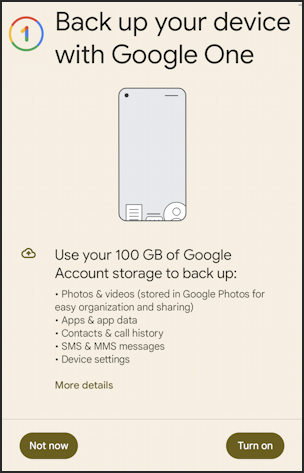
You can see it’s all ready to go but is not yet working. Alarming if your photos and videos are precious to you (not to mention your contacts, SMS history, etc). The full list of what’s backed up automatically once you enable Google One backup is shown.
Ready?
Tap on “Turn on“.
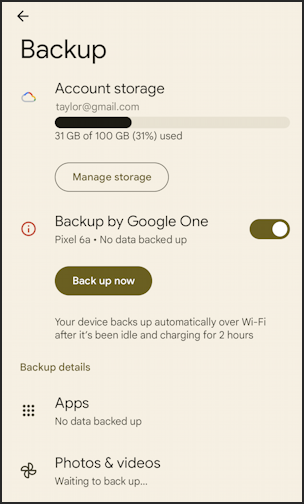
You can see that in my case there’s “no data backed up” yet, which is reasonable. More importantly, notice that “Your device backs up automatically over Wi-Fi after it’s been idle and charging for 2 hours”. This means that you’ll want to get into the habit of plugging your phone in to charge overnight, during which time it can easily back up whatever’s new.
Swipe down to see all the different categories of data that can be included in your backup:
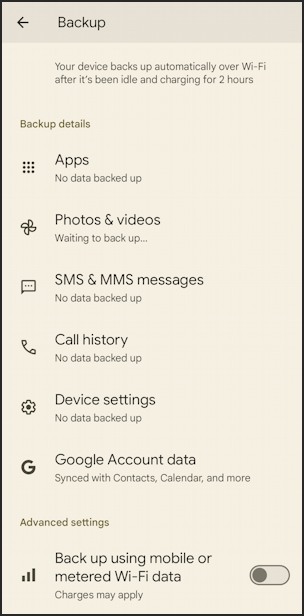
If you’d rather not include a category of data, tap and deselect it. Want to have backups occur over cellular in addition to Wi-Fi? Enable that last option: “Back up using mobile or metered Wi-Fi data”.
LET’S START THAT FIRST BACKUP!
But who wants to wait two hours? Swipe to the top, then tap on “Back up now” to get that backup started!
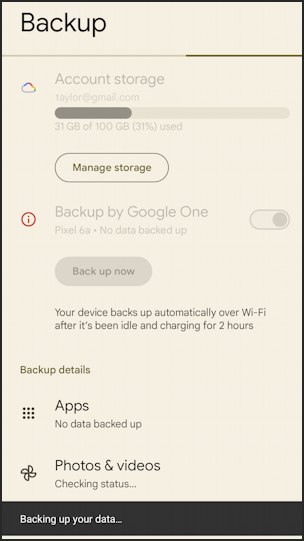
To set reasonable expectations, it’ll probably take a day or two before this first backup is completed because it keeps pausing as you use your phone, get notifications, etc. Best strategy is to plug in your phone and just leave it untouched for as long as you can manage.
While you’re waiting, Google One is also accessible via the Web and you can see that your new device backup is beginning by going to one.google.com:
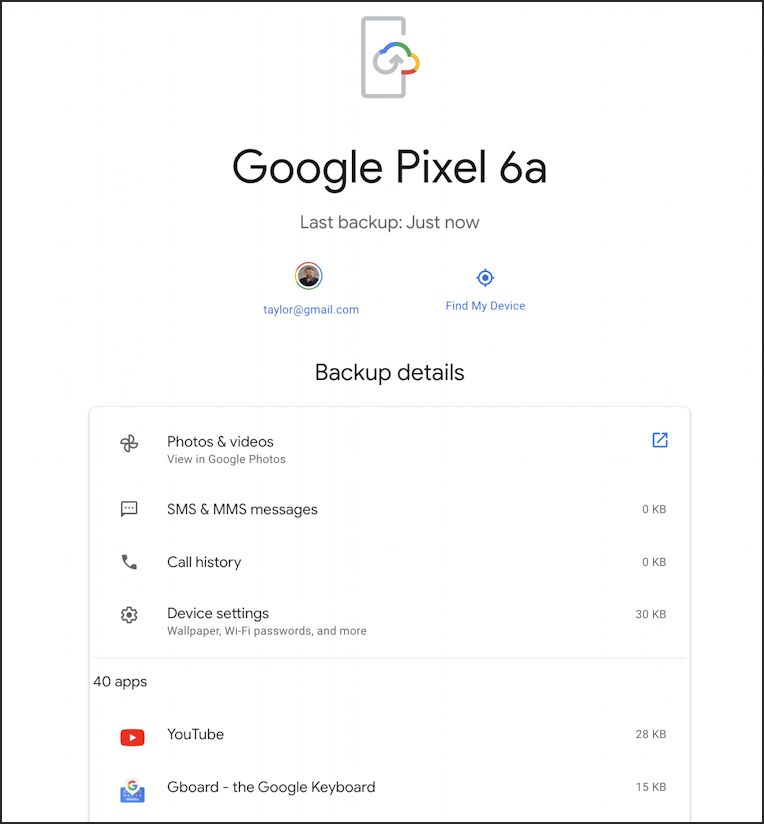
That’s it. The easiest and most straightforward way to back up your Android phone or tablet by utilizing your Google One account. Good luck with it!
Pro Tip: There are lots of ways to manage your Android devices and ensure the best possible experience. Learn more by checking out my extensive Android help area while you’re here too!
