
Just bought a new MacBook Air and am psyched about the speed boost and nicer screen. I reinstall apps, which has worked great, but I’ve lost all my email folders from Apple Mail. How can I copy across all my mailbox folders to the new Mac?
It’s actually curious how Apple set up the email archive structure in Apple Mail. Just about every program keeps user data somewhere in your Documents folder or in your Home folder itself, but Apple Mail has everything in $HOME/Library/Mail. Not a big problem except when people go to back up their account or copy data from one system to another, they typically ignore Library, assuming it’s nothing of critical importance.
Fortunately, you don’t have to muck about in the file system because the Apple Mail program has both an Export and Import facility that makes it pretty easy to migrate from one Mac to another. As a side benefit, the exported format is in what’s known as “.mbox” format, so you could also import them into a different email program if you preferred.
For this tutorial, I’m going to go through the steps needed to export email folders from Apple Mail, then move to a different system and import them into Apple Mail on that device. Generally speaking you should have the latest versions of all your software and the OS on both, but in this instance I don’t think it’ll matter too much. Ready?
HOW TO EXPORT EMAIL FOLDERS FROM APPLE MAIL
Launch Apple Mail on the old system and select all the folders you want to export by using click, then Shift-click to add to the group. I have quite a few! Now Control-click anywhere in the selected folders area to bring up the context menu. One of the items on that menu is “Export Mailbox…“:
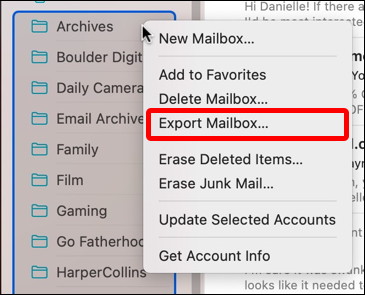
Don’t worry about the fact that it’s singular but you are going to export multiple mailboxes (just in case you’re an English major and notice these sort of things!). Apple Mail will prompt you to choose a destination for the folder / folders:
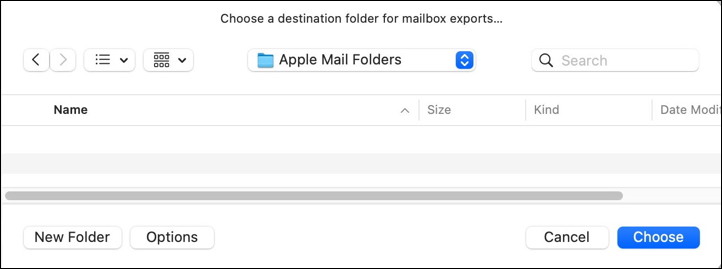
In this case, you can easily specify an external drive, either a USB flash drive or a larger storage device. That’s what I’ve done above: “Apple Mail Folders” then will let me import them onto the new system and serve as a backup too. Click “Choose” and it’ll start zipping along, exporting and creating those “.mbox” folders (files, really, but that’s another story):
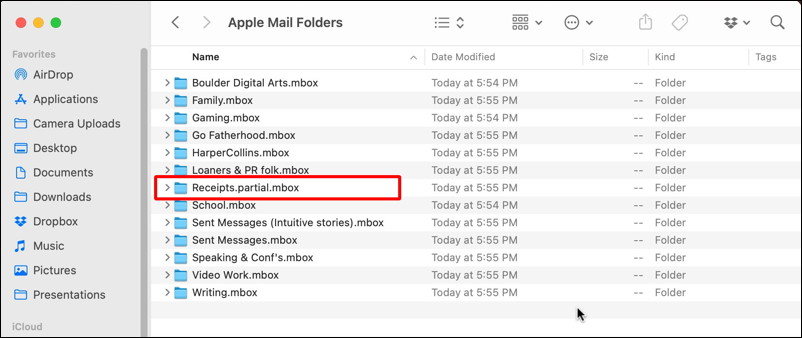
Notice the highlighted mailbox: The inclusion of the word “partial” denotes that it’s the one being exported currently, email by email. Once none of your folers have “partial” in their name, you’re done. Quit Apple Mail on your old system, then turn to your new MacBook Air and launch Apple Mail…
HOW TO IMPORT MBOX EMAIL FOLDERS IN APPLE MAIL
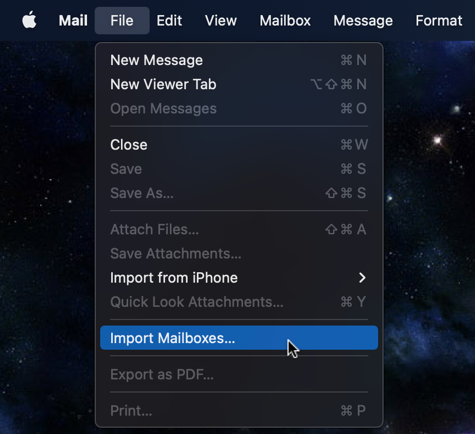
This is a bit more involved than the export process, but part of it is because how Apple Mail organizes things by default. To start, however, choose “Import Mailboxes…” from the “File” menu:
If we were on a PC, you’d now go into what Microsoft people would inevitably call the Email Import Wizard. On a Mac, however, it’s just a tool. 😀
Here’s what you’ll see:
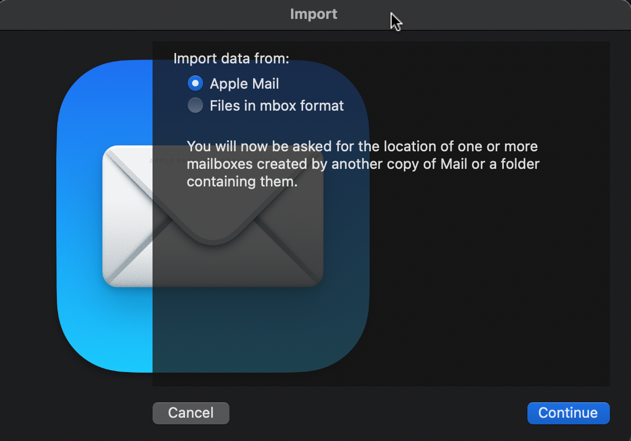
Even though you’ll ostensibly be importing files in mbox format, choose “Apple Mail” and click “Continue” to proceed.
Now here’s a trick: Navigate to the folder that contains all your .mbox files…
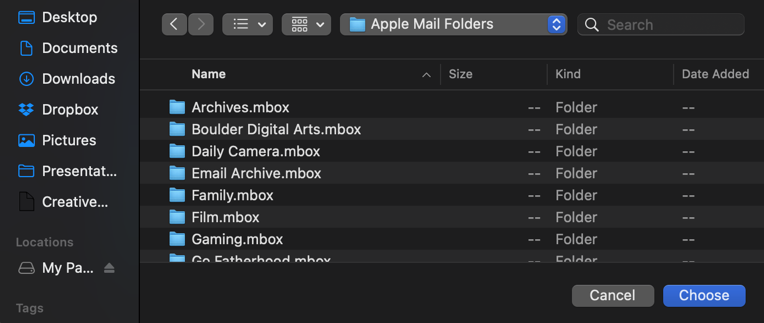
Then click on “Choose” without actually selecting an individual folder or file. This way Apple Mail will import all properly formatting folders from the directory, not just a single one. Much more efficient!
It will confirm what folders it found and let you change your mind and unselect any you don’t actually want to import:

All of these look good to me, so I’m going to get the machine to work by clicking on “Continue“.
Sometimes you’ll hit a bump, like this:

It says “Some messages could not be imported. The partially imported mailboxes are located in the mailbox named “Import” in the mailboxes list.” Worth checking, but otherwise, you’re done.
ORGANIZING IMPORTED MAILBOX FOLDERS IN APPLE MAIL
Well, I say you’re done, but you’ll probably want to reorganize things just a bit…
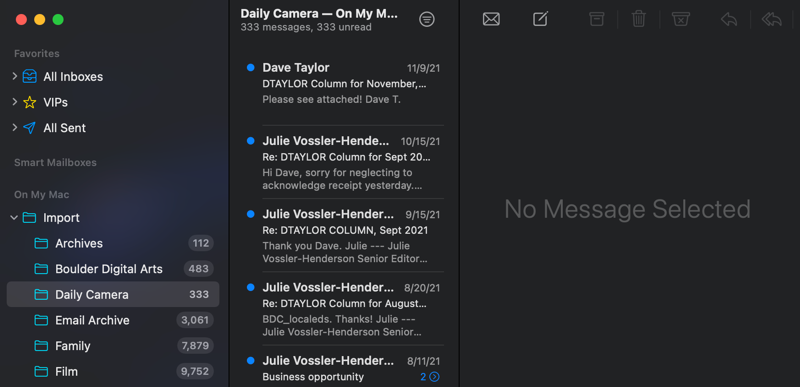
Yes, everything is placed in a parent folder called “Import”. And every single email message in every folder is marked as unread. As you can see, I have tens of thousands of unread messages now. Not so good.
To fix the organization, you can click and drag mailboxes “out” of the Import folder:
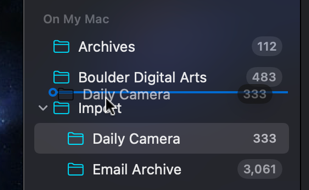
In the above, you can see that I’m moving “Daily Camera” out of “Import” and to the top level of mailboxes, as I have already done with “Archives” and “Boulder Digital Arts”.
To fix the problem with everything being marked as unread, simply click on a folder, then choose Mailbox > Mark All Messages as Read for each of your affected mailboxes.
That’s it. Done. All email imported safely and correctly from Apple Mail on your old Mac system to your new MacBook Air!
Pro Tip: I’ve been writing about MacOS since the days of MacOS 9! Please check out my huge Mac help library for hundreds of useful tutorials and how-to guides while you’re visiting. Thanks.
This was sooooo perfect. Thanks so much. I’d tried everything (and looked everywhere) to move my old client folder system to my new MBP. Nothing worked and then found your post. Great clear step by step and bingo! Job done. Only tip I could add… when all your folders come in as ‘Import 1,2,3 etc, simply rename the top level Import folder (Right click ‘rename folder’ to whatever top level heading you like. Thanks heaps again mate cheers – Mark M