Just bought a new iPhone 5s. It was time to upgrade from my iPhone 4, and wow! It’s about 25x faster and the screen’s way more beautiful and bright. And then there’s that fingerprint thing. How do I set that up?
Purely in the interest of being able to offer up valuable tutorials I upgraded from an iPhone 5 to an iPhone 5s and while I don’t see quite as dramatic a performance boost, it is clearly faster. I’m still trying to figure out when I’d want to use the slow-motion capability of the video camera on the phone, but that’s another topic. Maybe I need to force my kids to run like lunatics just for testing purposes. Yeah, that’s the ticket!
I believe I have now had every single model of iPhone that has come out, starting with the very first all the way back in 2007. In fact, I remember being at the Consumer Electronics Show when the biggest breaking story was the iPhone, as announced the same day at MacWorld San Francisco. Ah, those were the days. I had a Blackberry Pearl and the move from the Pearl to the iPhone was, in a word, an evolutionary leap.
Since then, the leaps have been more subtle, which is why the fingerprint scanner — called Touch ID by Apple — on the new iPhone 5s is so interesting. It’s the first major consumer electronics device that has a biometric identification system included, and, predictably, it’s generated some level of controversy about how the device stores the fingerprint data and whether it’s able to be hacked. That’s all solvable, and in the meantime it’s a fascinating thing to be able to so transparently unlock my phone even while my children try and try but, of course, don’t have my exact thumbprint.
In my experience, the initial phone setup sequence included an opportunity to scan your finger and get that set up, but it sounds like you skipped it. No worries, it’s easy to do after the fact too (and to add other fingers or, for that matter, other people’s fingers, to the database, since you can have more than one set up as an access key).
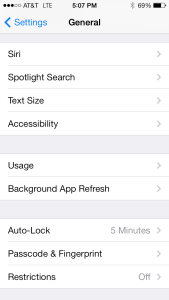
To do so, start by tapping on “Settings” -> “General” and scroll down until you see “Passcode & Fingerprint”:

Tap on “Passcode & Fingerprint” on your shiny new iPhone 5s and you’ll need to enter your passcode (hopefully you set one) before you can proceed.
My passcode is 1 2 3 4.
No it isn’t. I’m not going to tell you! Jeez! 🙂
Anyway, enter your passcode as needed:

Then you’ll see the settings for this area:

If you don’t have a passcode of any sort, the fingerprint Touch ID system is pointless. But I strongly recommend you have at least a rudimentary code to stop the most casual of people monkeying with your device.
To add a fingerprint, tap on “Fingerprints”, ingeniously enough.
Since there aren’t any set up, it’s pretty austere:

Tap on “Add a fingerprint…” and it’ll then prompt you to place the appropriate finger (I used my right thumb as I’m right handed) onto the Touch ID sensor and remove it a number of times. The sequence on screen will alternate between these two views:
 |
 |
As you proceed the red lines on the fingerprint image slowly fill in. Once they’re all red, you’re done and it’s ready to go, as you can see:

You can stop here and go try it out, but notice that in the Settings area it shows “Finger 1” and lets you add additional fingerprint scans if you’re so inclined:

More importantly note that there are two areas where the fingerprint Touch ID can be used on the iPhone 5s: for unlocking the phone and for iTunes and App Store purchases. Which you prefer will be up to you, but I fear making inadvertent purchases in the iTunes store if my fingerprint is sufficient identification for a transaction to complete, so I disabled that one.
That’s it. Done. I find it works very well and it’s taken remarkably little time to get used to simply pushing the home button to wake up the phone then leaving my thumb on the button for about 2 additional seconds to unlock it. Super easy and definitely safer if I’m driving, needless to say.
