
My husband has “live” set for the photos on his iPhone and while it’s fun to have that mini-video I really wish I could step through the frames and pick out the best one to save. Is there any way to do this on either my own iPhone or my iMac?
It’s always been a simple differentiation: Photos were still images, videos were moving images. Until Sept 2015 when Apple introduced the iPhone 6 and showed off a fun new feature called “Live Photos”. The process, they explained, adds 1.5 seconds before and after the actual image, offering a tiny 3-second video capture instead of the still image. Fun, but seven years later a lot of people don’t realize that what’s sent isn’t some special photo format but a very short video instead. This means that any video editor can also edit live photos, though there’s an even better solution.
On your iPhone, it turns out that the built-in photo editor works just fine with Live Photos once you save the image from Messages into your photo album. On your iMac you’ll find that you need to use the Photos app, again, having first saved the image into your photo gallery. I’m going to focus on how to do this with an iPhone (or iPad), but will give you a peek at the Mac solution at the end.
SAVE LIVE PHOTO FROM MESSAGES TO PHOTO ALBUM
My daughter sent me a funny live photo of her cat winking at her. The still image (what’s known as the “key image”) doesn’t show that off, however, so you have to tap and hold to get the live photo to play. Double tap on the image to do that, at which point you’ll see a view like the following:
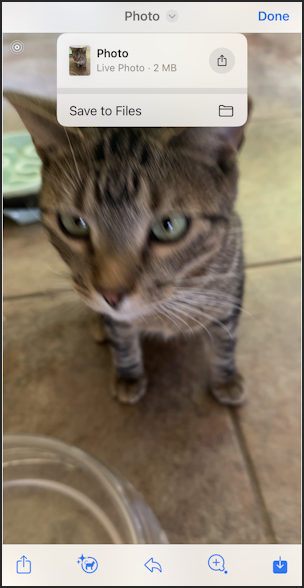
There are a number of icons along the bottom toolbar, the rightmost of which can be used to save the photo to your Files archive (which, since it’s a photo, is your photo album), but notice you can also tap on the tiny “v” adjacent to the word “Photo” along the top to reveal the menu shown, that includes “Save to Files”.
STEPPING THROUGH LIVE PHOTO FRAMES
Now that it’s in the photo album, you’ll want to switch from Messages to Photos and open up the newly saved live photo:

Notice on the top left that it indicates that it’s a “LIVE” photo. But that’s a button, offering some very interesting options if you tap on it:
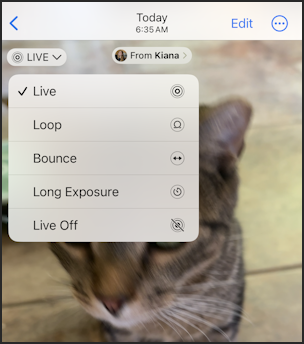
I’ll let you experiment with these options! For now, however, tap on the “Edit” button at the top.
The screen changes quite a bit:
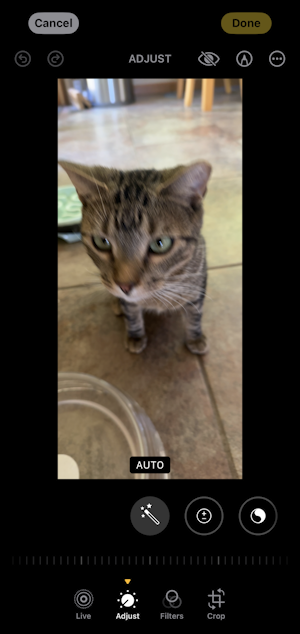
The default setting is “magic wand” which lets the iOS system automatically figure out how to improve the image quality, often quite a bit. This is all AI-powered, but Apple doesn’t make a big deal out of it (unlike some companies).
The difference here versus a regular photo edit is quite subtle, actually, it’s the greyed out “Live” option on the bottom toolbar. Tap on “Live” at the bottom.

Ah, here’s the frame-by-frame view of the Live Photo, what’s known as the “scrubber”. Tap and drag your finger along the top of the bar and you’ll be able to step from frame to frame and find the exact image you want. For me, it’s that moment when the cat winks:
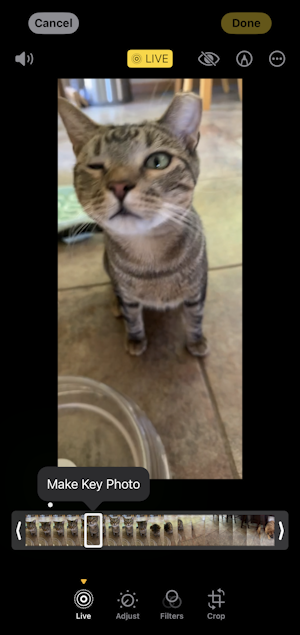
Got it! I can easily make this the Key Photo of the Live image, rather than the image exactly in the middle of the Live Photo sequence, by tapping on “Make Key Photo”. Tapped, done.
Now I can tap on the image to make it full screen and grab a simple screen capture too, extracting my favorite image from the 3-second live photo:

Not too difficult once you know you need to Save to Files, then open it up in Photos and choose “Edit” and “Live”.
IDENTIFY LIVE PHOTO FRAMES ON A MAC
What about the Mac itself? In the latest version of MacOS, you already have to double-click on the Live Photo image in Messages to animate it, but have you noticed that the frame of the window that shows the sequence also has an “Open in Photos” link? Click on “Open in Photos“.

With the far bigger screen, the Photos app can show everything at once, from all the adjustments along the right side to the frame scrubber along the bottom. You can probably figure out how to accomplish the same image save and updated key photo within Photos!
Pro Tip: I’ve been writing tutorials for the Apple iPhone since it was first released. Please check out my extensive iPhone help area for lots and lots of useful content.