
Apple just added a smart new feature to increase the security of your iPhone but it’s OFF by default. Here’s how to enable Stolen Device Protection to keep your phone – and data! – safer.
Modern devices are always seeking a balance between security and ease of use. That 4-digit PIN for your ATM debit card is fairly rudimentary (someone can look over your shoulder and memorize it easily enough) but is it enough for 99% of usage cases? Yes. Particularly when you think about the backend smarts of the system that are likely in place, including fraud detection that might include it texting you for confirmation before it allows a withdrawal hundreds of miles from your usual stomping ground.
Shortcuts: Check iOS Version | Enable Stolen Device Protection | Other FaceID Settings
Our phones are no different and often have enormous stores of personal and confidential data, from voice mails to text messages, email accounts, even bank accounts and apps that make it easier to interact with your medical professionals. Darn convenient, but are they locked down sufficiently well that you can be confident if you lose your phone – or have it stolen – that the information will remain locked and inaccessible?
Enter Stolen Device Protection, the latest security feature on Apple’s super-popular iPhone line. Your phone probably has a PIN set up and might also utilize facial recognition or fingerprint scanning to protect you, but what if a scammer learns your passcode and gains access to your phone? What information can they access and what can they change to ensure you can’t access it remotely?
As Apple describes it, enabling Stolen Device Protection means that “some features and actions have additional security requirements when your iPhone is away from familiar locations such as home or work. These requirements help prevent someone who has stolen your device and knows your passcode from making critical changes to your account or device. 1. Face ID or Touch ID biometric authentication: Some actions such as accessing stored passwords and credit cards require a single biometric authentication with Face ID or Touch ID — with no passcode alternative or fallback — so that only you can access these features, and 2. Security Delay: Some security actions such as changing your Apple ID password also require you to wait an hour and then perform a second Face ID or Touch ID authentication.”
In other words, if your phone is out of its usual geographic area, that passcode that they saw you enter or guessed will be insufficient to make important changes to your device. Smart. In fact, everyone should enable this feature right now to help all iPhones be more secure! Let me show you how to do just that, because it’s surprisingly easy to accomplish.
FIRST OFF, WHAT VERSION OF IOS ARE YOU RUNNING?
The first question is whether your iPhone is up-to-date with its version of iOS. You must have 17.3 or newer for Stolen Device Protection to be an option. How do you know what version you have? Go to Settings > General > About. On my iPhone 15 Pro, here’s what I see:
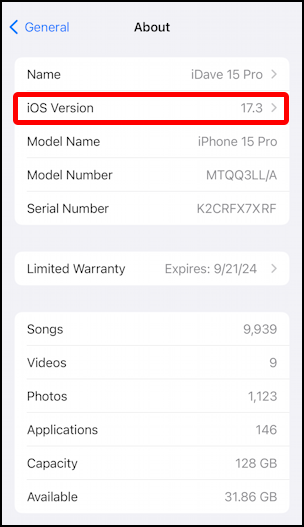
If you’re not on the latest version, back one step (use the “< General” link on the top left) then choose “Software Update” and let it update your phone. It’ll probably take about ten minutes, all told. Updated and ready to proceed? Let’s do this!
HOW TO ENABLE STOLEN DEVICE PROTECTION
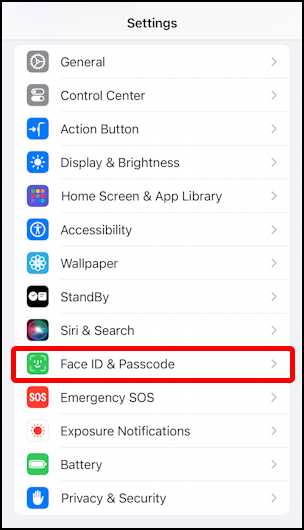
Once your phone’s restarted, if needed, go back into Settings and swipe up to find “Face ID & Passcode”:
Tap on it and you’ll have to enter your passcode. Now you can change your passcode (which is obviously problematic if someone has gained access to your phone by knowing your current passcode because they can change it to something you don’t know, preventing you from accessing your own phone. That’s the point of Stolen Device Protection!).
Face ID & Passcode has quite a few options:
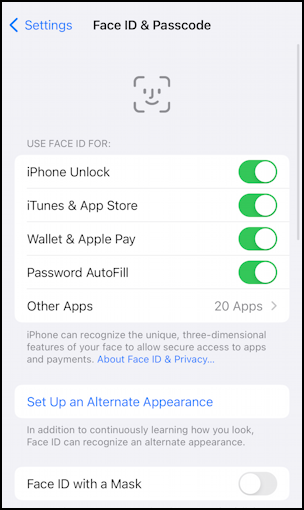
You’ll want to swipe up a bit, however, because what you seek is lower down on the app screen.
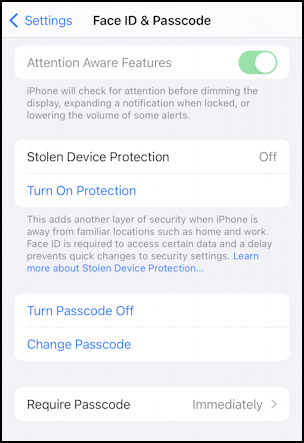
Some of the features in this area are a bit invasive (you might want to read up on Attention Aware Features before enabling it, for example). The new Stolen Device Protection feature is smack dab in the middle of this screen, though it has a curious on/off mechanism instead of the usual slider: You tap “Turn on Protection” to enable it or, if it’s enabled and you want to disable it, tap on “Turn off Protection“. An unusual inconsistency in the iOS user experience!
Anyway, tap on “Turn On Protection” and the status should change from Off to On:
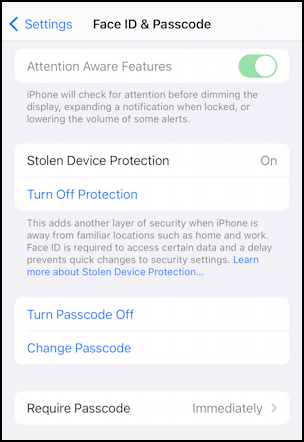
That’s it. No fanfare, no fireworks, no smiling user emoji. In fact, you should just about never bump into the Stolen Device Protection features on a day to day basis. Just know that you’ve enabled a valuable feature to help ensure that if your phone is stolen – and they know the passcode – they will have a much harder time locking you out and wreaking havoc!
WHILE WE’RE LOOKING AT FACE ID & PASSCODE
Swipe down to the bottom of this screen while you’re in this area of Settings and there are some additional options related to what you allow while your phone is locked that you might want to consider disabling:
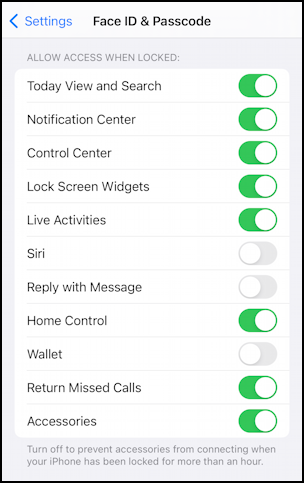
You can see what I am allowing, but I think I might disable a few of these to ensure that if I do lose my iPhone or it’s stolen they can’t create too much chaos in my life. In particular, “Return Missing Calls” might be worth disabling, as is “Home Control”. Either way, you’ve enabled Stolen Device Protection and have just increased your device security. Well done!
Pro Tip: I’ve been writing tutorials for the Apple iPhone since it was first released. Please check out my extensive iPhone help area for lots and lots of useful content.