
I have weekly meetings with my dev team and a few of them tend to speak in their native language rather than English. I understand Google Meet can offer auto-translated subtitles? How do I turn this feature on for our next meeting?
The world of language translation has changed quite a bit in the last forty years, and even more so in the last half-dozen with the rise of generative AI. Turns out that translation is just a natural for these ever-smarter software systems, so while first gen machine translation was abysmal, modern translation can be done for free and is pretty darn good. It’s also fast, so fast that it can support live translation so you can indeed have automatically translated closed captions. Are they as good as a native speaker of that language taking the time to carefully translate as they capture word choice nuances? No. But it’s often good enough.
Google Translate just announced that it’s added over 100 new languages to its capabilities, but unfortunately, only about a dozen or so have made it into the Google Meet translation capability at this time. Perhaps in a few weeks or months (and who knows, perhaps it’ll auto-recognize languages and auto-enable the live translation closed captions, but that’s just speculation on my part!)
ENABLE CLOSED CAPTIONS IN GOOGLE MEET
The first step is to enable closed captions in a Google Meet, then you can change what’s being shown. I was in a Google Meet with about 30 other people just last night, and snagged these screen captures…

Similar to tools like Zoom, Google Meet shows a set of buttons along the bottom to allow control of your presentation to others and of your experience in the meeting. Red are the important ones, so you can see that I’m muted while Ally talks, and that if I’m ready to bail, the “hang up the phone” icon is easily found.
Look closely at that center control strip and you’ll see that one of the icons is “CC”:

Click on it and you’ve enabled live closed captions:
 In practice, it looks like this:

It’s not always perfect English grammar, but then again, most people speak a bit more awkwardly than they write, so closed captioning often captures how we re-think phrases half-way through, etc. Suffice to say, if you want to read instead of – or in addition to – listening, it’s a great option.
ENABLE LIVE TRANSLATION
With closed captions enabled, click on the three-vertical-dots “more” button to bring up a menu of additional options in Google Meet:

Lots of fun things to explore here – I’m partial to the visual effects, so “Apply visual effects” can let you change your background. Peek back at the first screen capture and you’ll see I have a faux background set.
For our task, however, choose “Settings“, then “Captions“…
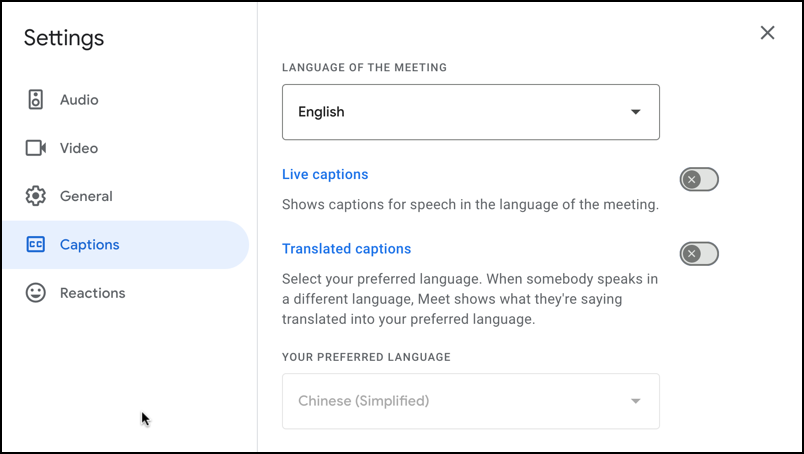
You can turn on or off closed captions (they call them “live captions” here, which is a bit confusing when they use the “CC” button for “closed” captions on the main toolbar). More importantly, once you’ve enabled captions, you can also enable “Translated captions” by clicking on the slider. Then choose your desired language; The default is Chinese (Simplified) but I’m going to choose “Spanish”.
The result is that Ally’s now auto-translated into Spanish within Google Meet:

Now, a few caveats. Sometimes I don’t see the Translated Captions option, which might occur if everyone attending the meeting has the same language specified as their default. It also doesn’t offer your own language as one of the “preferred” languages for translation, which suggests that the translation settings are required on the side of the speaker, not the participant. The Google help page on the translation feature is not helpful, unfortunately, so you might need to experiment a bit, possibly with the assistance of your colleagues who are speaking a different language, to figure out the nuances of how this all works. Once you do, please add a comment to share your findings with everyone else. Thanks!
Pro Tip: I’ve been writing about video conferencing and screen sharing tech for quite a while. Please check out my Zoom, Skype and Google Meet help area here on the site for more useful tutorials!