I’m going crazy! My Windows PC keeps dimming the screen, then brightening it again, even though I’m not touching the brightness control! What’s going on and how do I stop it so I can set a brightness level and have it stick?
When computer display units were basically modified television sets, there were two controls: brightness and contrast. That was it, and you tweaked them to get the text on screen (graphics? pictures? not back then) to have a pleasing contrast with the typically very dark grey or black background. Simple and easy to understand. As we’ve gained sophistication in display technology and they’ve long since been designed specifically for computer imagery, we’ve also gained complexity. Some of it’s good: color matching to ensure that your display is calibrated is critical for design work. Some of it, however, is a bit more head-scratching. Does anyone really know what a color gamut is? 😉
One of the biggest changes to display systems was when developers realized that they could tap into on-board cameras and clocks to identify ambient illumination and time-of-day. This allows some great features like Night Light, which removes the blue frequencies from your display late at night to avoid messing with your sleep cycles! It also allows your computer to automatically adjust its brightness level based on the ambient lighting. When it works.
Shortcuts: Auto Brightness | Night Light | Advanced Settings
Sometimes it just has a hard time, particularly if you’re in an environment where the lighting can be variable. It can also take a few minutes to “decide” the ambient illumination level, which is why sometimes when you first turn on your laptop the screen will become brighter, then dimmer. Usually it works but if it doesn’t, here’s how to disable this feature so you’re back in control of your display brightness.
AUTOMATIC BRIGHTNESS ON A WINDOWS PC
Starting at the beginning, there are likely two keys – or function keys – that allow you to adjust your brightness. On my Lenovo Notebook, they look like this:
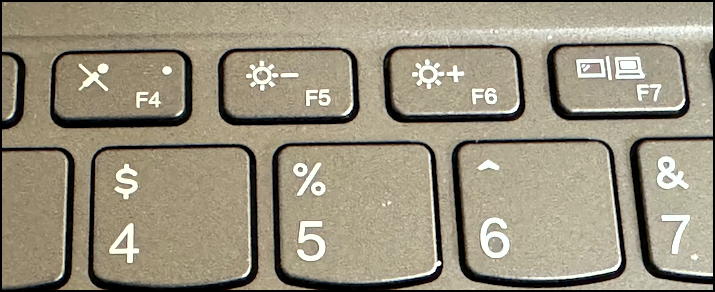
Since it’s so critical to the use of a modern computer, I’m sure you’ve already found your equivalent. Much easier than finding a knob or dial on the bottom or back of the computer screen!
These let you make the display more or less bright, but once you get it set to where you prefer, it can be quite annoying for Windows to then adjust it again because the sun went behind a cloud. To fix that, you’ll need to go into Settings then choose Display:
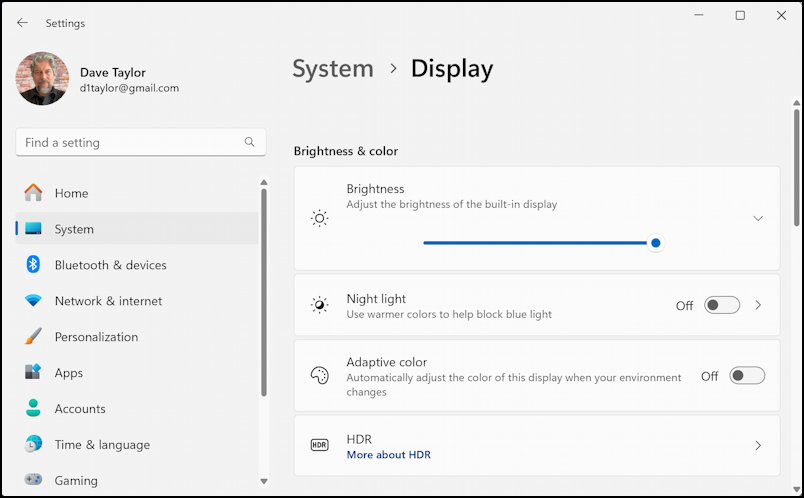
The slider allows you to also adjust the screen brightness: Mine’s up at 100% so it’s highly legible in an otherwise bright room. What’s not obvious is the “V” adjacent. Click on it and this pane expands…
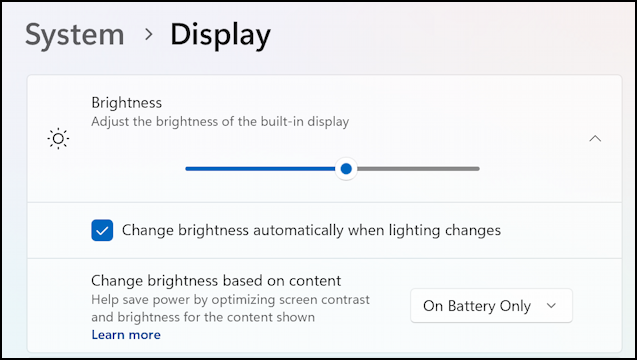
There’s the setting to disable “Change brightness automatically when lighting changes“. Uncheck that and you’ve fixed your problem. Maybe. There are other ways that the system might adjust the screen without your interaction too, one of which is immediately below this checkbox: “Change brightness based on content”.
This one’s interesting because it’s actually a power saving feature that has your PC analyze the content on your screen, then dynamically adjust brightness and contrast to optimize viewing quality while conserving power. As y0u can see, it’s disabled if your computer is plugged in and charging (or if you have a desktop computer), but there are a couple of options you can see if you click “On Battery Only”:

I recommend you leave it “On Battery Only” as a way to conserve some battery power. If it gets annoying, now you know where to find and disable this feature.
BONUS: ENABLE NIGHT LIGHT
While you’re in Settings > Display, I strongly encourage you to enable Night Light. The setting is just below the brightness slider:

You can turn it on and your screen will become more sepia as the blue frequencies of light are subtracted from the display. It’s jarring to just turn it on, which is why there’s also a scheduler. Click on the “>” just to the right of the On/Off switch and you’ll get to the Night Light details view:
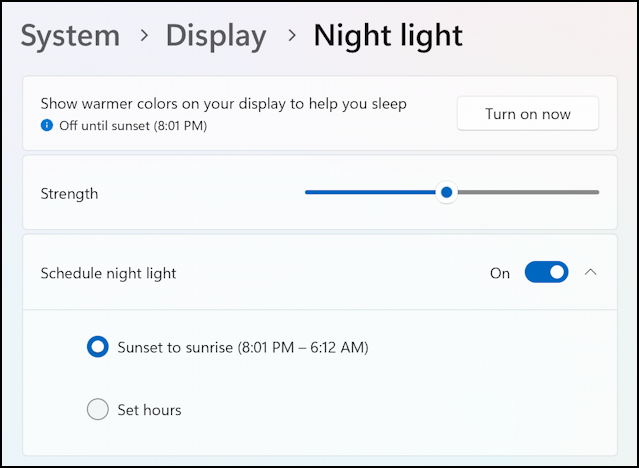
Enable the Schedule and choose Sunset to sunrise (as shown). It will change throughout the year as the days get longer and shorter, and it gradually enables night light rather than a jarring transition. If you haven’t used it before, I suggest you have the strength at about 20% – 25%, then in a week or so move it up to 50% or even 75%. On my main computer I have it almost at 100% to gain the maximum benefit.
Benefit? Yes, research shows that blue frequency light (e.g., daytime) lowers the amount of melatonin in our brain which wakes us up and increases our alertness. Exactly what you don’t want to do at night while you’re checking email or chatting with a few pals before you head to sleep.
Did you also notice the Adaptive Color setting in the Settings window? That’s something to try if you’re still having your computer randomly change colors in a way that you dislike.
ADVANCED DISPLAY SETTINGS
There’s one more place that might affect your display without you changing anything manually, and that’s tucked away in the Advanced Display settings. Get there by going to System > Display > Advanced display:
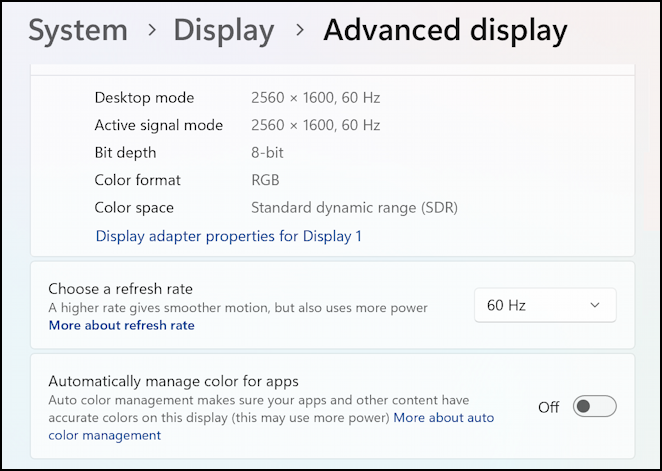
You really shouldn’t have to go into the advanced display settings to change anything, particularly with a standard display or popular notebook computer. Just in case, however, be aware that there’s an “Automatically manage color for apps” setting that can adversely impact your display. Microsoft explains it as “Auto color management makes sure your apps and other content have accurate colors on this display”.
Between all of these settings, you should be able to wrestle back control of your display brightness! Good luck.
Pro tip: I’ve been writing about Microsoft Windows and its many tools and utilities for quite a few years at this point. I started with Windows 3.1! Please check out my extensive Windows help area for more useful tutorials while you’re here.
