I was on a Zoom call with my Mom the other day and really wanted to show her how to do something in Microsoft Word. I wanted to share my iMac screen, but only have her see that app’s window. How do I share an app window rather than my full screen in Zoom?
There’s a common impression that the popular Zoom video chat and meeting system is really just about having a lot of live video streams in a shared space and everything else it does has been grafted on last minute. Completely false. In fact, Zoom has been around for quite a while and offers quite powerful and flexible screen – and app – sharing capabilities. Not only that, but you can plug in an external camera (even your smartphone in some configurations!) and use that as a shared video source too!
There are also a lot of different settings spread across a number of different places in the app and on the Zoom web site that you’ll want to check prior to sharing your screen with your Mom, your colleagues or your poker group! But I’ll get into that too, so let’s start at the beginning. You already have a Zoom account, but what’s not clear to most people is that not every setting in your account is accessible from the Zoom app itself. But let’s start in the app anyway. Launch Zoom, then go to your Settings/Preferences and choose “Screen Sharing”:
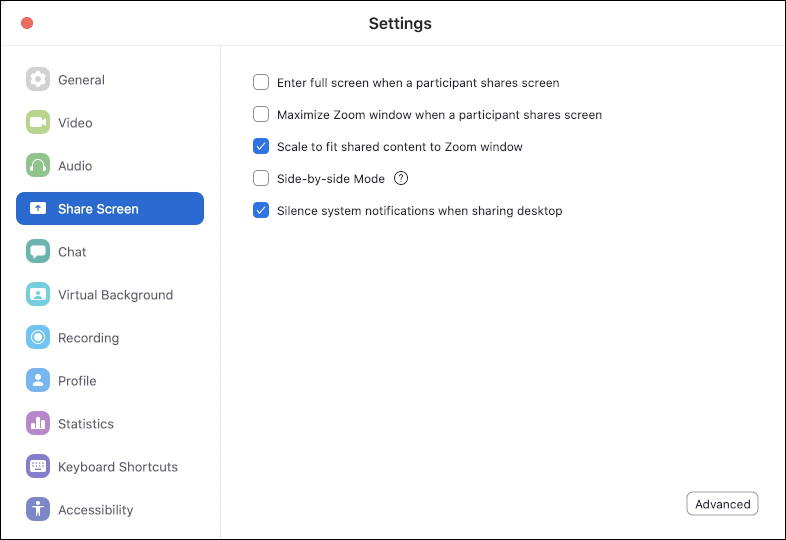
As you can see on the left side, there are a lot of categories of settings. It’s a complicated program! Also, this is the Mac interface, if you’re on Windows your settings might look a bit different, though you should have access to every single feature in the same manner. You can see my recommended settings for here: I disable ‘enter full screen‘ or ‘maximize‘ when someone else shares their screen on a Zoom call, and instead choose to ‘scale to fit shared content to Zoom window‘ so I can manually decide whether to full screen or not when on a call.
Ever been on a zoom call when you can hear the beeps and notification sounds as someone else gets email or a chat request? You can disable that when you share your screen with the ‘Silence system notifications when sharing desktop‘. Do that: Do they need to know everything going on with your computer? 🙂
There’s a lonely little ‘Advanced’ button on the lower right of this window too. Click or tap on it and there are a few additional settings you might want to peruse:
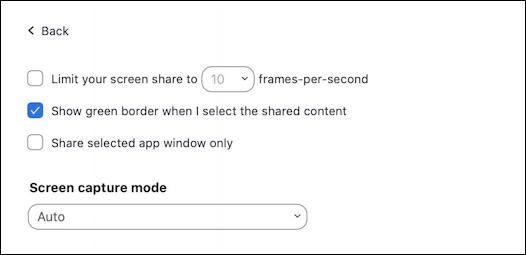
These are really for people who tend to do a lot of screen sharing, like instructors or teachers offering up a class. If your students or fellow participants complain that your screen is jumpy or stuttery when you’re moving things around or performing actions, dropping down your frames-per-second (fps) can be very helpful. For most people, however, you can ignore all of these Advanced settings.
Instead, go to Profile on the left side menu:
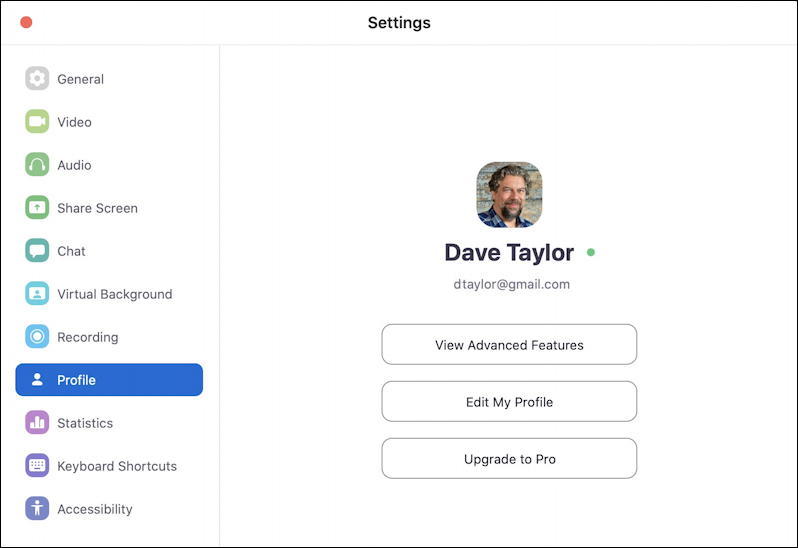
Now click on “View Advanced Features” and it’ll jump you to the Zoom Web site where you will probably have to log in to your Zoom account again. It’s confusing, but the app has some level of control over your Zoom experience, but there are also settings and features that can only be adjusted or fine-tuned in your profile that’s on the Zoom site itself.
In your Web browser, you’ll see a page with a really long list of settings and preferences. Definitely worth reading through them and remembering what’s where settings wise. Eventually you’ll scroll down and get to the screen sharing section:
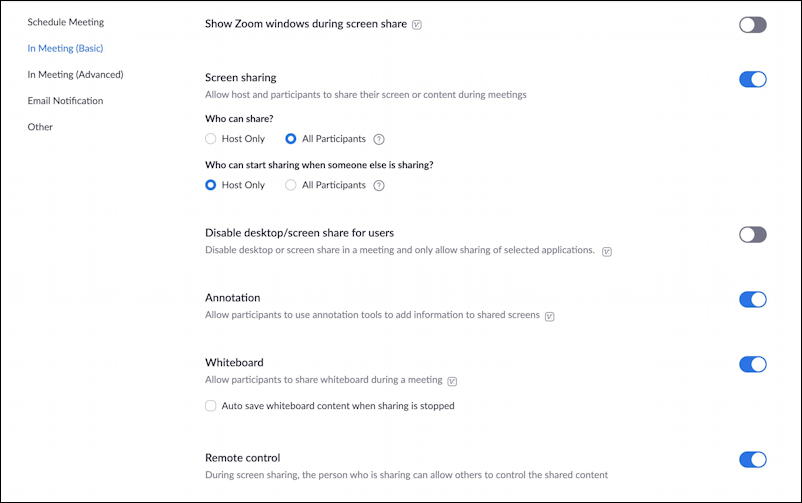
If you ask your Mom to share her screen with you and Zoom won’t let her, this could be why: Make sure you enable “Allow host and participants to share their screen or contents during meetings“. Also allow All Participants to share (which might not be advisable if you Zoom with a bunch of drunk buddies on a Saturday night. ‘nuf said on that!) The other really important feature to consider here is Remote control. As the prompt says, “During screen sharing, the person who is sharing can allow others to control the shared content“. If you’re a teacher you for sure want to disable this!
Those are the important settings on the Zoom site itself surrounding screen sharing. Complicated, yeah. But you really only have to go through these and tweak them to your preference once, then you can just get on with sharing your screen, app, remote camera, files, or whatever else you’d like.
Let’s have a look! I’m just going to fire up a Zoom call so I can demonstrate some additional features…
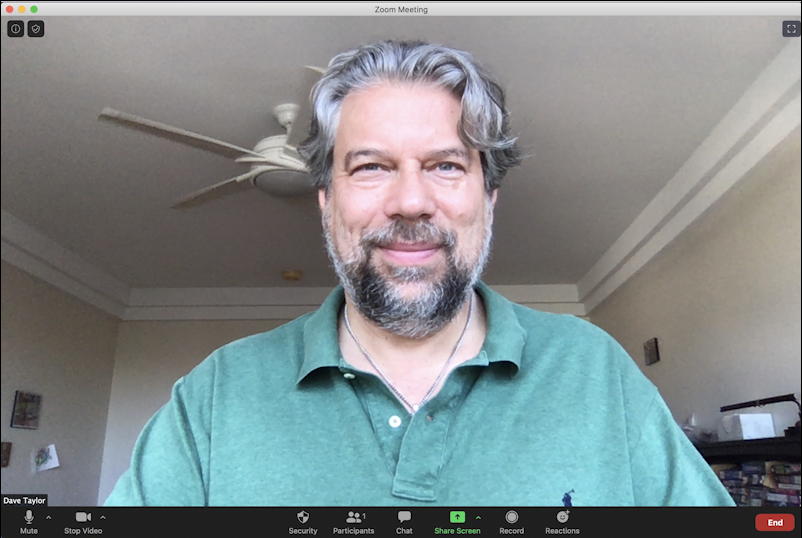
Hopefully you’re already familiar with the toolbar along the bottom. Left to right, it’s Audio (it might say “Mute” if your audio’s live), Video (it might say “Stop Video” if your video is live, as mine is), then Security, Participants, Chat, Share Screen, Record, Reactions and, all the way to the right, End. Yours might vary slightly depending on what features are enabled for a specific Zoom chat session (e.g., Chat can be disabled, for example).
Click on the tiny up arrow adjacent to Share Screen and a tiny menu pops up…
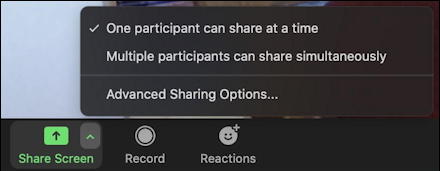
Yes, more settings. Choose “Advanced Sharing Options” and you’ll get even more choices that you can adjust:
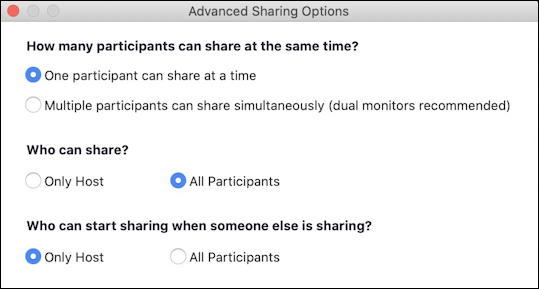
These are generally settings for this particular call or session whereas those on the Web site are for all of your calls, whether you originate or are a participant (though the call’s host or owner can override your individual settings if you’re a participant). This means that you can have your default be that all participants can share, but use this in-app setting to change a particular call to be only the host can share to ensure your students don’t do wacky stuff!
Oh, so many settings. It is rather overwhelming. But, finally, close the Advanced Sharing Options window and click on the Share Screen button itself!
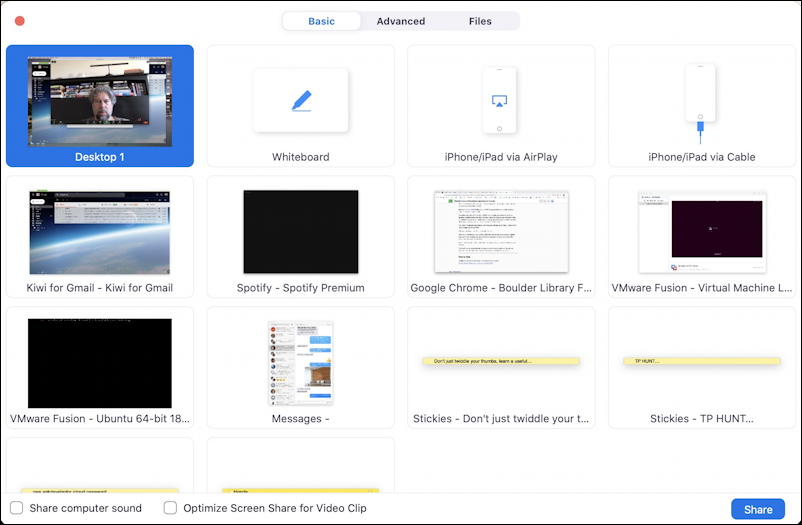
In addition to listing each of my open Windows on my Mac (including each Stickies note individually!) it offers some other really interesting options: A whiteboard, my iPhone or iPad via AirPlay or my iPhone/iPad via a cable connection. that’s how you can use your tablet or phone as a separate camera to, for example, show participants a sketch you’re doing, with you on camera through your webcam simultaneously!
Notice the tabs along the top: Basic, Advanced, Files. Click on Advanced and there are yet more options:

You can just share the top left of your screen, for example, or just the audio from your computer if you want a background song playing or even a second camera like a book scanner. That’s a lot of flexibility. And what about files? A click reveals:

So you can easily share a file with your participants from your Microsoft OneDrive, Google Drive or Box repository. If you’re thinking “ah, so it’s good to upload a file I want to share to a cloud service first” you’re spot on.
And… finally… back in the Basic screen share window, don’t miss the two really important checkboxes on the lower left:
![]()
Got it? Yes, that’s a completely bonkers number of features and options but now you know what you can do, how you can fine tune and really dial in exactly how you want to share and what you want to share, and make your Zoom calls – even with your Mom! – work great for you. Now call her back and help her out, you power zoomer you!
Pro Tip: I’ve been writing about Mac and Windows systems for a really long time. Please check out my Mac help and Windows help while you’re here, as well as my other Zoom help articles too.

Incredibly useful info – thanks for posting Dave.
I do have one question though. When I’m teaching in a classroom I have 3 screens, my main laptop screen which is duplicated onto a projector that the whole class sees on the wall behind me and this is also the screen I am sharing in Zoom. The third is an additional screen on my desk where I can drag my zoom attendees so the physical attendees can’t see them.
I also use this 3rd screen for file manager so I can dart about into different files and then drag them onto my main screen
The problem I have is that when I share my main screen the thumb of my zoom attendees becomes really small and often gets lost behind either windows. Is there anyway I can make their images much bigger and also so they stay on top, whatever happens.
Thanks in advance
Ah, I think that might be a question for Zoom tech support, Linda. Good luck!
So I have a second monitor so I can drag the chat over. During a teaching session, share screen showed the wrong monitor and I couldn’t figure out how to share the right screen with dual monitors. What did I do wrong?!
Thanks!
Try starting Zoom on the second monitor and see if the screen share still works? Or, better, share an app window, not a full screen, and you’ll find it won’t matter what monitor it’s on.
While screen sharing a video for class, I wanted to continue to monitor and check particiapnts coming and going, and answer chats, however these actions interfered with the surface of the video students were watching. They saw my cursor moving to and fro, and dark boxes where I had opened the folders for chat and participants (and the actual screen share control bar, at the top of the screen). Is the only solution for monitoring and controlling these features while sharing a screen with a video to physically add a second monitor to my computer, and select that as my screen for sharing? Are there any other options? I couldn’t locate anything in settings which would allow me to have this feature.
Thank you
You should be able to do that, Mary. Make sure you’re sharing *the window that the video playback is in* not your Desktop, and it should work. You can test it by joining a test Zoom meeting with your phone or tablet as a participant, then try various things to see what works best.
Is it possible for students to look into your photo file if you are screensharing with the class? You are just showing another program, not your photos. However, I am worried that they might be able to somehow get my desktop and look at other things I have stored there, some personal IDs are stored in photos …it just occurred to me that they might be able to access something even without the remote control on.
No, it’s not possible, Dee. And if you ensure that you share the *window* from the app you want to share with your students (e.g., a Web browser page, a Word document a PowerPoint slide deck) then they won’t be able to see what’s on your computer Desktop either.
Great article! One question – for our corporate Zoom account, even if we enable Silence notifications while screen sharing, we still see Skype messages popping up. Any idea on how to resolve that?
Bah, Skype. Sounds like they’re not respecting the notification parameters. Hmm… maybe disable Skype notifications within Skype or log out of the Skype service for the duration of Zoom calls?