While modern disk subsystems are incredibly reliable, things can definitely go wrong. Little oddities like losing a few words of a document might be easy to shrug off, but entire disks going corrupt and becoming unreadable would be a crisis. Here’s some basic maintenance you can do on a MacOS system to avoid problems, and how to erase and reformat a disc if you really have to start over.
Imagine back in the early days of computing when people worked with floppy disks, literal discs of magnetic media trapped in a floppy or hard plastic case. They had very little capacity and failed with some frequency. Zoom forward a few dozen generations of storage media and we now commonly have enormous arrays of RAM memory chips acting as hard drives (solid-state drives) that almost never fail. But almost and never aren’t quite the same thing, so every operating system has ways to check and verify everything’s working well.
On the MacOS side, there’s a terrific administrative tool called Disk Utility that is written by Apple and included in your own OS, whether you’re running MacOS on an iMac, MacBook Air, MacBook Pro, or even a Mac Mini. It’s a bit tricky to use because clicking without paying attention can have very bad results but with a bit of care, it can not only be a lifesaver, but it can help you avoid problems before they become critical.
For most users, the best way to utilize Disk Utility is to occasionally run its “First Aid” check to ensure that your hard drive and all the files and folders thereon are properly formatted and without error. If you want to reformat a drive to give to someone else or yours has failed and you’re trying to start over, Disk Utility can also wipe and reformat a disk too. Let’s look at both use cases…
HOW TO RUN DISK FIRST AID ON A MAC
Disk Utility is tucked into the “Utilities” folder in “Applications” on your computer. You might never have looked in that folder, but there are actually a number of useful tools. Disk Utility’s icon looks like this:

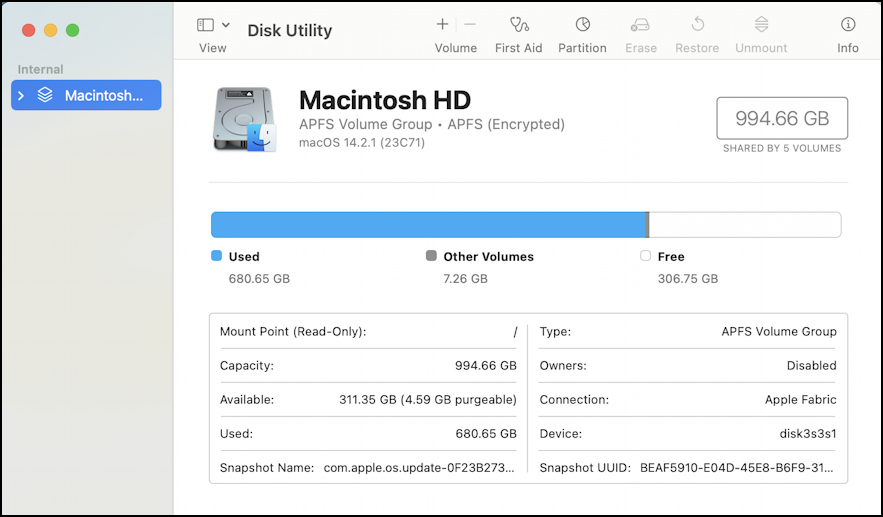
Launch it and you’ll see something very similar to this:

It’s a 1TB drive, why is it showing 994.66GB available? A fair question! Turns out that the operating system itself needs a bit of space to organize all of the files and folders on the drive, that’s where the few gig have gone. Nothing to worry about, it’s true of all disks at all sizes. Notice this shows that the drive is encrypted, running Apple File System, and that I have 306.75GB available.
If you have multiple disks, perhaps some external drives, they’ll all show up on the left side too. Along the top are the major tasks that Disk Utility can perform. Some are greyed out because “Macintosh” is my boot drive (the disk that includes the operating system itself). I’ll get back to that in a moment. For now, we want to run that check to see if all is well, which is done by clicking on “First Aid”. It will pop up a first confirmation window:

Then, because it’s the main boot drive, it’ll also remind me that the system itself will essentially disconnect for a few minutes (or longer, if you have a big drive and lots of problems encountered) from the drive to allow the tests:

Before you proceed, it’s best to quit every other program on your Mac to ensure nothing else tries to write to the disk while you’re running First Aid. Ready? Click on “Continue“.

SSDs are faster than physical media, and newer drives are generally faster than older drives; the slower your disk drive, the longer this process will take. My 1TB SSD drive took just a few minutes to verify everything. Eventually you’ll see this:

You can “Show Details” to skim through what it did, but it will generally notify you if anything major is encountered.
That’s it. Done. Maintenance complete. I run this maybe every 3-4 months on my drive as a sort of MacOS insurance policy against things possibly going bad.
REFORMAT A DRIVE WITH MAC DISK UTILITY
The other major task that Disk Utility can perform of value is that it can either erase a disk, or it can erase it and change its disk format. For example, you might have an external drive you’ve been using on a Mac and now you’d like to have it work on Mac and Windows computers. Doable!
I have an external drive I’m going to be giving to my daughter for her use as a backup device and I want to ensure that it’s completely empty beforehand. In fact, I’m going to also switch it from the Apple APFS file system to the Windows compatible “ExFAT” file system too. This is also done with Disk Utility…
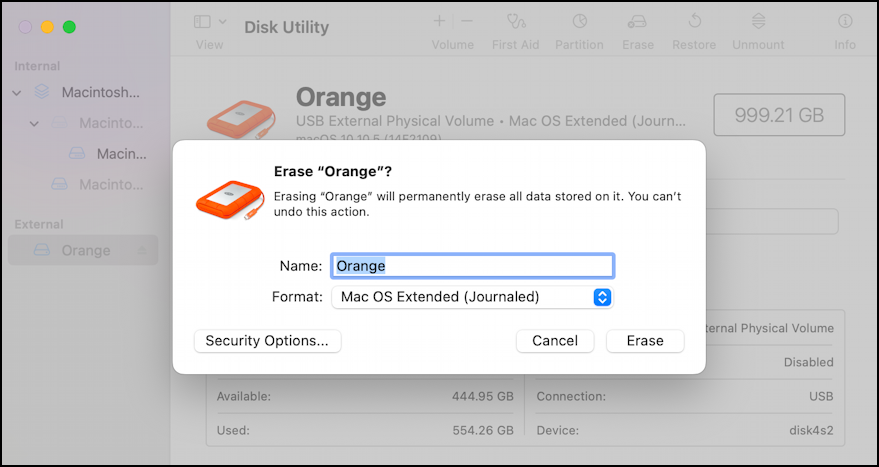
This time I’m going to choose the drive, then click “Erase” from the top bar:

You can see that it’s a MacOS Extended Journaled format and called “Orange”. I can rename it, but more importantly, I can choose a different format.
NOTE: Erase will indeed erase everything on a disk drive, so be very, very careful you choose the correct drive and that you don’t need any files or other content from the device prior to proceeding. Remember the carpenter’s motto: measure twice, cut once!
To choose a different format, I simply click on the current format listed:

The format that’s maximally compatible with other computers is “ExFAT”, as shown, but if you’re working with a Mac system or two, then I recommend “APFS (Encrypted)” or “APFS (Case-sensitive, Encrypted)”.
Ready to proceed? One thing you can select when you reformat a disk with Disk Utility is how hard it should try to cover up the previous contents of the disk. Without any security options selected, most files will probably be recoverable for someone who knows how to work with hardware. Adding any security options, however, significantly adds to the time required to erase and reformat the drive.
Click on “Security Options” to see the choices. Here’s the default:

As you can see, the Fastest “does not securely erase the files on the disk”. It’s a slider so you can choose just how aggressively you want the program to work on overwriting the data. I’ll move it up one step:

The lower portion explains what’s been added to the task. Given that I’m reformatting a 1TB physical drive, this is going to add quite a bit of time to the task. But let’s give it a whirl! I’ll click “OK” to proceed.

At this point, I’m actually going to leave my computer to run overnight because it’s going to take hours and hours. For most people, however, I’ll note that the regular reformat is probably just fine if you’re starting afresh with your disk or giving it to a friend or family member. If you’re donating it to a charity, however, take the time for a secure erase. As they say, better safe than sorry.
That’s it. Two of the most important tasks that Disk Utility can do for you to help ensure your Mac continues to be able to read and write all your precious files, photos, music, videos, and every other document you store!
Pro Tip: I’ve been writing about MacOS since the first release and have hundreds of helpful tutorials here on the site. Please check out my Mac help library for lots more useful content while you’re here!
