
Time Machine is a solid backup solution for Mac users if you have an external or network drive. Sometimes, however, that drive fails or you change location so it’s not available. You start to get the dreaded “No Backup for 2 Days”, “No Backup for 4 Days”, etc alerts. Annoying. Here’s how to eliminate them from your Mac experience.
Modern computers and the increasingly common solid-state drives (SSD) are vastly more reliable than in the past. It’s still a good idea to have a reliable backup strategy, however. This is something worth setting up for your Mac, PC, even your smartphone, because ya just never know. Once it’s set up, you can forget about it, knowing it’s keeping your data safe.
Then, when something bad happens, like accidentally deleting an important file, you can go to your most recent backup and recover an earlier version of the file. Much better than being empty-handed. With Apple’s Time Machine, there’s even a cool “time tunnel” style interface that lets you “travel back through time” looking at versions of files and folders.
Having said all of that, the modern backup approach is utilizing the Internet. While iCloud doesn’t directly support system backups for your Mac, there are plenty of third-party companies that do a great job. I have been using iDrive for years and have a redundant backup that uploads to Dropbox.
When I recently moved my office, I decided to disconnect my external Time Machine local backup device. Well, maybe “decided to not plug in” would be more accurate. All good, but then the dreaded “no backup for X days” alerts started showing up every evening. It was a valid error message, but since I had no plans to reconnect the Time Capsule device, I needed a solution, and it turns out it’s pretty easy to shut down that alert, but you have to know where to look.
Note that if you want to continue using Time Machine for backups but suppress that alert when it sporadically fails, you won’t want to follow the guidelines herein. Instead, just plug in that drive as often as possible!
TIME MACHINE ALERTS
Okay, back to the error. Here’s what I was seeing:

Certainly not a show stopper, but imagining that I’ll see this every day forever does sound more than a bit annoying, so it’s worth fixing the problem.
Not to state the obvious, but the following Time Machine alert is different and much easier to remedy:
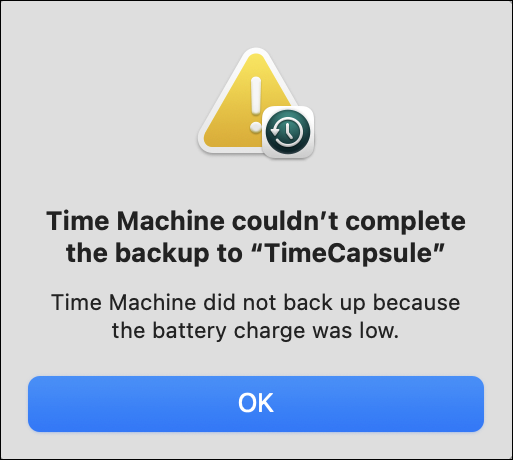
You can enable Time Machine to perform its usual backup when you’re on battery power, but it is careful not to run if the battery is too low to ensure it doesn’t die and potentially corrupt the archive during its process. Fix: Plug in your computer, run Time Machine again.
TIME MACHINE SYSTEM SETTINGS
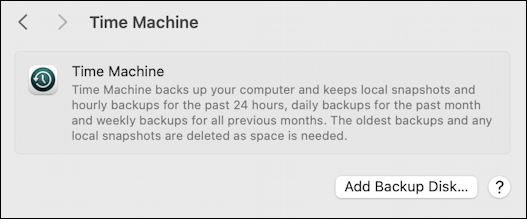
Since Time Machine doesn’t have its own app, it can be a bit mysterious where you control the program. Solution: It’s buried in the System Settings. Go to System Settings > General and you’ll find a section labeled “Time Machine”:

A click on “Time Machine” and your configuration is revealed:
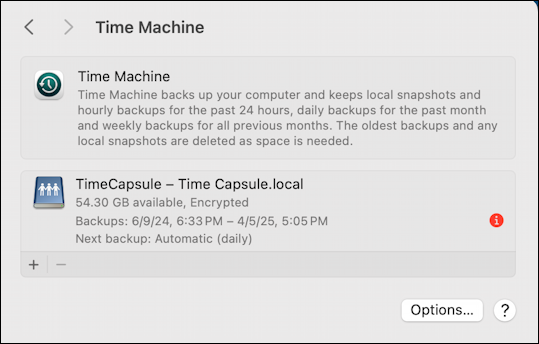
Notice the tiny red alert icon. Something’s wrong! In fact, if you read the text carefully, you can see that the most recent backup was on 4/5/25 at 5:05 PM. Given that I’m writing this on 5/10/25 that means it’s been 35 days since the last successful backup. No wonder it was complaining!
At this point I have to make a decision. If I want to fix things, I now know what external drive I need to plug in: “TimeCapsule”, as shown. If, for example, the backup was getting too big for the backup device and I wanted to modify it, I could click on “Options…” and change what folders are excluded from my backup…
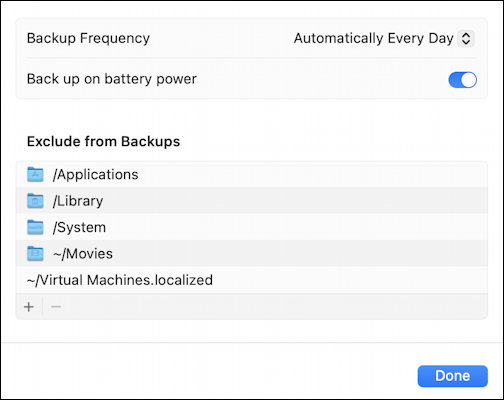
This is also where you can change backup frequency — perhaps weekly works better? — and control whether it tries to complete backups when the device is only battery power, not plugged in.
TO REMOVE A TIME MACHINE BACKUP
Since I’m not going to be utilizing Time Machine anymore, Options isn’t the right place to look. A click on “Done” and it’s back to the main Time Machine view. This time, I’m going to click to select it, turning the entire entry blue:
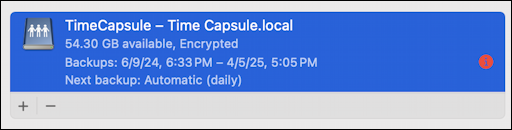
The backup schedule is removed with a single click on the “-” button at the lower left.
A confirmation window appears:
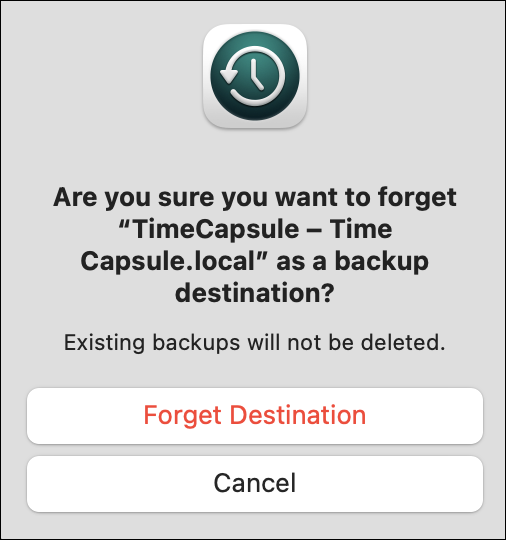
It’s rather curious how it’s worded because it’s not cancelling a backup routine, it’s just forgetting a backup destination. The end effect is the same, however, so I’ll forgive Apple for this confusing miswording in the program. 🤓
Anyway, a click on “Forget Destination” and the backup device is disconnected, and the backup schedule is eradicated from Time Machine. The display changes a bit:
Since I don’t have the external drive plugged in, as explained, it’s no surprise that when I click on “Add Backup Disk…” I just get an error message:
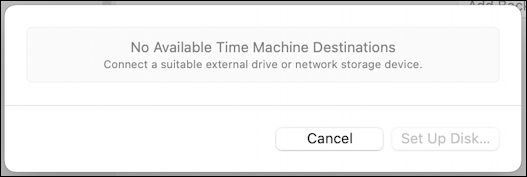
That’s the job completed. No more alerts from my obsolete backup task. If I do want to re-enable this backup, with access to its historical data, I can plug my relatively ancient Time Capsule back into the network and come back here to select it. To create an entirely new backup schedule, I’d plug in a new drive (or reformat the Time Capsule) and set it up from this point in System Settings.
Pro Tip: I’ve been writing about MacOS since the first release and have hundreds of helpful tutorials here on the site. Please check out my Mac help library for lots more useful content while you’re here!