
I just rearranged my office and moved my second monitor to the other side of my work area. But my MacBook Air still thinks it’s on the left side: How can I change its virtual location in MacOS to match my new desk setup?
The ability to work with computers across multiple screens has always been a great feature, whether you’re a day trader with multiple full-screen market trackers or a gamer who wants a more immersive experience while enjoying your latest titles. Configuring them so that the software’s understanding of the actual location of the displays matches your setup hasn’t always been easy, however, and in the beginning even involved command line operations.
Apple has always developed gear for pro designers and artists, however, so multi-display setup has become quite straightforward if you know where to look for the settings and options. You’ll also want to update to the latest version of MacOS – Ventura, MacOS 13 – so that your settings screens look the same as mine: The jump from 12 to 13 introduced a startling new design for System Settings in MacOS, one that’s rather a bit jarring the first time you see it!
Shortcuts: Display Settings | External Display Settings | Display Layout
FINDING THE DISPLAY SETTINGS IN MACOS 13
Off the Apple menu, choose “System Settings…” then go down the list on the left side of the resultant window to choose “Display”. Here’s how it looks with no external displays:
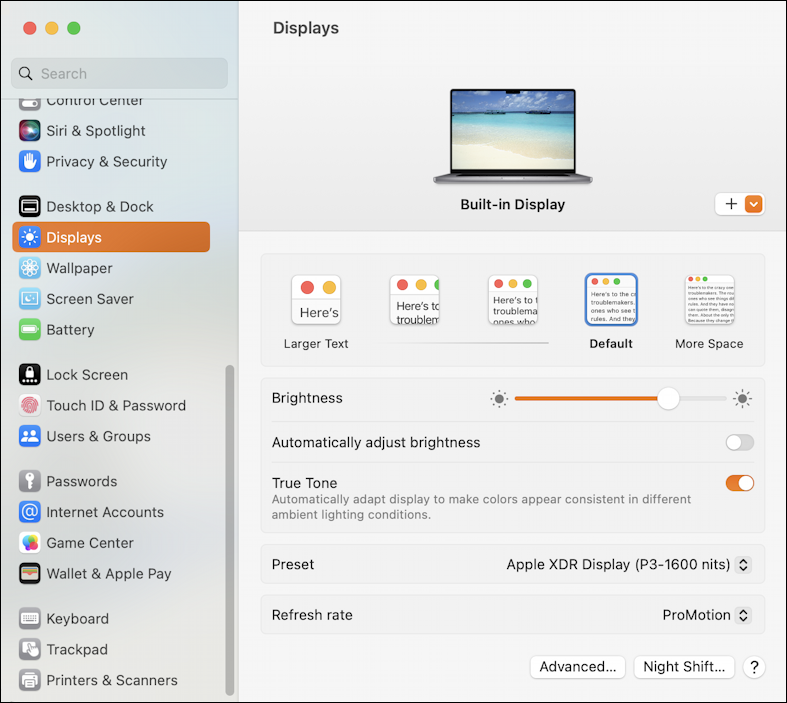
For a single display, it offers an easy ability to change resolution based on text size, a brightness slider, access to auto brightness and True Tone (almost always something you want to enable), along with details of the identified display hardware and image refresh rates. There’s more you can do from here, but I’ll come back to those additional features in a bit. For now, check out what happens when I plug in a second display:
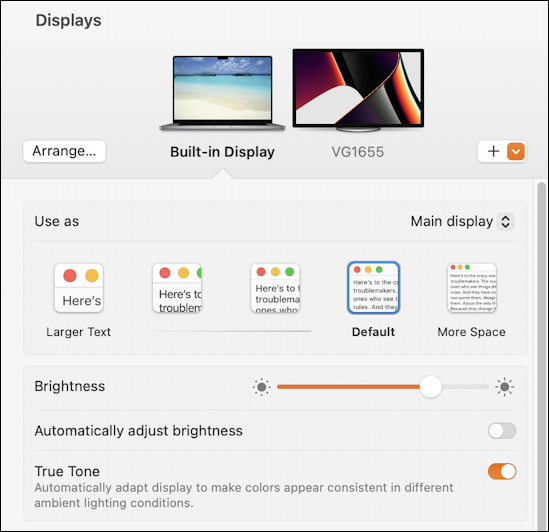
I’ve plugged in a ViewSonic VG1655, as it’s showing. What’s new in MacOS 13 is that I can actually change the settings of the external monitor without moving my attention from this screen. Before we check that out, however, notice how the two displays are shown: The external monitor is to the “right” of the built-in display. That’s the virtual arrangement I have set up, even though I moved the monitor to the left of my MacBook Pro. We’ll fix that in a moment.
ADJUSTING EXTERNAL MONITOR SETTINGS
Check out the settings of your external monitor by clicking on it in this view. For me, a click on VG1655 changes all the settings and options…
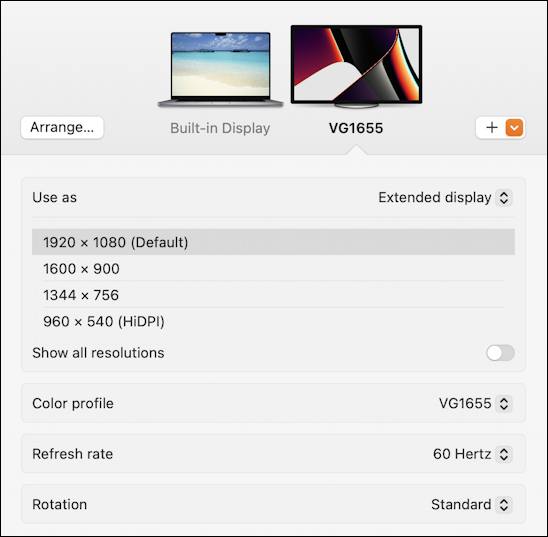
Since the display is a basic HD screen, 1920 x 1080 is perfect, with a 60Hz refresh rate. Note that it’s super easy to rotate the image if you have an unusual configuration (for example, an external monitor mounted to the ceiling of your office can be easily rotated 180º to work). This ViewSonic supports portrait mode which I sometimes use for reading documents, and it’s on this Settings screen that I rotate it 90º to work.
HOW TO UPDATE YOUR MULTI-DISPLAY ARRANGEMENT
Do the settings look good? Great. Click on that “Arrange…” button at the top left. When I do it, no surprise, the external display is shown to the right of my laptop:
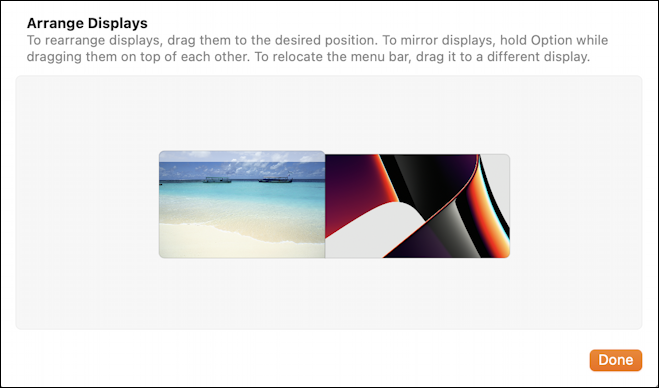
It’s easy to click and drag displays to have the virtual layout match your actual arrangement. I click and move the ViewSonic display to be on the left of my main display with a simple drag motion. To confirm, I hover my cursor over one of the images and the pop-up tip confirms that it’s the Built-in Display:
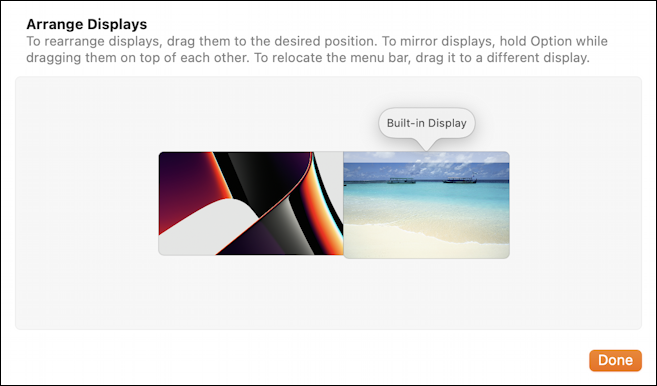
It’s much easier to arrange displays so that the tops are lined up, in my experience, but your experience may vary, particularly if you have more than one external display or monitor.
That’s basically it, though. Want to mirror the contents of your main display on the second display, perhaps for demos or training purposes? That’s done by closing up the Arrange Displays window and opening up the “Use As” menu to change from “Extended display”:
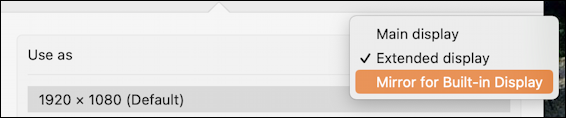
Notice you can also choose the external monitor as the main display (if, for example, your laptop screen was broken but you still needed to use the computer for data recovery). For 99% of users, either mirroring or extended works great.
Finally, one bonus item: Did you notice the “+” on the top right of the Displays system setting? Click on it!
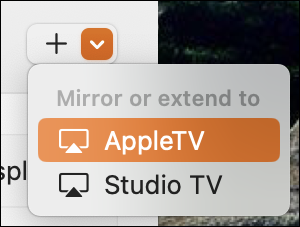
It’s a shortcut for AirPlay options, a way to wirelessly utilize a compatible display as, yes, another monitor. I have an AppleTV unit but I also have an AirPlay-compatible Vizio TV called “Studio TV” in my studio. I could easily extend my virtual workspace onto those displays too, giving me quite a rich multi-screen world.
That should get you up and running with your second display. Have fun!
Pro Tip: I’ve been writing about the Mac since the very first system was released. Back in the era of the “fishbowl” design! Heck, I started my computing career on an Apple II. Please check out my extensive Mac Help Library while you’re visiting. Thanks!
Hi, maybe this is a longshot but I’ve been hunting around all over the place. Does anyone know of a way to change the display arrangement via command line? I use universal control/sidecar all the time but my ipad ends up moving around a lot. Instead of opening up the settings, going to display, clicking on arrange, dragging the monitor, etc I am looking for a way to set up hot keys for left and right, maybe even up/down. I figure finding a command or perhaps writing a script would be the way to go, then I could use automator or shortcuts or something to make it work with hot keys or whatever.
Or, if there’s already a way to do this in the GUI, please share!
I tried installing Displayplacer via homebrew but it doesn’t seem to see any displays shared this way. Any ideas? Thanks!