
I just upgraded to an M4 MacBook Air and am excited to try out all the new features. One that I heard a lot about at Apple was something called “Center Stage”, but I can’t find it on my Mac. What is it and how do I use it?
As system processing capabilities have improved, so have the drivers and software associated with the webcam gotten smarter too. Just about every web conferencing app now lets you change your background or enhance your lighting, at least a little bit. Some have made quite a production out of it, including Zoom, where you can actually hire artists to create custom backgrounds for your meetings!
A number of Windows computer manufacturers have created apps that allow users to control various settings with the webcam, and that’s turned out to be quite popular. Apple, inspired by that capability, introduced something they call Center Stage back in spring of 2021. Initially launched on the iPad line, it’s now something you can find on the entire new Mac lineup.
Shortcuts: Turn on Webcam | Center Stage Basics | Add’l Features | Backgrounds | Desk View & Mic Mode
But “find” is a bit of a misnomer, because it’s not an app, it’s a capability that just shows up without any fanfare. In fact, you already have it running when you’re accessing the webcam on your new M4 MacBook Air, you just haven’t noticed it. Why? Because it’s yet another tiny icon on the menubar…
TURN ON THAT SHINY NEW WEBCAM
I have a new M4 MacBook Pro and it features an all new 12MP webcam system with Center Stage. The easiest way to explore its features and capabilities is to launch a web conferencing program. I’ll use Zoom (which you can use without ever starting a meeting) but you can just as easily utilize FaceTime for this task. Before I launch the program, here’s my menubar along the top of my screen:
![]()
I’m running the beta of MacOS 15.2, but yours will look the same (though, of course, you might have different apps or utilities running). My apps, left to right, are ChatGPT, 1Password, iDrive, CleanMyMac, Dropbox, Clippy, Weather (new to MacOS 15.2), Wi-Fi, Battery, Search, and Control Center.
When I launch Zoom, I can go into Settings > Video and see what it’s ready to share with my colleagues or friends on my next Zoom call:
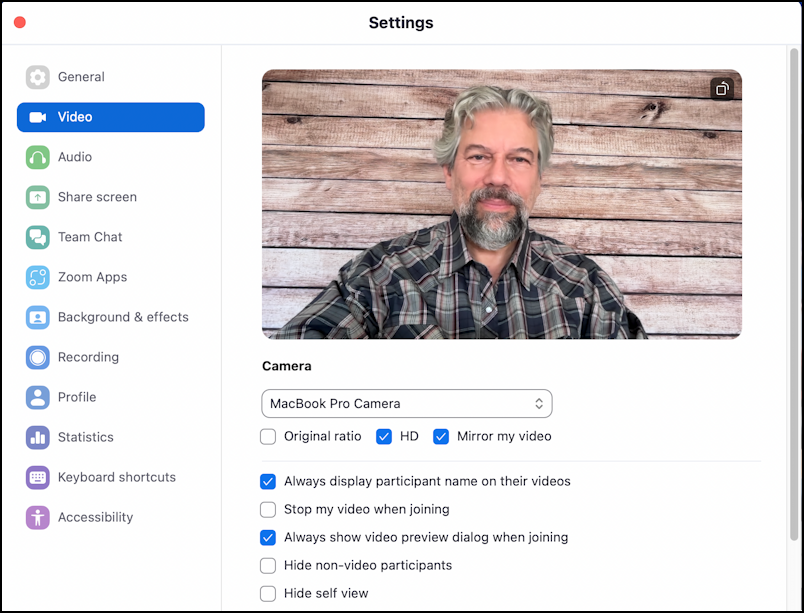
There are a fair number of controls in Zoom to tweak and tune the video image, but none of them are related to Center Stage. However, without most people noticing, that menubar has changed too:
![]()
See it? That green camera icon is Center Stage (which turns out to be just one feature of a surprisingly feature-rich set of capabilities).
BASICS OF WORKING WITH CENTER STAGE
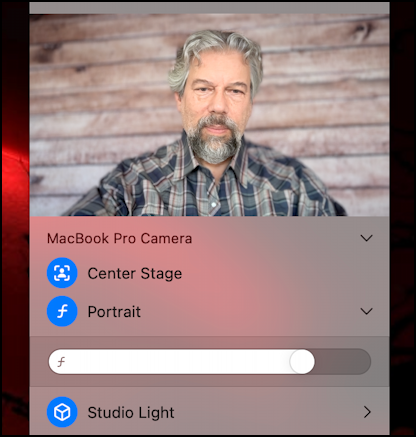
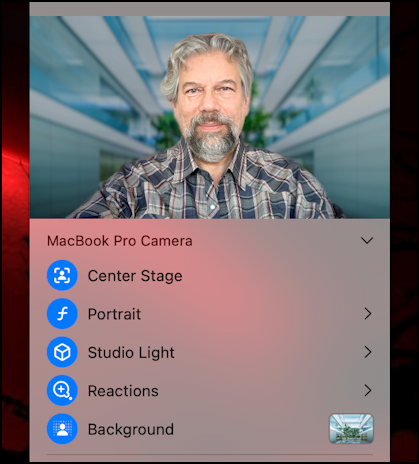
A click on the green video camera icon on the menubar and a pull-down appears, including a video preview:
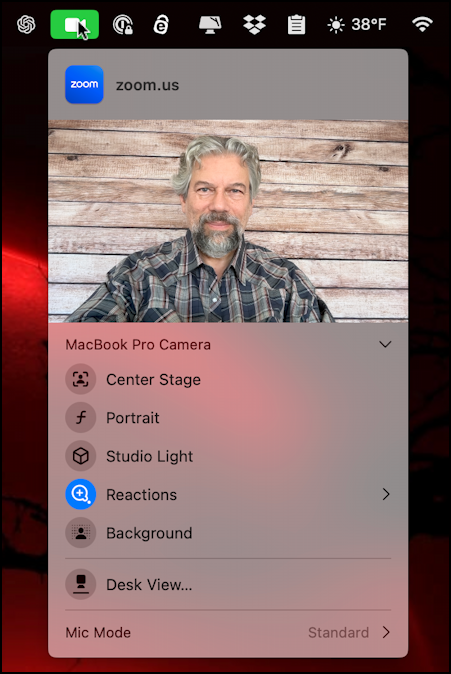
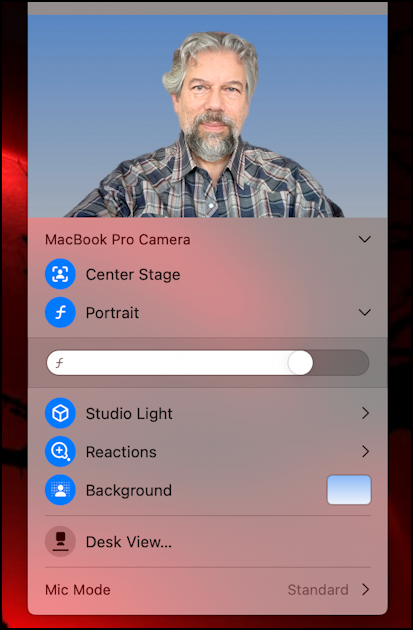
There are six ways you can adjust the video image – Center Stage, Portrait, Studio Light, Reactions, and Background – along with the ability to switch to Desk View, and a few options for microphone and audio pickup. Let’s go through them all.
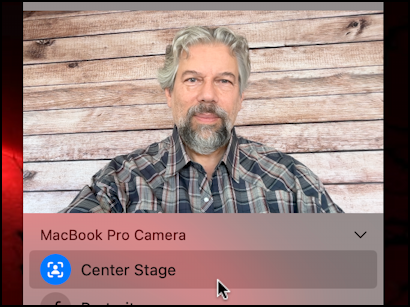
The star of this is Center Stage, which automatically centers you in the frame regardless of whether you’re square in front of your Mac or not. Without it enabled, here’s how I look when I slide my MacBook over just a bit:

A click to enable Center Stage and the webcam view is automatically shifted so that I’m centered:
Cool, right? A feature worth enabling so you don’t feel like you have to sit, frozen, in the center of your camera’s field of view. But what about the rest of those features?
CENTER STAGE IS MORE THAN JUST CENTER STAGE
Turns out that in a typical Apple fashion, they waited to see what other companies did in this area, then implemented something that’s smart and very well designed. Center Stage has a lot more useful features than just auto-centering, that’s for sure. Check out Portrait mode, for example:
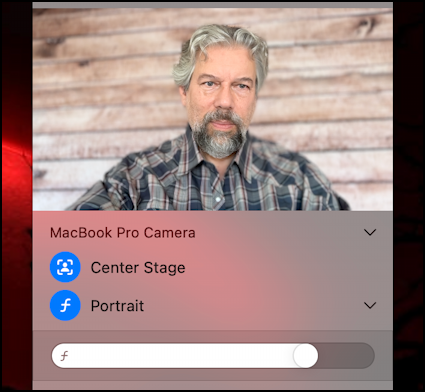
This feature, which you can adjust, blurs the background, but it does it in a far superior way to Zoom, Google Meet, and other web conferencing apps, as you can see if you zoom in on the edge of my hair in the above image. Notice that the background has been subtly blurred, just enough to add a sort of virtual bokeh.
You can use Studio Light to subtly darken the background too, making it even more uninteresting to the viewer:
It’s not heavy-handed but just a slight darkening that in practice looks quite professional. Probably worth enabling as a standard option so that you’re the center of attention in your webcam image (which is the point of video conferencing after all, right?)
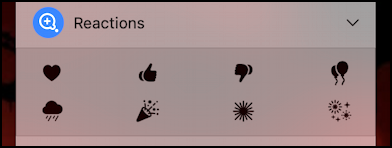
Perhaps the least interesting feature is that Reactions are woven into Center Stage rather than per-conferencing app. That means you can use fireworks or festive balloons – or a heart! – with any program that uses the webcam, even FaceTime:
Having said that, they are beautifully implemented, as you can see with this fireworks reaction mid-explosion:
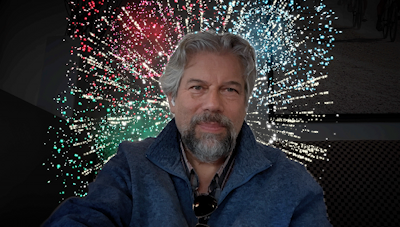
Whether you utilize these or not might depend on your webcam personality!
CENTER STAGE IMAGE BACKGROUND OPTIONS
Another area where Center Stage really shines is with its implementation of Backgrounds. Tap on it and you’ll immediately switch to having a blue gradient background, perfect to cover up the clutter of your work-from-home office space in the kitchen:
But wait, there’s more! Click on the blue box in the Center Stage menu and a new window is revealed:
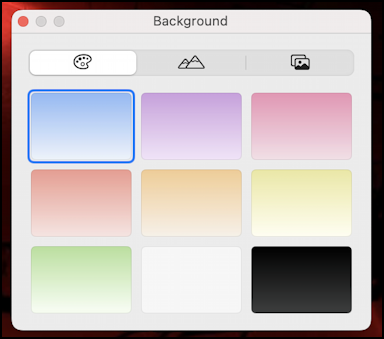
A variety of fairly dull colors from which to choose but instead click on the mountains tab just below the word “Background”…
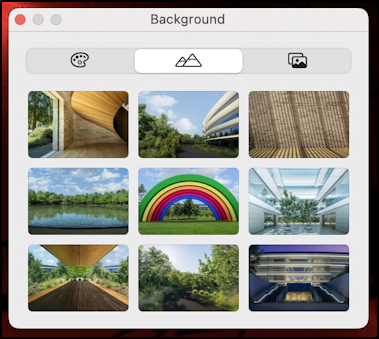
The rainbow arch in the center is from Apple’s Cupertino campus but they’re all great, neutral choices for backgrounds. Don’t like ’em? You can use the third tab along the top to upload your own images, whether it’s a favorite mountain vista, a beach, the local park, or pigs in space. I’ll choose one of the presets for my own background:
Simple, straightforward, useful, and, as mentioned earlier, very well processed so that there isn’t a blurry area where foreground meets background. Nice!
AND A FEW MORE FEATURES
Before I wrap up, let’s look at two more options in Center Stage: Desk View and Mic Mode. The idea of Desk View is that the webcam shows the desk surface immediately in front of your laptop, while simultaneously using sophisticated image processing to undistort the skewed view. Click on it and a new window appears that makes everything immediately obvious:
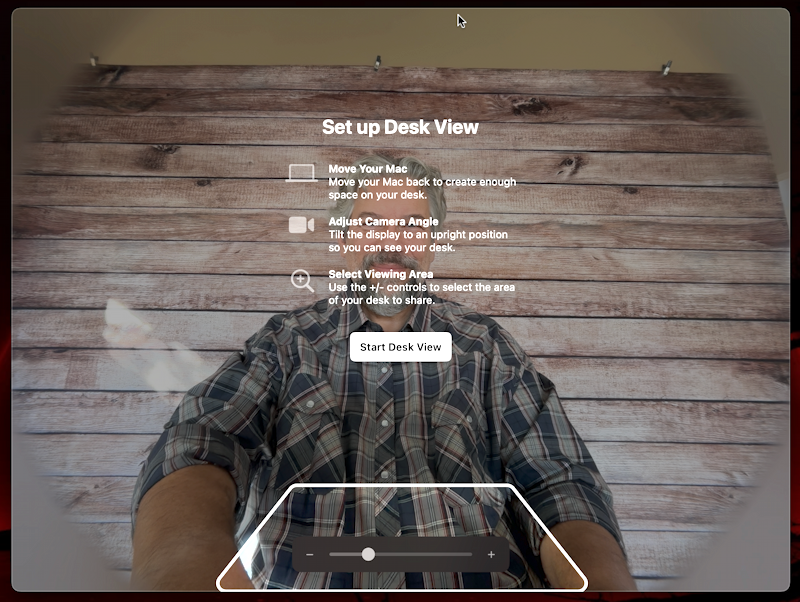
You suddenly realize the enormous field of view, horizontally and vertically, with this webcam! The small, oblong region highlighted in white is what’s going to be shown in Desk View. Worth experimenting with, this can be great if you want to sketch on a piece of paper or do a show and tell without “holding it up” to the camera.
Finally, there’s Mic Mode:
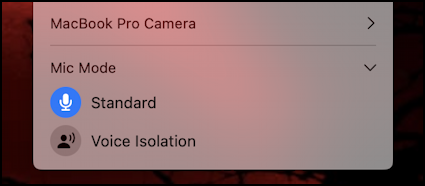
If you’re in a noisy environment, your webcam can now apply some basic audio filtering to minimize the background noise with Voice Isolation. If you’re in a quiet space, it won’t have any benefit, but next time you’re trying to have a Google Meet while at a noisy tradeshow, it’s going to be a huge boon!
That’s it for Center Stage. Not as easy to find as it could be, but once you know about it, you’ll be fiddling and experimenting with all of these features every time you connect!
Pro Tip: I’ve been writing about MacOS since the first release and have hundreds of helpful tutorials here on the site. Please check out my Mac help library for lots more useful content while you’re here!