
I want to ensure that I have a secure connection when I’m using my PC on public networks, but don’t want to pay for a VPN subscription. Are there any easily added to Microsoft Edge that don’t cost anything?
Microsoft has been really taking security seriously over the last few years, which is great. Instead of relying on third parties for malware protection, for example, we now have the rugged and robust Windows Defender built into Windows 11 and enabled by default. But dangers lurk in the ether too, particularly on open, public wifi networks where the nice chap across the room might be running a packet sniffer or other program to try and capture all your login and password information.
An obvious solution to this is to eschew the use of public Internet connections, but that’s not so easy to do, particularly if you’re mobile or are a remote worker. Many companies pay for their employees to have access to a top commercial VPN like NordVPN or ExpressVPN (I use both) but it turns out that the big tech companies have been moving in this direction too. For example, if you have Google One, you have access to Google’s VPN service (as I wrote about here: How to Use Google VPN).
Microsoft’s been slowly building out its public VPN too, and recently even expanded your bandwidth limit from 1GB/month to 5GB/month. In other words, it’s great for checking your email securely, but not so much for binge watching a Netflix series: You’ll blow through your data limit in an hour or two!
HOW TO FIND EDGE SECURITY SETTINGS
The service is tucked into the latest versions of Microsoft Edge and goes by the name of Microsoft Secure Network Service. Well, except it’s not actually called that in the browser. Let’s check it out. Start by opening up Edge and clicking on the “•••” link on the top right. It’ll bring up a menu:
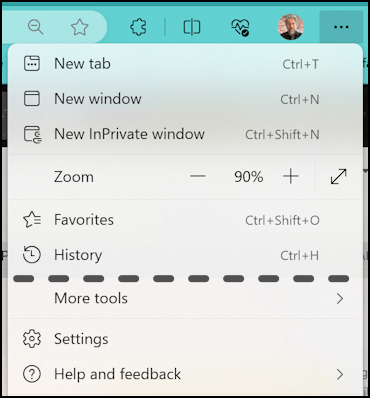
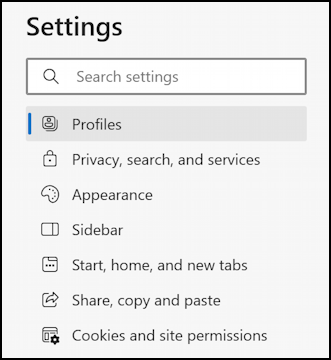
I’ve trimmed it down a bit: What you seek is “Settings” near the bottom. Click or tap on it and a new tab will open up with a lot of settings and options. On the left side identify and click on “Privacy, search, and services“. It’s near the top:
Now you’ll be looking at a surprising number of different preferences and settings in this category:
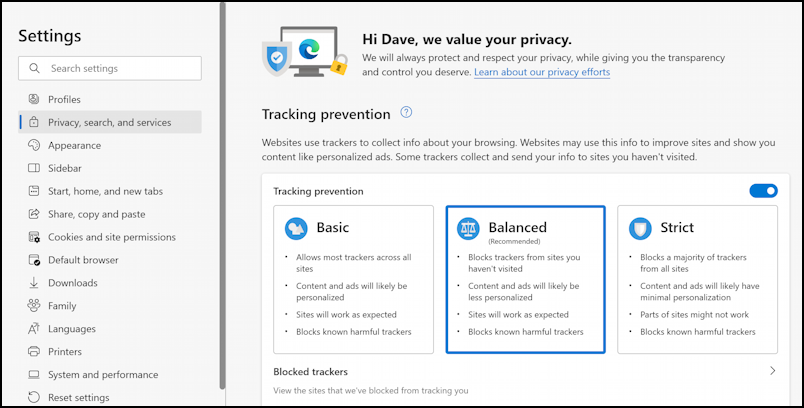
You probably already know that Web sites like to track what you do so they can build more accurate user profiles and, yes, display more relevant adverts. We users, however, prefer for that not to happen. Edge has a solid tracking prevention system built-in, as shown above. I strongly recommend choosing “Balanced”, as shown.
ENABLE MICROSOFT EDGE SECURE NETWORK SERVICE VPN
Once you’ve decided your optimal tracking setup, scroll down on this screen. Take your time and check out all the many, many other options you can set or unset, as appropriate, to have the device work perfectly for you. Eventually, you’ll get to the second section with boxes that denote security options:
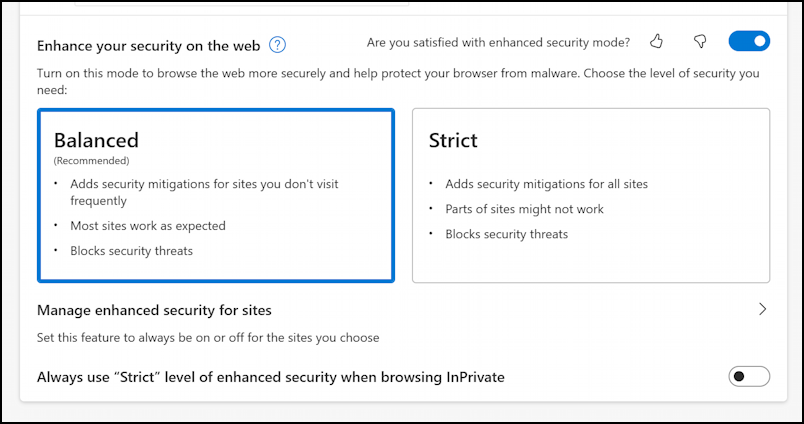
This is probably all grayed out and it’s confusing: You need to click on the On/Off slider on the right side. The one next to the thumbs up and thumbs down feedback tool. Do that and suddenly you’ll be able to choose between Balanced and Strict. Either way, you’ve just enabled Edge VPN. Well done!
Note: Some versions of Edge will show three boxes here, labeled Select Sites, Optimised, All Sites. I believe what you see is based on your geographic location, but if you ensure you have the latest version of Edge, you’ll still be able to enable the secure network service VPN.
For most people, “Balanced” is probably sufficient; it’s supposed to utilize the Edge VPN if you’re on a public wifi network but leave it disabled if you’re on a secure network like your home net. Want to utilize Edge VPN all the time? Choose “Strict” instead. Note that it also only protects you while you’re in Edge, so if you fire up another program like Outlook or Thunderbird, it won’t be able to utilize Edge VPN (though it would be able to use Google VPN through Google One or NordVPN/ExpressVPN if you utilized those).
Still, as a simple way to improve your network security while you’re on a public wifi network, it’s a no brainer. Set it up, use it, let me know how it works for you!
Become a Power User: I’ve been writing about Windows for many years and have an extensive Windows help library here. Please check it out while you’re visiting. Thanks!