
Hi Dave. I’ve been running Windows 10 through VMware Fusion on my Mac system and am wondering if I have the optimal settings. Can you advise on the best settings for running Windows on Mac?
While it’s not too easy to run MacOS X on a Windows computer, it is remarkably easy to run Windows on a Mac system. There are a lot of different paths too, from dual booting your computer (fastest solution, but most complicated) to various virtualization systems that essentially run Windows “within” MacOS X as if it’s an app. The two biggest options in this space are Parallels and VMware Fusion. My choice? The latter, and I’ve been happily using it on my Mac systems for Windows and Linux installs for many years.
But you do want to make sure you have it configured properly to get the best performance in the virtual OS while not crippling your overall Mac performance in case you want to bounce back and forth from app to app. I typically have Google Chrome running on the Mac side, for example, while testing out software apps in Windows in VMware Fusion, and go back and forth as things proceed. Easy and darn convenient versus carrying two separate computers.
The first thing to know when you want to configure your VMWare virtual machine is that it has to be completely shut down for you to change any [virtual] hardware settings. In Windows, for example, that means choosing “Shutdown”:
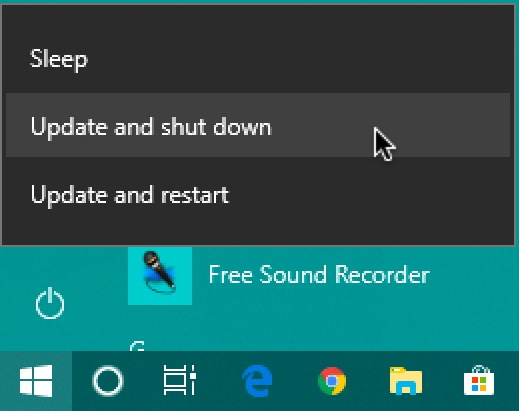
Oops, looks like I have an update to apply too. Okay, so “Update and shut down”. Once your virtual OS is powered down, you can go to Settings in the VMWare Fusion app and have complete control over the virtual world it’s presenting the Windows OS:
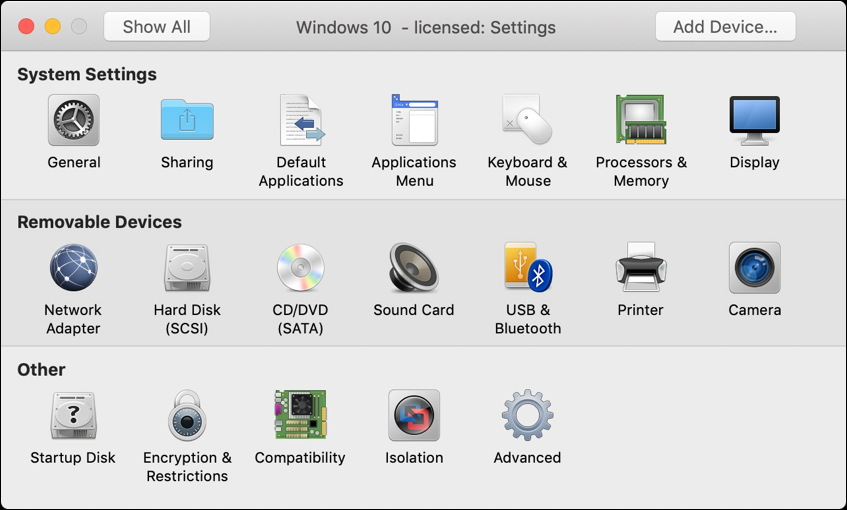
I always start with the Processors & Memory settings because those really define the performance of the OS in Fusion and are also the settings that can come back and bite you when you notice that your Mac is running painfully slow every time Fusion is also running. Click on the icon (top row, right side):

I have what’s known as an “octa-core” MacBook Pro CPU and Fusion allows me to assign anywhere from one to all eight cores to the Fusion app and therefore to Windows 10 within the app. More cores = faster performance, but assign too many and MacOS then starts to bog down. I like to assign two cores, though you could go up to four without a major issue unless you use lots of processor-intensive apps on the Mac side simultaneously.
Like any OS, the system you run in Fusion is going to want as much RAM memory as possible. VMWare recommends 2GB of RAM but that’s pretty paltry for a modern PC configuration so I bump it up just a little bit. My Mac computer has 16GB of RAM (you can see it on the right edge of the slider) but I greedily want to reserve most of that for Mac applications too. Finding your Windows system is running slower than you’d like? Increasing memory is a great place to try fixing the problem.
There are also a variety of advanced options, but you’ll want to do your research before opting to enable any of these. As you can see, I leave them all to the default ‘off’ setting since I don’t fully understand how hypervisor, code profiling or IOMMU will impact both the Mac and Windows sides of the equation. You can dig through “Using VMware Fusion” doc if you want to learn more…
Now there are a few other settings you can change. First up, click on “General” to see if you are wasting disk space with its lazy garbage collection algorithm:
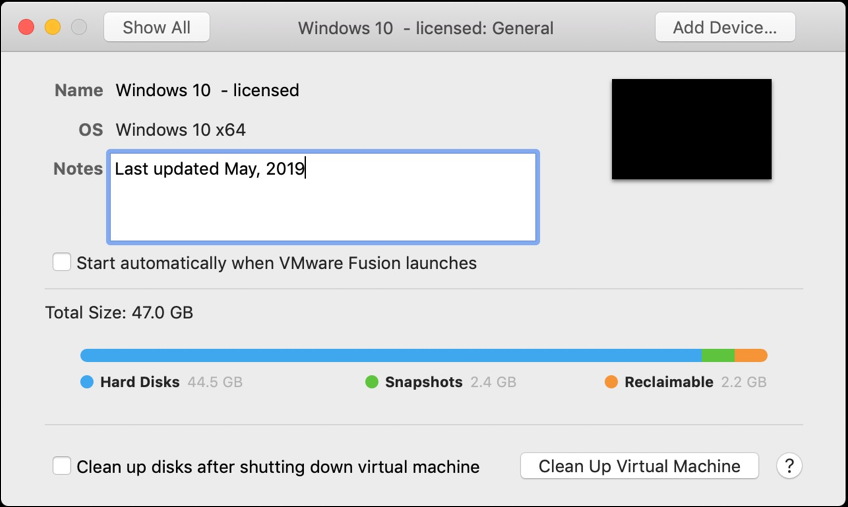
Notice that there’s 2.2GB of reclaimable disk space and that I’m using an additional 2.4GB of space for snapshots.
Tip: Once you get everything configured as you want both within Windows and VMware Fusion, take a ‘snapshot’ so if the system gets messed up, infected, or broken, you can jump back and restore to a known good point. You’ll thank me later!
To recover the reclaimable space, simply click on “Clean up Virtual Machine” on the lower right. Once every few weeks is plenty and will ensure that Fusion doesn’t creep and take over your entire Mac hard disk!
If you print, you can share your Mac printer or printers with the Fusion OS easily enough. Click on ‘Printer’:

Don’t do that hard copy thing? No worries, uncheck this and you won’t have to worry about Windows apps sneakily printing anything.
One more setting: Make sure your Fusion OS is online correctly by choosing the right network interface. Click on ‘Network Adapter’:

There are some situations where bridging might not be the right option for you, but again, check on the VMware site to learn more about your options. They’ve simplified this window in Fusion recently too, which is much appreciated. Figuring out the technical nuances of a shared IP address and network access can be a bit daunting, to say the least.
Now, with these settings tweaked as you desire, restart the VM and your Windows system should be faster, more efficient and happier. Or, at least, you should be happier with a better VM!
Pro Tip: I’ve written about VMware Fusion before too. Check out my VMware Fusion help pages for more tutorials while you’re here!