
Every time I want to share files between my work PC and home PC I end up emailing them to myself. Seems clumsy at best, but I hear from others that they actually transfer their files via text message! To themselves! Does Microsoft Edge Drop fix this problem??
It’s surprising how tricky it is to share files across multiple computers even after decades of network file system evolution. Apple has “AirDrop” for the Mac and iOS universe but since that uses Bluetooth file sharing, a lot of people have problems getting it to work for them and there’s no Windows compatibility, so it’s not really a universal solution. Then there are cloud backup solutions like Dropbox which can make it pretty easy if you have it set up on all the different devices (it’s what I use), but it’s a bit clumsy because it’s not really designed for sharing your own files.
Shortcuts: Enable Drop | Share A File | Access Shared Files | Delete File
As Microsoft has made the Edge browser its own with additional features, clearly someone was paying attention to this file sharing dilemma too. Microsoft Edge Drop offers up a simple and elegant solution, one of the best in the industry, and it only requires one tiny step to enable it: You have to sign in to your OneDrive account on all the systems you seek to utilize.
ENABLE MICROSOFT EDGE DROP
First things first, however. You’ll need to update Microsoft Edge on your systems. This is usually done by simply restarting the browser on occasion (since updates are downloaded in the background), but you can force it by going to Help and Feedback > About Microsoft Edge from the “•••” menu too. You should have a big blue “b” button appear on the right edge of the navbar in the browser. It’s a shortcut to the Bing AI chat system, but that sidebar has some other helpful features too…
For this section, I’ll be using a Windows 11 system, but the sequence should look identical in any version of Microsoft Edge. I click on the “b” button to open up the sidebar and there’s a new column of icons on the right. For me, it only has one; a tiny paper airplane icon. That’s the Drop icon! A click on it and:

If you aren’t logged in to your OneDrive account, this is where it’ll prompt you to do so. I’m all set, so I’ll click on “Start” to proceed.
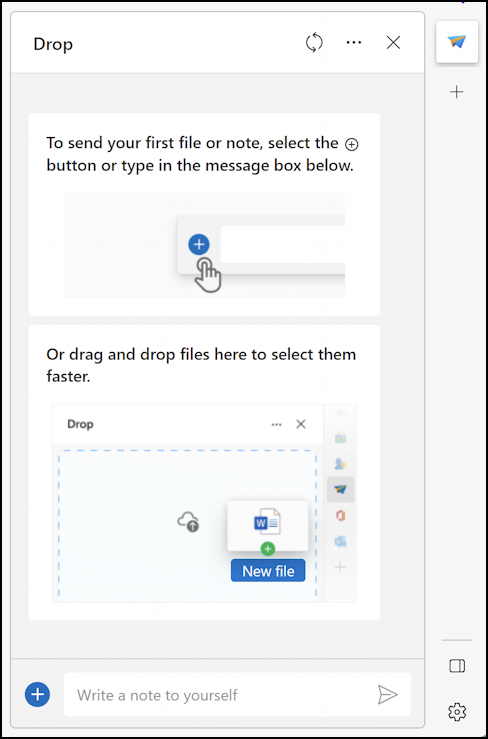
That’s easy enough. Notice you can also write notes to yourself too, something that at first glance seems daft, but can actually be useful. Think”copy and paste from email”, for example.
SHARING A FILE THROUGH MICROSOFT EDGE DROP
A click on the “+” brings up a standard Windows file dialog:

I’m going to share the “important-note-to-share”. For obvious reasons. 🙂
It then uploads and a tiny info window appears confirming that has happened:

Notice that rather than show the filename, it’s showing the content of this particular image (some info I captured from a dialog with a colleague). If it’s a PDF or DOC or similar, it’ll show the filename instead. That’s the “upload” part of the process. Easy enough!
DOWNLOAD SHARED FILE FROM EDGE DROP
Now I’m going to jump over to my MacBook Pro, where I also run Microsoft Edge. Since it’s the latest version, it also has the “b” button on the top right, and opens up a side window with a click:

I’ve added more shortcuts to the vertical sidebar on this system, as you can see. You can check out what options are available by clicking on the “+” at the bottom of the column. The tiny paper airplane icon is here, though, so I clicked on it and got another welcome graphic for Drop, as you can see.
A click on “Start” and I’m in the “Drop” zone. 🙂
Lo and behold, there’s the graphics file I shared from my PC into Drop, ready to open on my Mac:

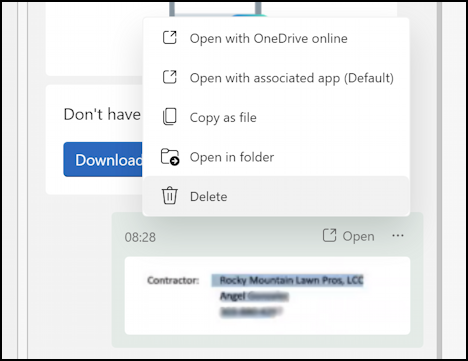
Yes, it’s that easy. A click on the “•••” adjacent to Open and you can see there are other useful options too:
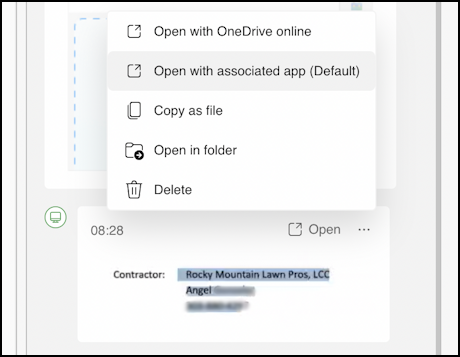
The default is actually for Microsoft Edge to “open with associated app”, which on my Mac means this image will be opened by GraphicConverter. You will want to move it or save it somewhere else if you want it to stay on your computer, but that’s easy enough, as you can see.
HOW TO DELETE FILES FROM MICROSOFT EDGE DROP
What about when you’ve shared the file and don’t want to have it sitting and collecting dust in your Drop archive? Easy enough, it’s the last option on the “•••” menu. I’ll jump back to my PC for this, but as you can see above, you could do this from any computer or device that’s plugged into your Drop account.
You’ll get a confirmation prompt, as you probably expect:

A click on “Delete” and you’ve accomplished your task, with remarkably little fuss or hassle.
Now at some level it is like sending yourself text messages, particularly if you use the text input area of Drop in addition to the file sharing feature, but it’s designed specifically for this task, which makes it faster, easier, and more intuitive. I think it’s a winner and a tech worth learning more about!
Power User Tip: I’ve been writing about Windows for many years and have an extensive Windows 11 help library here. Please check it out while you’re visiting. Thanks!