
When I press Cmd-Shift-3 on my Mac, it automatically just saves the entire screen. But I only want a subset of the screen captured. Can I change what happens with Cmd-Shift-3 to do what I want?
There are a lot of ways to deal with screen captures or screenshots on your Mac OS X system, and it’s definitely handy that Apple includes the default capture-screen feature in the OS itself, accessible with Cmd-Shift-3. If you don’t want that, it turns out that there are three other ways you can capture the screen using the built-in Mac commands: Cmd-Shift-3 saves a picture of the screen as a file, Option-Cmd-Shift-3 copies the screen picture into the clipboard, Cmd-Shift-4 saves a picture of the selected area as a file, and Option-Cmd-Shift-4 copies the selected area to the clipboard.
So the simple answer to your question is “yes, just use Cmd-Shift-4” and you’re good to go.
You could even use your Keyboard settings to change it to work with Cmd-Shift-3 if you were so inclined! But instead, let’s do something a bit more sophisticated: let’s replace the Mac OS X screen capture feature with a completely new program called Screenshot Plus, which gives you a lot more control over what happens when you press Cmd-Shift-3…
To start, you’ll want to go to System Preferences… from the Apple menu (top left of your screen):

Look for Keyboard on the second row of icons, then click on it, then choose Shortcuts along the top, and Screen Shots along the left side. You’ll end up here:

This is where keyboard shortcuts are associated with specific functions, so if you want to change “Save picture of selected area as a file” to be triggered with Cmd-Shift-3, you can do that here. But let’s not. Instead, just uncheck the first option “Save picture of screen as a file” so that the shortcut is greyed out (as you can see above).
Done. Now you can reassign it, which we’ll do in a minute. For now, just close this window.
From the same Apple menu, this time choose App Store… and search for “screenshot plus”:
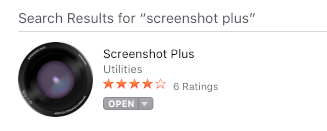
To make it easy, you can just click on the image above and it’ll take you to the correct place in the App Store!
Once it’s downloaded, click on Open and it’ll launch, which consists of it showing up in your menu bar as a camera icon. Click on the icon and you’ll see the menu of screen capture options, all ready to go:
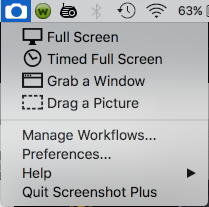
As you can see, it’s easy enough to work with and choose any of the four options (including “timed” which is darn handy and not part of what’s built in to the Mac operating system).
Choose Preferences…
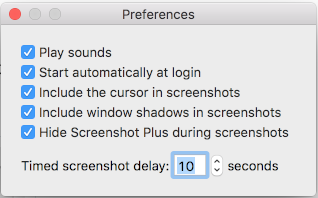
Okay, that’s actually a tiny sidetrack. Just wanted you to see all the options you can change, including the delay time on a delayed screen capture. Really, you want to choose Manage Workflows…

Here’s where you can fine tune exactly what happens when you choose a specific type of capture. Above I’m looking at Grab a Window and as you can see, you can specify the default filename for a capture, the format of the saved file (JPG, PNG, GIF, etc). Closer to the bottom note that you can opt to have captures opened up automatically in the Preview app, specify that you want the image saved as a file, and where, and more.
Want to fine-tune the filename? You can do that too. Click on the tiny wrench icon to the right of the filename box:

Here you can simply drag-and-drop date, time, filesize, dimensions, and more into the filename box to create the template that you prefer. Me? I like “screenshot” + date + time, so that’s what I set. Heck, you can even fine tune the format used for the date, time, etc, as shown:

Looks good? Click on “OK” and now let’s do the final step!
Click into the box adjacent to Shortcut, then press the key sequence you want to assign. Which is Cmd+Shift+3, right?

And, finally, look what’s displayed in the box! That’s it, Click the red button to close the Workflows window and you’re done. Now go into a different app and press Cmd-Shift-3 and, voila! you’re able to click-drag and define the region!