
I’m running low on disk space and my Dad told me that it’s probably lots of junk leftover from Windows upgrades and admin files. I have no idea where they are stored, so how can I find and delete them to make more space on my disk?
Your Dad is right that Windows has a habit of leaving old files around, particularly from system installs, that can take up quite a bit of space. You don’t need to know where to look for them, however, because there’s a slick utility you can use instead. Even better, it’s part of Windows 11, so there’s no additional download required.
What I recommend for most users, however, is to enable what Microsoft calls “Storage Sense”, a feature that will automatically delete old and unneeded files, like files that have been sitting in your trash for months or longer. Did you remember to delete your trash before you checked your available disk space, by the way? 🙂
FREE UP DISK SPACE BY DELETING UNUSED FILES
To start out, go to Settings then choose System > Storage and you’ll see a handy visual of how many files you have in various categories versus your overall disk size:

With a bit of inspection, you can see that I have a 255 GB drive with 210 GB free. Lots of space! Still, my drive has 44.4 GB allocated for temporary files, of which 10.8 GB is being used. I have a similar size partition for installed apps, which are currently taking up 9.24GB. I don’t want to delete any apps but let’s have a closer look at those temporary files. Easily done: Click on the “>” to the right of that information…
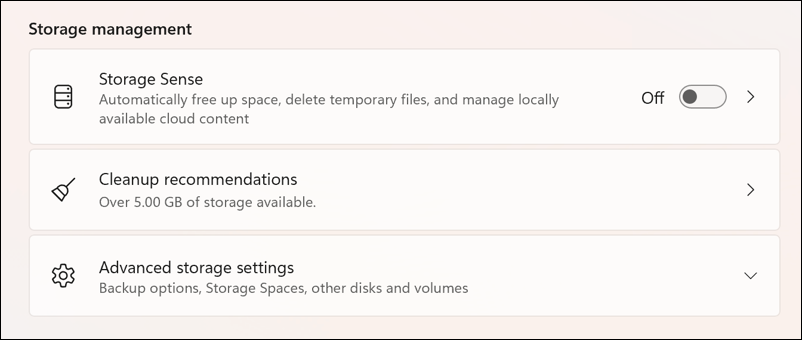
There’s that Storage Sense feature I was talking about. We’ll come back to it. For now, focus on “Cleanup recommendations“. Mine shows that there are over 5GB of space I can free up by following the system recommendations. Not a massive amount, but helpful. A click on the “>” adjacent to that and…

Sheesh, will ya look at that: 11.2 GB of files and data from previous Windows installations. That’s a lot of geegaws in the attic, isn’t it? Notice the other categories of files are far more benign, with Downloads representing 9MB and the Recycle Bin 6.6KB. Neither are a big deal in this instance, but that “Previous Windows Installation(s)” is one to pursue. Click to check the corresponding box or boxes.
ADVANCED TEMPORARY SYSTEM FILE CLEANUP
Don’t actually delete anything yet. Click on “See advanced options” (at the very bottom of this window) to check out a few additional categories of files and data that can be cleaned up.

The “Previous Windows Installation(s)” has shown up again, but notice that it breaks down into additional file types “Delivery Optimization Files” and “Windows upgrade log files”. Check both those boxes too; why not?
Scroll down, however, and there are more you can axe but one that I recommend you do not choose:

Windows cheerily suggests that you can delete “Thumbnails” on your PC and they’ll be rebuilt as needed, but my experience is that it doesn’t quite work as on-demand as suggested. It’s not much space anyway – 9.01 MB on my system – but I’d skip this unless you’re really, really desperate for every byte you can recover. Otherwise, go back to the top and choose “Remove Files”. It’ll prompt you to confirm you want to proceed:

You do! Click on “Continue” and it’ll chug along for a minute or two, ending with you having more space. In fact, go back to the main Storage window and it’ll show the new numbers:

We started with 10.8 GB of temporary files, which is now down to 50.9 MB. A huge disk space recovery win!
MANAGE DISK SPACE WITH WINDOWS STORAGE SENSE
While we’re on this screen, choose the “>” adjacent to “Storage Sense” to learn more about the feature. Here’s what Microsoft explains:

As I said earlier, I recommend enabling Storage Sense for most PC users, with the default settings, as a way to set and forget disk management on your PC. Way easier than remembering to go through the steps I’ve outlined every month or two. You can learn How to Get Started with Storage Sense on your Windows PC from an earlier article I wrote too!
Pro Tip: I’ve been writing about Windows since the early days of the operating system. While you’re visiting, please do check out my extensive Windows help area for hundreds of other useful tutorials and how-to articles. Thanks!