
I sent my iMac into Apple for service and was rather distressed to get it back with the OS reinstalled and everything else wiped clean! I said “restore from Time Machine”, but it never saw my Apple Time Capsule. What’s the trick, Dave?
First off, you bring up an excellent point, a reminder that everyone reading this should take to heart: always do a full backup before you take your computer in for any service work. I have had my hard disk wiped and rebuilt almost every time I have ever sent my Apple computer in for service, even when all they were doing was something like fixing a keyboard problem. Your best bet is to always assume that you will have your hard disk cleaned and be surprised if it isn’t.
I was glad to see your query because when I recently sent in my MacBook Air for service (it needed a new heat sink to stp overheating and slowing down) I again had the hard disk completely reformatted and the latest version of Mac OS X installed on the drive. The good news? I already have a 500GB Time Capsule and religiously use Time Machine to have solid and reliable backups.
Of course, you never really know if your backups work until try to restore from them, so it was providential that your question arrived just as my MacBook Air returned from Apple service. I set up my camera and tried to capture all the screen shots as I went along, including some amusing sequences.
Here’s what you see first, of course, when you power up your post-service Mac, because it’s a brand new install and acts like a newly purchased computer:

As you can see, the key selection here is that you want to restore your account and disk information “from a Time Machine backup”. Choose that and click “Continue”. Now you’ll see something that’s a bit disturbing:
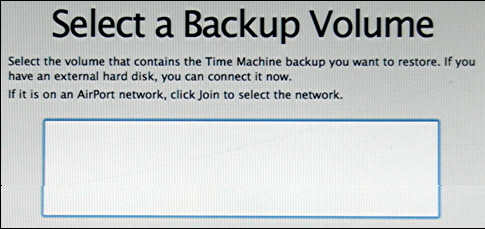
Where, you might wonder with some panic, is your backup volume? Where’s that Time Capsule gizmo that is still plugged in and still running? It’s hiding! You need to click on the “Join…” button on the lower left (not shown in the above). Once you do, there’s another moment of anxiety waiting for you:
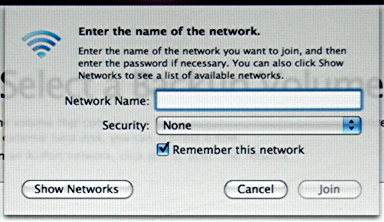
You need to remember the name of your wireless network? Not so fast. At this point you actually can just click on “Show Networks” and, poof:
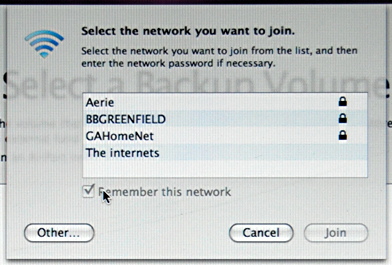
You can see my neighbors networks and my own, Aerie. Since Aerie is a protected network (and yours should be too, by the way), when I click on it, I am prompted for a network password:
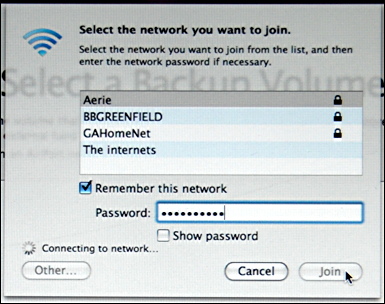
Enter the password correct, click “Join”, and now you’re on your wireless network, the one that hopefully has the Time Capsule accessible:

Not sure if you can read it here, but my Time Capsule is called “Time Tunnel” (yes, after the goofy TV show of the same name) and you can also see that the system recognizes that a login and password are needed to successfully connect to the device.
To continue from this point, I click on the “Continue” button (not shown) and:
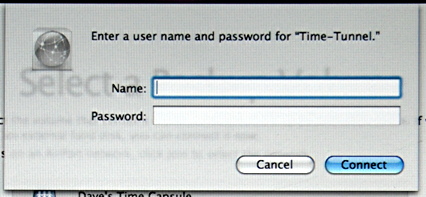
Time to enter a valid login and password pair to gain access to the Time Capsule. Hopefully you remember what you used when you set your own up!
Once you enter appropriate credentials, you’ll see the Mac spend some time digging around in the Time Capsule system (actually the Time Machine backup on the Time Capsule device, if you want to be pedantic):

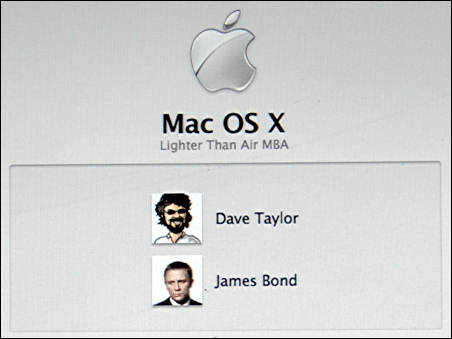
I actually have more than one computer backing up to the Time Capsule, so when it first connects, it actually randomly picks the wrong device, my MacBook Pro. As you can see, it finds four categories of backups:

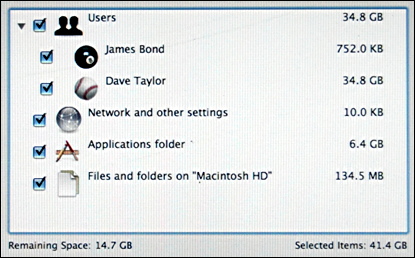
More importantly, notice the “Calculating” entries where the aggregate file size will be shown. That’ll come back and haunt us in just a moment, but for now, I need to change the pop-up menu to pick my MacBook Air backup. The Air is called “Lighter than Air”, as you can see:
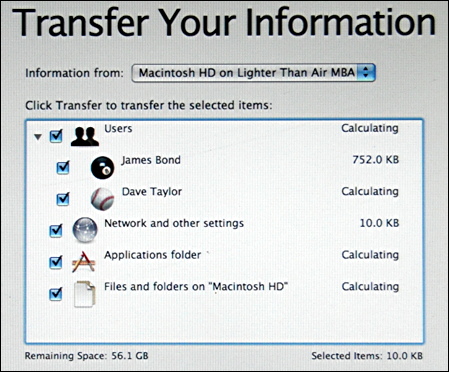
To proceed to the next step you must wait until it calculates all file sizes at this point. In practice, with my multi-gig backup, this process took over 30 minutes. Thirty long, tedious, wasted minutes. I realize that the point is to avoid you ending up restoring more data than you have space for, but surely there’s some sort of indexing system that could be used in a Time Machine backup that would let you avoid this sort of tedious waste of time?
Anyway, finally, after muuuucccchhhh time passed, I saw this:
Now, finally, I could click on the “Continue” button, and then promptly see:

Nice, happy, cheery Macs. A few basic elements transfer, then we get into the nitty gritty of the process, transferring all the different categories of files and data in the archive. First thing that I see is:

Not too bad, less than two hours left. Except, it’s not. Quite a while later, I see:

and:

Now watch what happens here carefully. The Applications transfer mysteriously slows down and though I’ve actually progressed, my time estimate goes far back:

Weird, eh?
Anyway, about seven hours after I started my “two hour” restore, it was done and it’s time, finally, for the screen you want to see:
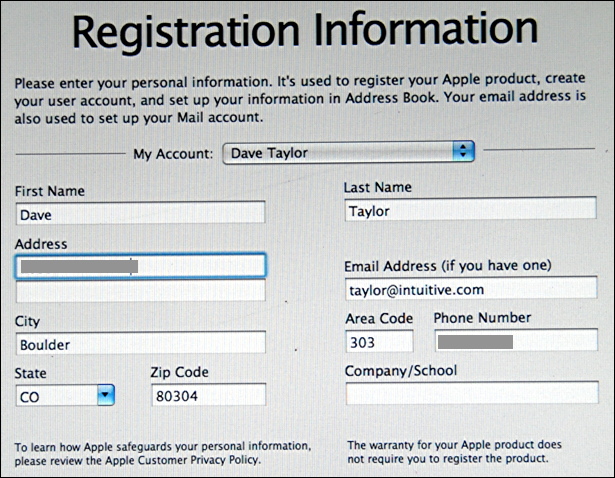
It’s a new computer, right? So you get to answer a bit more:

And, finally, after a remarkably long period of time, the computer restarts and when it’s done, I see my two default accounts ready for login:
When I do log in, I’m delighted to find all my files, folders, preferences, iTunes library, photos, and everything else configured and set up just as it was before. Turns out that the Time Machine backups do work!
I hope that this long walk-through is helpful to you.
Hi Dave,
Thanks for taking the time to create this walk through. I haven’t had to do a restore from my Time Machine yet but it’s great to know that when the time comes this great guide is available.
Regards,
Rick
I had a total time machine backup when I had a new HD in my MACbook pro, but I still lost all my printer and scan drivers, some HP scan programs no longer works and a couple of other irritating drivers. It also set the security to only accept Verified vendors and purchases from the apple. That can be changed in security, but who guessed that HP was not a verified vendor?
Anyway I would like to know what time machine does NOT backup so I can backup those items and preferable where the data is stored. Can you help?
Thank you for your excellent information
Keep smiling -o-
Pat, it’s always problematic to restore to a different OS version than the one you’re running, whether you’re trying to go backwards or forwards. Nothing unique about Time Machine.
If I have upgraded to OS X Lion, but using a download, no disc, then am I correct in reading above that using my original disc (Snow Leopard) for recovery will leave me unable to restore from a Time Machine backup which was done from Lion?
This is my situation, i didnt have my external hard drive at the time i restarted everything on my mac, so now my mac is back to a “brand new” state and only has standard options i need to restore thru my external hard drive (now that it is on hand). But i dont know how to go about it. I’m currently on my Mac, and dont know how to get to the “restore” screen as you have described perfectly above, please help.
Ginger, this should do it:
•Start your Mac from your Mac OS X Lion Install disc
•Select Utilities from the menubar, then Restore System from Backup.
•Select the backup you want to restore and where you want to put it.
That’s it. It’ll take quite a while, but eventually you should reboot and be ready for action!
I had to bypass this awesome step-by-step instructions on restoring to my Time Capsule because I still had to upgrade to Lion after uninstalling and reinstalling Snow. Now I don’t get the luxury of apples simple walk-thru of this process. How do I restore to my Time Capsule manually after opting not to restore to it originally when prompted?
Does this only work for post-service Macs? Will I see the same first screen if I have installed a new hard drive and wish to transfer data?
Thanks for the information. Can you help with my problem?
My hard drive crashed on my MacBook Pro. It is functioning again and I’m trying to restore from time machine on an external drive. I’ve gotten to the “Transfer Your Information” window. There is a list of items to transfer. However, to the right of that list is a statement in red…. “You cannot transfer from your other Mac to this one because your other Mac is running a newer version of Mac OS X. You will need to upgrade this Mac before you can transfer from your other Mac.”
I don’t have Snow Leopard on disc. I thought Time Machine would simply restore my entire system to a previous state.
What to do?
hi.. at any point when TM was changing it’s mind on how long it will take to restore did it say it will take 1443526789 hours? that’s what mine seems to do at a certain point. Presuming this is some kind of hang I have (twice) cancelled at this point, done a clean install and gone to back up using TM. Where this gets tricky is that before I did so I did a restore to another partition on my external HD, to see if I could boot from that. I can’t AND now when I try to restore my (internal) boot drive it tries to restore to the external partition. If I unmount that it restores to a phantom location in /Volumes. Should I try a wipe-and-restore as you describe and just wait some of those 1445367 hrs in case it really only takes 24?) or.. because I’ve already had a week of chaos, is there a way of restoring to today’s clean install (while I get back to work online?
I searched the internet before upgrading my macbook hard disk. This was one of sites that explained me well on the “How to”. During the process I encountered some issues I want to share.
I have a Time Capsule and used it ever since as a network drive. I determent that in my upgrading strategy making a backup over wire using Time machine could do this trick smoothly! And as a bonus this would be the start for making backups.
No problems making a backup ~90 Gb (3-4h), used ifixit.com guide to replace the current 160 Gb hd for a 7K500.B. Used the DVD with OS X 10.5 -Leopard- to boot and formatted the new hard drive. The restore finished with ease….
No the problem started.
I got caught in a reboot loop. Meaning every time after on/off I got the same screen pointing out to turn power off and on for reboot, even full unplug and some minutes of pause didn’t do the trick.
So what went wrong ?
Using logic some of the steps are reconsidered.
1. If the backup on the Time Capsule was screwed than the restore would not have been done completely. Right ? Time to take a good look before erasing the question mark. Reboot on the DVD by holding C at startup, went back to the “Restore system from backup source” and noticed the date and time stamps were not very appropriate for my situation.
2. I did a upgrade to OS X 10.6 –Snow Leopard- . Does this mean anything ? After a brain wave session at work. A cow worker suggested to use the Snow Leopard DVD instead to restore my system.
Solution ?
Yes it was the Snow Leopard DVD that did the trick. Apparently some files are needed or copied of this boot disk for a restore (didn’t know, didn’t care). I can not recall how I changed the DVD at this stage. I know I rebooted several times in different ways and pushing the eject button a lot. Went trough the process from start again | format disk | Restore System from Backup source |
Did I already mention that the backups for selection no did comply to my situation ? Because it did! Date and time stamps were now appropriate. The restore would take ~1.5 h.
Conclusion
Use the Wright DVD for restorations!
In total with the problems encountered it toke ~12 h of work spread over 3 days, including the Backup strategy bonus.
It was totally worth it and in my case it still beats the “full re-install everything“. That is what I pay for being picky and such a control freak 🙂
Andre, yes, I believe that’d be the easiest way to restore once you get a bigger hard drive!
Dave would I take the same steps to restore my macBook pro when I change my hard drive to a 500GB HDD
Have a rather unique problem in that the restore button for my Time Machine has never responded to attempts to initiate a restore. I have a MacBook, running OS X Leopard with all applicable updates. My backup is on a separate hard drive using a USB connection. Any ideas??
GREAT article. You are a valuable resource, not to mention a nice guy to post this. Thanks for sharing your knowledge.
I recently installed snow leopard and then had some issues with iChat so I reinstalled Leopard then snow leopard as a clean install. Before I did this I backed up my computer with time machine and an external hard drive. I made a rookie mistake and pulled out the time machine drive before it was done. So when I restored my computer it tried to do it from the latest backup which was incomplete. Now I have no photos or itunes music at all! Before the latest incomplete backup, I backed it up about a week prior and did it correctly. Can I restore from that earlier backup? Or am I up the creek without a paddle?
Thanks
That may be, cmsproducts, but BounceBack is a separate standalone backup solution that has nothing to do with Time Machine. It might be good, but Time Machine is *superb* at constantly backing up my computer so that I never have to worry about losing data on any of my Mac systems…
Much easier to boot direct from backup and continue working using BounceBack. http://bit.ly/hqq4I
Hi Dave, just about to replace HD on my 13″ MB Alu. The above advise is reassuring. In reading your post I saw that your TM shows multiple categories, is that sop or did you set up TM to backup those specific categories? If so, can you shed some light on that please.
Cheers
-B
Hi, Dave. I just had my macbook wiped to put my school software on it. I backed up my previous info with an external hard drive. While this was a great step by step guide, unfortunately, I blew through the registration in a session and didn’t get to use your recommended option. Is there any other way I can convert my files from my external hard drive ??
I would GREATLY appreciate your help!!
Hi, great step by step guide. Just a question i have, does restoring from a backup reinstall all the applications you previously had, and if it does, do the applications all need reactivating? Thanks 🙂
Thanks, Hamilton. As far as I can think, it should be the case that what’s restored is the latest backup, so that should include all the updates you’ve actually applied.
Good tips Dave! Thanks. Just one clarification; Does Time Machine also restores all the Apple Updates that has been on my Macbook??
I should have added that I do not get the drop down to go to the other machine and that sometimes it says that there is one backup available and sometimes two.
Thanks for a great article. I am trying to restore my MacBook Pro and am up to the point where it sees the Time Capsule and the two backups (from two different machines) that are available but when I click on it it automatically goes to the wrong backup and will not show me the correct one? Any ideas?
My question which remains unanswered (though I’m still searching) is how to restore from another computer. My two MacBooks backup wirelessly to a dedicated HD on my MacPro. So there are three backups, but the wireless ones are sparsebundles. At the point of transferring information, it only recognizes the MacPro’s backup. When I try to copy the opened sparesebundle to a third drive, I get an error. Any ideas?
Can an update to my system from Apple, cause my CD ROm or optical thing stop working and just spit out the cd right after
i put it in?
Hi Dave,
Firstly, thanks for a great resource. I have to admit that I have found your articles very helpful in the past – please keep it up!
I have one question on your article about restoring a MacBook from a Time Machine back-up. The install CD that came with the Mac contains a version of the system that doesn’t support Time Machine! So, how can I ‘restore’ my Mac? I don’t get the option to restore from a Time Machine back-up (as in your article).
At the moment, I can only assume that I have to re-install the system on the CD and download GBs of updates to get the system back to a version that can ‘see’ the Time Machine drive and restore the system as per your breakdown.
I couldn’t nominate the TM drive as the start-up disk either and I can’t see any other way of restoring the machine – unless you know differently???
Amazing. I never needed to use my Time Machine backup, but I was always trying to figure how it works. I had doubt about Applications folder – I can see it works and well! Thanks for the walkthrough.