
My brother upgraded to a 3TB Apple Time Capsule and gave me his old 500gb Time Capsule. Why you can’t just pop the drive and put in another one I don’t understand, but meanwhile, I want to reformat or reset the older unit so I can make it my own and set it up in my dorm room. How do I reset the Time Capsule?
First off, my compliments to you and your brother both for realizing the importance of a consistent and zero-maintenance backup solution. For most people, it’s not until they lose a ton of critical data like a year’s worth of digital photographs or movies of the children or even a thesis or school papers that they learn rather after the fact that yes, having backups is not just a good idea, it’s a necessity in this day and age.
There are a number of different backup solutions, but I have to say that as a Mac user, I’m partial to Time Capsule coupled with the built-in backup software on Mac OS X “Time Machine”. Once set up, it’s as no-brainer as you could ask for. I never pay attention and the few times I’ve needed to recover a file, there it’s been, even a year later. Nice.
It’s not perfect, however, and while I’ll show you how to reset the new Time Capsule, it turns out that there’s an additional step you’ll need to take that I’ll talk about at the very end, a step that actually deletes the old backups that will otherwise eat all the disk space up on your hand-me-down hard drive.
To get started, launch Airport Utility from the Utilities folder in Applications. Give it a second and assuming you’re connected to it via wifi or hardwired with an Ethernet line, you’ll see this:

In this case, my old Time Capsule was called “Time Warp”. Yours will have a different name, of course. If the utility doesn’t find the device, make sure that’s what you’re hooked up to (you might need to get the wifi password from your brother) and restart the app again. If it sees more than one Airport device, no worries, pick the right one, then click “Continue”, which is a bit confusing to the Utility, but it’s okay…
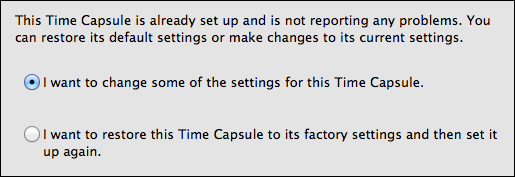
As you can see, choose “restore this Time Capsule to its factory settings” and “Continue”…
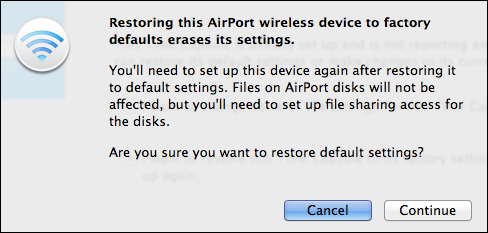
Yeah, that’s the plan, so let’s restore it to factory defaults. Click “Continue” again and lots of stuff will happen behind the scenes:
This can take a few minutes. Eventually the unit will vanish, then reappear:
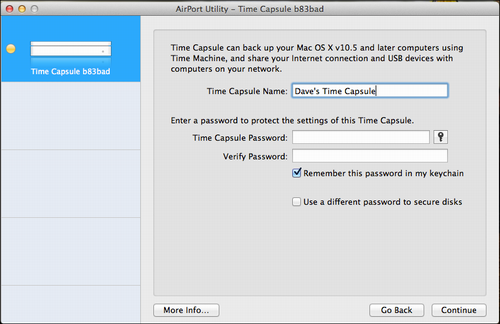
Rename it to something interesting. Note that at this point you’re naming the backup hardware, not the wifi network. You’ll end up with two names and two passwords. Enter a device name and a password. Write it down: you’ll need it when you hook up your computer to the device later for backups.
Click “Continue”.
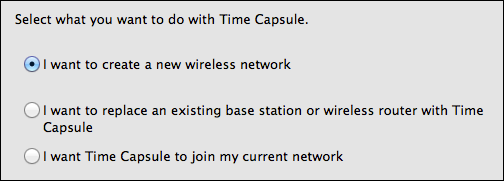
Now let’s set up the wireless networking wifi part of it. You probably want to create a new wireless network, so choose that and “Continue” again…
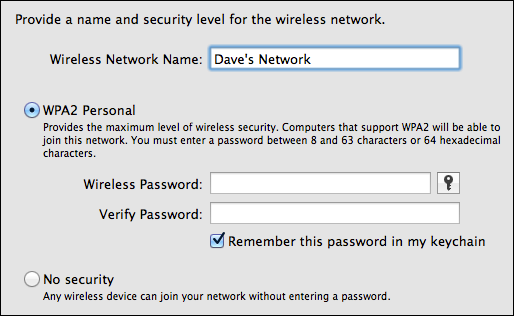
Now let’s add a network name (mine is boring, sorry) and I strongly, strongly recommend you create a password for the network. Again, write it down and remember you’ll need to enter it on your tablets, smart phones, other computers, etc.
Ready? “Continue” and you’ll be able to also set it up as your Time Machine backup device, which is exactly what you want to do:
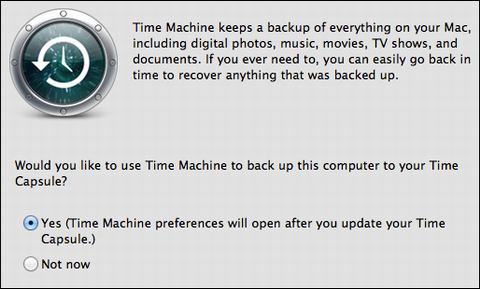
Step through the configuration there – it’s super easy – and spend the extra few minutes to decide if there are any directories you’d like to omit from the backup (I don’t backup “Applications” and “Downloads”, for example) then quit the Time Machine config and go back to the Airport Utility. It’ll look like this:
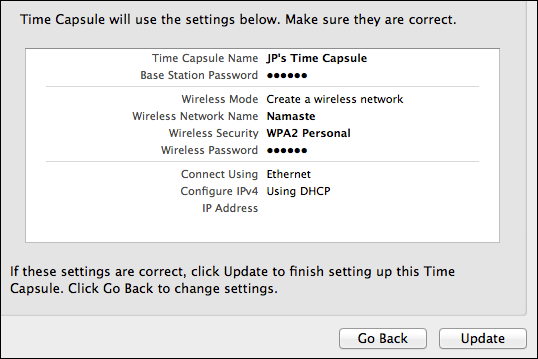
Ah, if you look closely, you’ll see that I changed the name of both the Time Capsule and the wifi network to be a bit more interesting. I couldn’t just do boring stuff. Life’s too short. 🙂
Looks good? Click on “Update”.
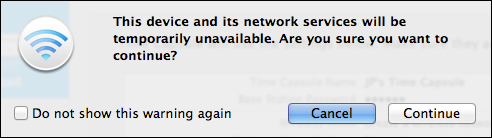
No, really, you do. Click “Continue” and it’ll go away again for a minute or two while the device restarts, then you’re up and running.
Or are you? Turns out there’s one more thing you need to do: delete your brother’s old backups on the drive. That’s easy: in the Finder go to the drive (I’d see “JP’s Time Capsule”) and delete any files that might be present. They’ll have names like “Mike’s iMac” and “Mike’s iMac.sparsebundle”. Delete everything then empty your trash.
There. Now you’ve completely reset the Time Capsule and should be good to go.
One tip: The first backup is a big one, everything on your system. I strongly encourage you to connect it via Ethernet not wifi, then let it run overnight. Starting the next day, you’re good to go and it’ll do its incremental backups exactly as you desire.
This is very long process indeed. I will try this later.
Yes, first backup should always be done using the ethernet.
Thanks.