
Every so often I remember to check my Recycle Bin on my PC and realize I have hundreds of megabytes of junk just sitting there. It wastes disk space! Is there a way I can automatically delete files in the Trash after 30 days¡ in Windows 10?
It’s a sure bet that if the Recycle Bin (Trash) on your PC operated like the actual trash can in your kitchen, this wouldn’t be an issue. Imagine if it had a fixed capacity of, say, 20 files or 2GB and then after that whatever you tried to put into the bin actually spilled over onto your Desktop in a messy, chaotic pile of icons! It would be a great way to ensure that people frequently deleted their trash, that’s for sure. Or would you just ask your teenage child to “take out the trash” and then complain when they ignored you and prioritized something else, like another game of Rocket League or Fortnite? 🙂
Fortunately – or perhaps unfortunately – that recycle bin is infinitely large and you can have a single 205 byte file or thousands of files consuming hundreds of gigabytes tucked neatly into the folder. Problem is, it’s not really a trash can at all because until you empty it, the files, photos, videos and documents you drag and drop are still on the hard drive and still taking up space. You’re really just moving things around, not freeing up space at all.
One of the great innovations of modern Windows 10 comes into play here, because it’s clear that Microsoft employees had the same problem: moving files into the recycle bin, but never actually emptying the darn bin and freeing up that space. Their solution: Storage Sense. It’s a smart utility that can not only automatically delete old trash files, but also keeps an eye on other folders, notably the download folder. Let’s have a look!
ENABLE STORAGE SENSE ON YOUR PC
To start, as always, utilize the Win10 search system! I’ll search for “trash” directly from the Toolbar:

First match is perfect, the system setting Delete temporary files. While most program installers do a great job of cleaning up after themselves, some do have a bad habit of leaving detritus after their install is complete, files that can just sit, taking up space until the end of time. ¡No bueno!
Click on “Delete temporary files” to open up the corresponding system setting…

I’m a big fan of Storage Sense (in case that’s not obvious) so recommend you enable it. If you want minimal impact, you can set it to only run “During low free disk space” but there are other settings too.
More importantly, notice the settings for Temporary Files. Specifically, that first entry allows you to specify that files in your recycle bin that have been there for more than a specified amount of time – I have 30 days set – should be deleted. Ah, an automatically emptying trashcan. What will they think of next?
But notice just below that too: Delete files in my Downloads folder if they haven’t been opened for more than… and I have it set to Never. Oops. That’s worth fixing:

While we’re here, why not run Storage Sense to see if there’s anything ready to be axed from the drive? A click on “Clean now” and it whirs along for a little bit…

Can you see the line at the bottom? “Done! We were able to free up 532 MB of disk space.” That’s half a gigabyte just freed up with the click of a button. Better yet, the settings are now going to help keep my drive just a bit more open too.
PROPERTIES OF THE RECYCLE BIN
Storage Sense offers a great way to manage your recycle bin or trash on your PC, but let’s not ignore the recycle bin icon itself on your Desktop. Right click on it…

You can see that there are a few useful options, notably “Empty Recycle Bin”. That’s the digital equivalent of asking the kids to take out the trash, I suppose. 🙂
You can also rename your recycle bin if you just prefer “Trash” or “Circular File” or whatever, and if you want to fiddle with icons, you can change the image associated with your recycle bin too. But that doesn’t help make space on your drive, does it?
Okay, so click on “Properties” to see yet another place you can tweak your Recycle Bin settings.
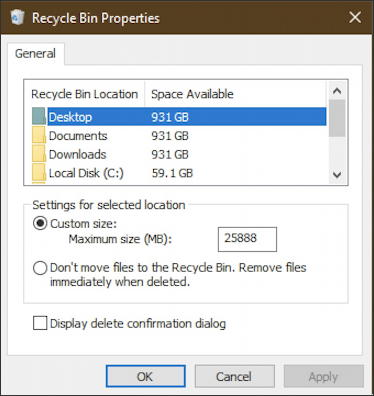
From the oh-so-modern Windows interface of Storage Sense, this is the old school Windows 95 sort of interface to an object. There’s not much here, but the few options are worth noticing:
Custom Size – lets you specify a max size for your recycle bin. You’ll notice I have mine set to 25888MB (which is 2.5GB). You can set a max size too if you want to ensure it’s never too full.
Remove Files Immediately – well, it says “Don’t move files to the Recycle Bin. Remove files immediately when deleted”, but it’s the same thing. This can be risky if you ever drop something in the Recycle Bin then change your mind and pull it out again. I do not recommend this setting unless you’re really confident in your file management skills.
Display Delete Confirmation Dialog – fed up with the “are you sure you want to delete these files?” confirmation? Here’s how you can disable it. Finally.
Between these settings and the Storage Sense features, you should be able to get a solid handle on your recycle bin. Hmm… that sounds a bit odd, actually. Let’s just say you can gain control of your PC trash!
Pro Tip: I’ve been writing about Windows since the early days of the operating system. While you’re visiting, please do check out my extensive Windows 10 help area for hundreds of other useful tutorials and how-to articles. Thanks!
Thanks for the reply. Sorry for an unclear question – I was curious as to how the 25888 figure came to be. Perhaps it’s just set by Windows. I now see mine is 25821 MB.
Curious as to how you arrived at 25888 MB for the max size of your recycle bin. And isn’t that 25 GB – not 2.5 GB?
The max size of my recycle bin is specified in the properties window shown above. I did, however, misplace my comma! 25888MB = 25.8GB. Well, technically it actually is 25.2GB.