
I’ve been taking Windows screen captures with the Clipping tool for ever and it’s amazing to me that nothing’s improved in all these years. Am I missing something? Is there a better way to capture what’s on my screen in Windows 10?
It’s perhaps one of the most unsung features in any operating system, but it turns out that people really like to capture what’s on their screen, whether it’s their phone, their TV or their computer. TVs are still the missing link, but if you’ve ever used a Mac with its smart Cmd-Shift-3 screen capture system, you’ll definitely be left wanting more on the Microsoft Windows side of things. Except Microsoft snuck a new feature into Win10 a year or two ago that few people realize exists: Windows-Shift-S.
The key sequence invokes the Snip & Sketch program – which you probably didn’t realize you had in Win10 now too! – and lets you very quickly capture a rectangular area of your screen, the entire screen or, in a choice that I find a bit inexplicable, an arbitrary shape surrounding your object. The resultant region is copied into the clipboard and you can even click to launch Snip & Sketch with the image already displayed!
Let’s give it a test whirl! First off, if you haven’t already long ago, find the Windows key on your keyboard:
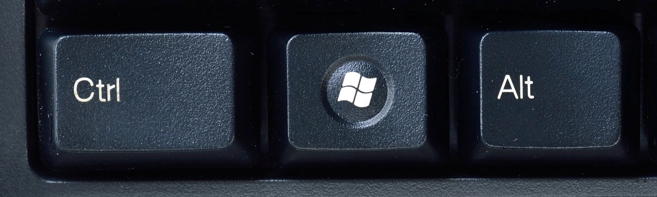
It’ll look slightly different – and possibly be in a different location – on different PC computers, but hopefully you have one just like this. If you’re running Windows through a VM on a Mac, typically the Command key serves the same purpose.
Now press Windows + Shift + S and a small box will pop up at the very top of your screen:

The leftmost option is to specify a rectangle, followed by the arbitrary shape capture, full screen and the “X” to cancel the capture if you change your mind. Let’s do the shape capture because it is so unusual. Easy enough, click or tap to choose it, then click (or tap) and drag to define the region. It’ll look like this as you proceed:

As soon as you release the cursor, that region will be captured and copied onto the clipboard. It also shows up as a tiny notification window on the lower right of your screen for a few moments:

If you click on that notification window, it’ll open up in the Snip & Sketch program. Easy enough!

The program has a weird user interface (why is Save on the right side, not the left portion of the toolbar) but once you familiarize yourself with the UI it’s pretty easy to work with. Two menus of significance: “New” and “•••”. Here’s the first menu:

Delayed screen captures can be really helpful if you need to click to reveal a menu or otherwise do something pre-capture. This is how ya do it with Snip & Sketch.
The “more” menu at “•••” has the Settings option, pretty important so you know how the program’s working:

Choose “Settings” and here are the few options you can tweak:
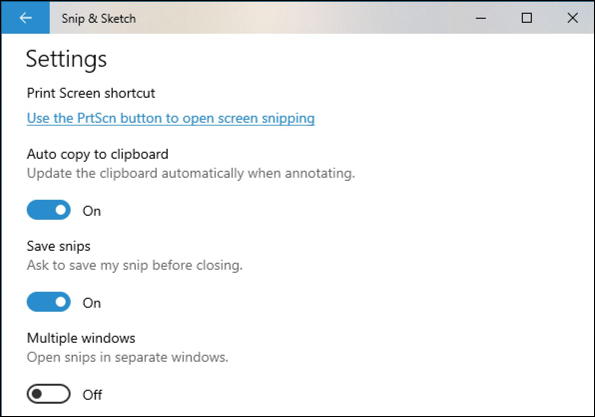
What’s really surprising is that there’s no way to automatically save your screen captures to a file in Snip & Sketch. Such a basic feature and so darn useful when working with screen captures, but as of today, that must still be on the to-do list for the Snip & Sketch development team. “Save snips” refers to within the program, it doesn’t apply to captures you do without opening up in a window. Weird choice, but I certainly am hoping that’ll just become an option very, very soon. Are you listening, Microsoft? 🙂
But that’s it. There are lots of excellent third party apps that give you more power and control over screen captures, including annotation abilities, but Snip & Sketch is still the cool kids way to do screen captures within Windows itself.
Pro Tip: I’ve been writing about Windows 10 since the very beginning. Please check out my extensive Windows Help Library for lots more useful tutorials and how-to guides!
So glad I’m following you on Facebook. Your knowledge is so appreciated.