
My Dad gave me a pair of hand-me-down Apple AirPods, and I’d like to use them with my PC. But I run Windows, not MacOS. Can I still pair and use the AirPods in Win11?
Perhaps surprisingly, Bluetooth is Bluetooth is Bluetooth, so while there are some cool extra features that Apple gear offers when you use it on an Apple system, they work just fine as generic Bluetooth devices too. You can also pair AirPods Pro or even the AirPods Max headphones with your PC, if that’s your preference! In the same way, you could use Microsoft Surface Headphones with an Apple iPad if you were so inclined.
You will need a relatively modern version of Windows since all Apple devices use what’s known as Bluetooth Low Energy or BLE. If you’re running Bluetooth 3.0 or earlier, you might well see a “not supported” error instead of being able to pair. But that’s pretty ancient stuff – the latest Bluetooth version is 5.2 – so if you’re running Windows 10 or Windows 11 you should be just fine. Of course, if your device doesn’t have Bluetooth at all, well, then you’ll need a dongle. One option: TP-Link USB Bluetooth 5.0 Dongle Adapter. Under $15 on Amazon. Painless enough.
HOW TO PAIR A NEW BLUETOOTH DEVICE IN WINDOWS 11
Odds are pretty good that you actually have the Bluetooth shortcut icon on your Taskbar or on the tiny overflow window:
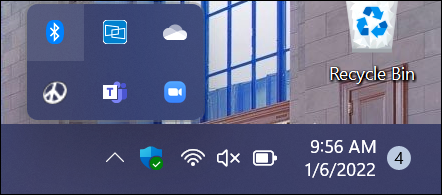
Can you see it on the top left of the overflow window? That graphic is actually a combination of the Nordic runes for H and B, named after Denmark’s King Harald Bluetooth. Now ya know.
Tip: If you don’t have the Bluetooth icon on the Taskbar, search for “Bluetooth” in Settings to enable it. If you can’t find it at all, your PC might not support Bluetooth without a dongle (as mentioned above).
Right-click on that tiny icon and you’ll get a context menu of Bluetooth choices:

As highlighted, choose “Add a Bluetooth Device“.
Now you’ll go to Settings > Bluetooth:
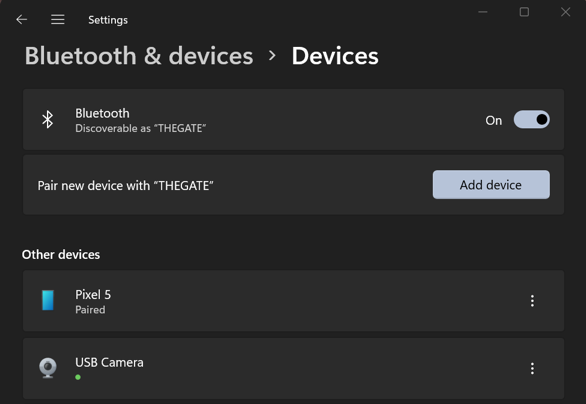
You can see that with this particular Gateway PC – “THEGATE” – I’ve already paired a couple of devices, the Pixel 5 and USB Camera. To add a new device it’s easy: click on the “Add device” button.
The next step is to identify what kind of device you want to pair:
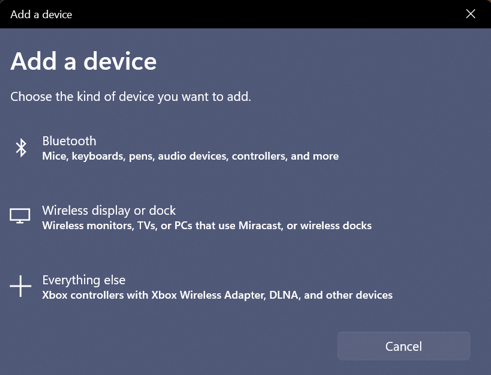
In this instance, the Apple AirPods are a Bluetooth audio device, so choose the first option.
Now the computer will scan and look for devices that are in pairing mode…

I’m using AirPods Pro units, called “DT AirPods Pro – Find My”, and they’ve shown up along with two other devices. Don’t see your Apple AirPods showing up? There’s a tiny button on the back of the charging case: Put the earbuds in the case, open the top, then press and hold that button for about ten seconds until the status light slow blinks white. Then it should show up on the list.
I’ll choose “DT AirPods Pro” with a click and…

It should only sit at this prompt for a few seconds, then indicate “Connected” and you’ll get the very cheery feedback “Your device is ready to go!”

That’s it. Click on “Done“.
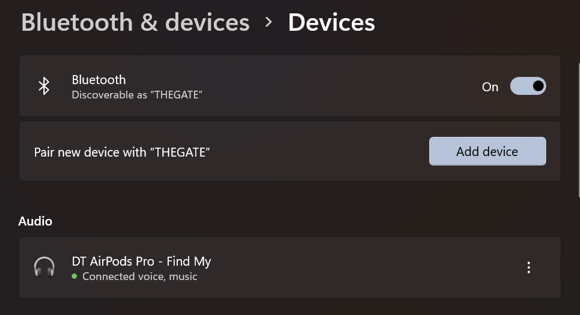
APPLE AIRPODS PAIRED TO WINDOWS PC
Notice that it’s not only paired, but shows that it’s connected for voice (phone calls, Zoom, any mic input) and music (output, Windows media player, audio from your Web browser, etc):

That’s about it. Not much you can do with the AirPods at this point, you can’t even see battery status level with the default Windows software suite. You just see ’em:
There are some third-party utilities you can investigate if you want more functionality, notably MagicPods. It’s a few dollars, but offers all the AirPods features without having to use an Apple device. Check it out at MagicPods.app or in the Microsoft Store. Better yet, there’s a free preview option so you can try it before you pay the registration fee (currently $1.99).
That’s it. You should be able to enjoy those Apple AirPods from your Dad with your PC with no further effort on your part!
Pro Tip: I’ve been writing about Windows for many years and now have an extensive Windows 10 & Windows 11 help area. Please check it out to find lots of additional tutorials and guides while you’re here. Thanks!