
Now that I’m running iOS 12 on my Apple iPhone X, I can see all the many apps that are posting notifications on the lock screen. And some of them are just dumb and I don’t want them. What’s the fast way to mute specific apps without having to fiddle with Settings?
iOS12 has completely revamped how notifications show up on your phone, particularly on the lock screen. In fact, it’s a whole new world because they’re automatically “grouped” and it’s only the most recent notification from an app that is shown. Below it is a subtle visual indication of how many other messages are from that app. You’re right that one consequence of this is that you can now see all the programs that are pushing out notifications whereas before they might have been lost in the stream of incoming email or Facebook notifications you have (depending on your setup).
Seems like the engineers at Apple might well have recognized the problem through their own testing because in addition to the stacking behavior, there’s now a mute feature you can get to directly on the lock screen – without even unlocking the phone to do so! This, of course, makes me wonder if people will start muting their friend’s notifications screens, but that’s another story! 🙂
So let’s have a look and I’ll step you through how to mute those annoying apps so you don’t have to worry about their notifications bugging you while your phone’s locked.
To start, here are some notifications on my iPhone X from various apps:

If you look closely at the Nest notification near the bottom, you can see the subtle visual cue that there are more than just that one notification stacked up from that app. Also notice that the Smartthings notifications did not stack when they should have. I imagine that’ll be something fixed in a quiet update, probably some code in the Samsung Smartthings app that needs updating. Ah well…
Let’s get rid of the ZUS notification at the very top. After prompting me thousands of times to set a parking meter alert and me never doing so you’d think the app would know not to prompt me for a parking meter timer! Simply force press the notification and it will change to give you controls:
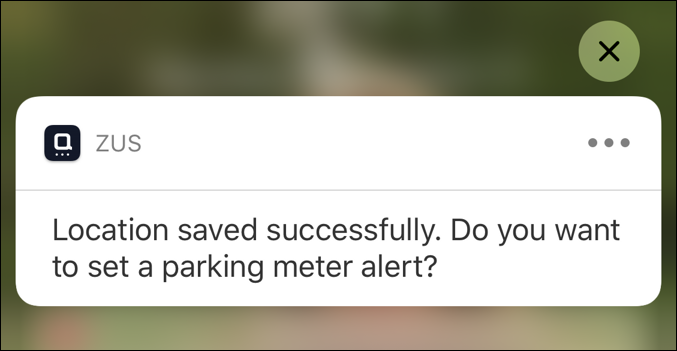
You can press the “X” on the top right to remove just this one notification (if it’s embarrassing or awkward, I suppose) but that won’t change the notification settings. Instead, tap on the “•••” instead. Now you get some cool controls:

As you can see, this is a great pop-up with lots of controls. Deliver Quietly is even defined on the window: “Quiet notifications appear in Notification Center, but do not appear on the lock screen, play a sound, present a banner, or badget the app icon.” If that sounds good, tap it. Not enough? Tap on “Turn Off…” and you can drop a sort of digital nuke on the notifications:
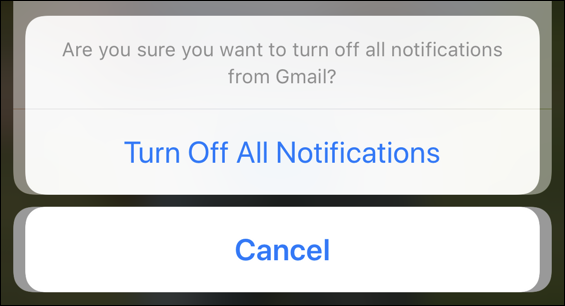
(eagle eyed readers will notice the above is from Gmail. It all looks the same!)
So you can turn off all notifications, but instead, tap on “Settings” and… you’re back to the regular iOS Notifications Settings:
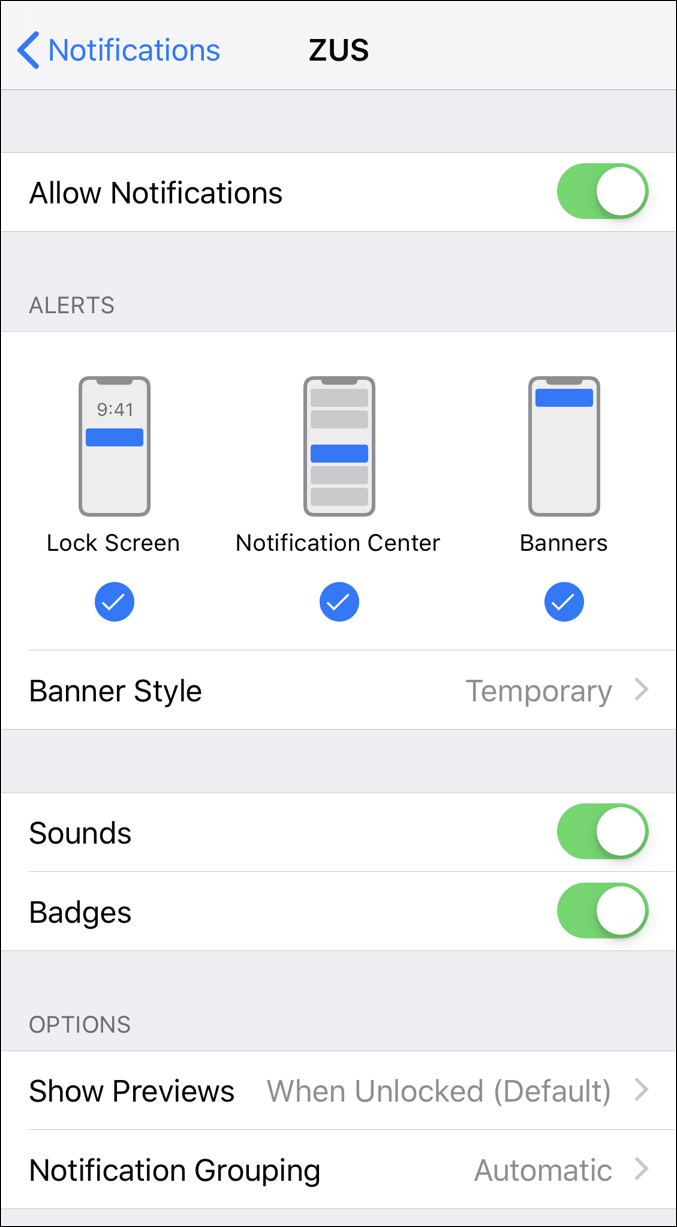
Between all of these, you now have options. Lots of options. And you can clean up notifications exactly as you desire!
Pro Tip: Learn about lots of helpful iPhone and iOS tips while you’re here. We have tons of tutorials!